Xbox Thompson DVD drive laser adjustment procedure
Xbox Thompson DVD drive laser adjustment procedure
Xbox Thompson DVD drive laser adjustment procedure

You also want an ePaper? Increase the reach of your titles
YUMPU automatically turns print PDFs into web optimized ePapers that Google loves.
<strong>Xbox</strong> <strong>Thompson</strong> <strong>DVD</strong> <strong>drive</strong> <strong>laser</strong> <strong>adjustment</strong> <strong>procedure</strong>Do not try this mod unless you are having problems reading media? Not all cd-r's areable to be recognized after this is done! So if your xbox can read cd-rw's and dvd-r'sdon't attempt this mod!!1. Take <strong>drive</strong> out of xbox (if you installed a mod, you know how to do this)2. unclip plastic bracket - the 2 plastic clips are to the rear of the <strong>drive</strong>.3. pull off metal grounding piece - just slips off4. remove 2 screws in the lid of the <strong>drive</strong> (there are only 2)5. push in plastic clips to allow the lid to come off6. take out the 2 torx screws at the back of the <strong>drive</strong> (T10)7. Ease off the bottom of the <strong>drive</strong> being careful not to damage the connectors at the back.8. Undo the screws in the <strong>drive</strong> PCB.9. Unclip the 2 ribbon cables, done by sliding part of the connector away from the cct board.(It may be easier for the <strong>laser</strong> emitter end to be done.10. Move the circuit board out of the way, it will still be connected by 2 small wires but dontworry about that, you just need the room11. The PCB that the pot is on would be facing you if you were staring at the BACK of the <strong>drive</strong>(where the IDE connecter is). The pot is a little black box with a screw covered in red resin inthe middle.12. Easier said than done. The resin does not come off that easily, so you have to be a littlerougher on it than you would think from reading the above (don't blame me if you fuck it upthough).13. If you have a Radio Shack multimeter like me, switch it to use ohms. The ohm symblelooks like a miniature pair of headphones. Touch and hold one connecter to the screw on thepot. Touch the other connecter to the top-left metal leg that hold the black box on to the PCB.You should get reading of over 1000.14. You need a tiny screw<strong>drive</strong>r. I mean tiny like the ones used for eyeglasses. You cannotturn it anticlockwise, because that is a made up word. Turn it counterclockwise. You should bealright.15. re-assemble16. test17. If the <strong>drive</strong> is still not perfect, decrease the ohm value in 25 ohm steps until it is. I wouldsuggest that you do not go much further than 850 ohms as I noticed the <strong>drive</strong> becoming noisyafter this.Now reads ALL my <strong>DVD</strong>-r flawlessly and even some CD-rNO RESPONSIBILITY IF YOU MESS UP YOUR XBOX DOING THIS!!!!
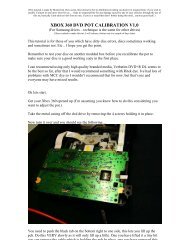
NOTE : The black thing that the arrows are pointing to, is this the pot w/ the resin scrappedoff. You want to measure where the red arrow is pointing.DO NOT LOOK INTO THE LASER BEAM FOR ANY REASON.FAILURE TO FOLLOW INSTRUCTIONS CAN BURN YOUR $50 PRESSES or YOUR EYES.Use this information only if you can follow directions, and you have a digital ohm meter.PART #2TGM600 Model onlyFind the <strong>laser</strong> module. It has the <strong>laser</strong> diode and the lense and slides forward and backwardon a two pole track.lets define:top of module=lens sidebottom of module=opposite of topfront=the side closest to the xbox emblem on the trayback=the side we are going to work on(has the white flex cable)Now the easy part( I have done all the scoping and math) you just have to set the gain.on the back of the module on the bottom right hand corner(If you are looking at it from thetop side) there is a little black square box on the pcb.see it? after you find this, peel the glue from atop it. Under the glue you will see a screw.Now with your digital meter take a reading(One lead on the screw and one lead on the topright pin). Write this down.
Now take 1975 ohms from your reading.The result is what you are going to set your gain control to if:THE RESULT IS NOT UNDER 800 OHMSDue to the purposeful design of this <strong>drive</strong>, anything below 800 will burn your discs. (YOUHAVE WARNING)To set this turn the screw counter clockwise to go down( careful, the screw is hard to turn anda little bit goes a LONG way.), and the other way to go back up.now test your CD-R that you made. If it tracks every track, (listen to #1 and #2 all the waythrough) then it is set.If not -+100 ohms should set it for every <strong>drive</strong>The post this information was in can be found at the following location:http://www.i-hacked.com/forums/viewtopic.php?p=295#295Thanks to Spaztic and Hevnsnt in the i-Hacked.com forums for all of the information.Runkster