Dip and Read⢠Residual Protein A Detection Kit - ForteBio
Dip and Read⢠Residual Protein A Detection Kit - ForteBio
Dip and Read⢠Residual Protein A Detection Kit - ForteBio

Create successful ePaper yourself
Turn your PDF publications into a flip-book with our unique Google optimized e-Paper software.
Technical Note 18<strong>Dip</strong> <strong>and</strong> Read <strong>Residual</strong> <strong>Protein</strong> A <strong>Detection</strong> <strong>Kit</strong>Background<strong>Detection</strong> of residual <strong>Protein</strong> A in product purified from a <strong>Protein</strong>A, or similar purification column is a critical quality control step inantibody therapeutic development <strong>and</strong> production. During theIgG purification process, <strong>Protein</strong> A can leach off of the purificationcolumn matrix <strong>and</strong> co-elute with the IgG. This contaminant cancause adverse reactions in patients <strong>and</strong> thus must be detected<strong>and</strong> minimized. The <strong>Dip</strong> <strong>and</strong> Read <strong>Residual</strong> <strong>Protein</strong> A <strong>Detection</strong> <strong>Kit</strong>provides the sensitivity <strong>and</strong> accuracy needed for this critical testalong with minimal h<strong>and</strong>s-on time <strong>and</strong> an easy to use protocol.INTENDED USEThis assay quantitates <strong>Protein</strong> A or biosimilars such as MabSelectSuRe, in the presence of human IgG. This kit is for research <strong>and</strong>manufacturing use only <strong>and</strong> is not intended for diagnostic use inhumans or animals.PRINCIPLEThe <strong>Dip</strong> <strong>and</strong> Read <strong>Residual</strong> <strong>Protein</strong> A <strong>Detection</strong> <strong>Kit</strong> contains biosensors<strong>and</strong> all the reagents required to quantitate <strong>Protein</strong> A or similarcolumn matrix material such as MabSelect SuRe from column fractions.Reagents are provided to dilute <strong>and</strong> treat the sample <strong>and</strong> tomake the <strong>Protein</strong> A accessible for binding by the <strong>Residual</strong> <strong>Protein</strong> Abiosensors. After capturing <strong>Protein</strong> A on the biosensors, a detectionreagent is used to specifically quantify the bound <strong>Protein</strong> A.KIT CONTENTS• 1 tray of 96 <strong>Residual</strong> <strong>Protein</strong> A biosensors*• 1 bottle of Sample Denaturing Buffer ( caution: acidic) †• 1 bottle of Neutralization Buffer ( caution: corrosive) †• 1 bottle of Sample Diluent†• 1 bottle of Sample Diluent+PEG†• <strong>Protein</strong> A <strong>Detection</strong> Reagent†• Recombinant <strong>Protein</strong> A Calibrator†* Store biosensors in the provided re-sealable bag in a dry place at room temperatureaway from direct sunlight. Dispose of biosensors as sharps. Upon receipt, biosensorsare stable for 6 months.† Ensure all reagents are equilibrated to room temperature prior to running the assay.Additional Materials Required but Not Provided• <strong>ForteBio</strong> Octet system with software version 6.1 or later• <strong>ForteBio</strong> Sidekick shaker (for best results <strong>and</strong> shortest incubationtimes) or other lab shaker• 96-well microplates (Greiner Bio-One, part no. 655209)• Heat block for microfuge tubes or 96-well microplate, set to100 °C• Centrifuge (for tubes or swinging bucket type for microplates)• Optional 384-well microplates for Octet RED384 <strong>and</strong> OctetQK384 (Greiner Bio-One, part no. 781209)Techniques For Optimal Performance• Read these instructions carefully to underst<strong>and</strong> all the necessarysteps to achieve optimal performance <strong>and</strong> precisionfrom this assay.• At the end of the technical note, there is a consolidated protocolthat outlines a common workflow that can be easilyprinted <strong>and</strong> used at the laboratory bench.• Make certain to fully equilibrate all reagents <strong>and</strong> samples toroom temperature prior to preparation. If using frozen samples,thaw <strong>and</strong> mix thoroughly prior to use.• Wear proper personal protective equipment when h<strong>and</strong>lingacidic <strong>and</strong> corrosive reagents.• For best results, include a st<strong>and</strong>ard curve in each assay. Recommendedcalibrator concentrations: 25, 10, 5, 2.5, 1, 0.5, 0.25,<strong>and</strong> 0.1 ng/mL Recombinant <strong>Protein</strong> A Calibrator, diluted inSample Diluent. It is also recommended to run buffer-onlycontrols as references.• Recombinant <strong>Protein</strong> A is provided as a calibrator in the kit. IfMabSelect SuRe was used as the column resin, two optionsare available for accurate quantitation of the residual MabSelectSuRe material.• MabSelect SuRe can be used directly as the calibrator (GE,cat no. 28-4018-60).• Alternatively, the Recombinant <strong>Protein</strong> A calibrator canbe used after establishing a correction factor by runningthe supplied Recombinant <strong>Protein</strong> A calibrator side-bysidewith the MabSelect SuRe material. The binding ratescalculated for the Recombinant <strong>Protein</strong> A calibrators willbe linearly related to the binding rates determined for the1
Technical Note 18cCarefully lower the tray of biosensors onto the sample microplate,lowering the biosensor tips into the sample wells.d Incubate the samples on the Sidekick shaker for 1 hour at30 °C at 1000rpm.If using a st<strong>and</strong>ard microplate shaker or incubating overnightwithout shaking:aSeparate the upper biosensor tray from the blue tray bottom.b Place the black microplate with the samples in the blue traybottom, making certain the A1 corner is in the notch.cCarefully lower the tray of biosensors into the tray bottom,lowering the biosensor tips into the sample wells.d Incubate on a microplate shaker for 2–3 hours with moderateshaking or on the benchtop overnight without shaking.Time <strong>and</strong> shaking speed may need to be optimized for bestresults.3 During incubation, prepare enough working-strength <strong>Protein</strong>A <strong>Detection</strong> Reagent for 1 column by diluting 20-fold withSample Diluent+PEG. For example, for 8 wells (1 column) ina 96-well microplate, dilute 90 µL <strong>Detection</strong> Reagent into1710 µL of Sample Diluent+PEG.4 Prepare two microplates:For assays on Octet QK/RED instruments:aPrepare one black, flat-bottom 96-well microplate with200 µL Sample Diluent+PEG in each well that correspondsto the location of a biosensor in the incubating microplate.b Prepare a second black, flat-bottom 96-well microplatewith 200 µL Sample Diluent+PEG in one column (wells Athrough H). Pipet 200 µL of the diluted <strong>Protein</strong> A <strong>Detection</strong>Reagent into a second column (wells A through H) of thesame microplate.For assays on Octet QK384/RED384 instruments :aPrepare one black, flat-bottom 96-well microplate with200 µL Sample Diluent+PEG in each well that correspondsto the location of a biosensor in the incubating microplate.b For the second microplate can be either a 96-well or a 384-well black, flat-bottomed microplate:For a 96-well microplate:• Pipet 200 µL of Sample Diluent+PEG into two adjacentcolumns (wells A through H) of the microplate.• Pipet 200 µL of the diluted <strong>Protein</strong> A <strong>Detection</strong> Reagentinto two more adjacent columns (wells A through H) ofthe same microplate.For a 384-well microplate:• Pipet 80 µL Sample Diluent+PEG into every other well oftwo columns that have a single column separating them(e.g. wells A, C, E, G, I, K, M, O of columns 1 <strong>and</strong> 3). Pipet200 µL diluted <strong>Protein</strong> A <strong>Detection</strong> Reagent into alternatewells of two additional columns separated by a singlecolumn (e.g. wells A, C, E, G, I, K, M, O of columns 5 <strong>and</strong> 7).5 When incubation is complete:If using a Sidekick shaker:aRemove the biosensor tray <strong>and</strong> place the microplatecontaining only Sample Diluent+PEG buffer on the shaker.Lower the biosensor tray onto the microplate on the shaker<strong>and</strong> shake for 5 minutes.If using a st<strong>and</strong>ard plate shaker or incubating overnightwithout shaking:aRemove the biosensor tray assembly from the shaker,if using. Place the microplate containing only SampleDiluent+PEG buffer in the blue biosensor tray bottom <strong>and</strong>lower the tray of incubated biosensors into it. Place thetray assembly on the biosensor stage in the Octet instrument.Allow the biosensors to incubate without shakingfor 10 minutes.6 Place the biosensors, still in the tray of Sample Diluent+PEGsolution, <strong>and</strong> the detection reagent plate in the Octetinstrument.C: Read the Results in the OctetSet up Assay File <strong>and</strong> Biosensor TypeThe assay file <strong>and</strong> biosensor type must be set up using Octet DataAcquisition software version 6.1 or later. The setup procedure onlyneeds to be performed the first time an assay is run on an instrument.1 Set up the assay type:aIn the Data Acquisition software (version 6.1 or later), selectEdit Assay Parameters from the Experiment menu.b Under Advanced Quantitation highlight the St<strong>and</strong>ard assay<strong>and</strong> click Duplicate.cName the new assay <strong>Residual</strong> <strong>Protein</strong> A <strong>Detection</strong>. Enter anassay description if desired. Click OK.d Check the Offline box next to Sample.efCheck the Buffer box to enable this step <strong>and</strong> set the parameterto 30 seconds at 1000 rpm.Change the parameters in the <strong>Detection</strong> step to 300 secondsat 1000 rpm.g Click SAVE to save the changes. This assay type is now availableto all users of the instrument.2 Add the <strong>Residual</strong> <strong>Protein</strong> A <strong>Detection</strong> biosensor to the list ofbiosensor types:aChoose Edit Sensor Types from the Experiment menu.3
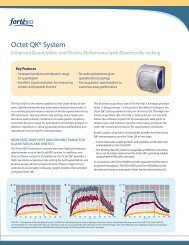
<strong>Dip</strong> <strong>and</strong> Read <strong>Residual</strong> <strong>Protein</strong> A <strong>Detection</strong> <strong>Kit</strong>b Under Quantitation Sensors click Add…cEnter <strong>Residual</strong> <strong>Protein</strong> A as the new biosensor name <strong>and</strong>click OK.d Click Close. This sensor type is now available to all users ofthe instrument.St<strong>and</strong>ard Assay Protocol1 At least 40 minutes before running the assay, turn on theOctet instrument <strong>and</strong> associated computer. It is critical thatthe lamp warms up for at least 40 minutes prior to the firstmeasurement.2 Start the Data Acquisition software (version 6.1 or later).3 From the Experiment Wizard (ctrl+N) choose the AdvancedQuantitation option.4 In tab 1:aClick the Modify button <strong>and</strong> choose the <strong>Residual</strong> <strong>Protein</strong> A<strong>Detection</strong> method from the list on the left. The settings inthis list are default settings. To modify the settings use theup or down arrows.b Select the Sample Plate radio button <strong>and</strong> right-click on theSample plate map to open the contextual menu to definethe location of the samples, controls, references, <strong>and</strong> calibratorsin the sample plate (i.e., the microplate used duringthe offline biosensor incubation step).cEnter Sample IDs, concentrations <strong>and</strong> dilution factors asdesired in the Sample Plate table.d Select the Reagent Plate radio button <strong>and</strong> right-click onthe Reagent plate map to open the contextual menu todefine the location of the buffer (Sample Diluent+PEG)<strong>and</strong> the detection reagent (diluted <strong>Detection</strong> Reagent).5 In tab 2:aDefine the locations of the biosensors. Default locationsare shown automatically. Locations can be changed byhighlighting the biosensors <strong>and</strong> using the Remove, Fill orFill Plate buttons.7 Start the assay by clicking the Go button. The default settingswill ensure the data, method <strong>and</strong> runtime charts are savedautomatically.D: Data Analysis <strong>and</strong> Report Generation1 Start the Data Analysis software (version 6.1 or later).2 In tab 1:aLoad data by locating the data folder in the lower explorertree, right click on it, <strong>and</strong> choose Load Folder.b Select data to analyze by clicking on the data folder in theQuantitation section of the Loaded Data tree. Multiple datasets can be selected for analysis. All selected data sets willbe analyzed as a group.cOnce the data is loaded, sample ID, group, concentration<strong>and</strong> dilution factors can be modified in the table ifneeded.d If needed, use the “Reference Subtraction” option to subtractreference well values from the remaining sample wells.3 In tab 2:aSelect the desired st<strong>and</strong>ard curve.b Select R equilibrium as the binding rate equation. Thisequation will fit the binding curve generated during theexperiment <strong>and</strong> calculate a response at equilibrium as theoutput signal.cClick Calculate Binding Rate. Results will be displayed automaticallyin the table.4 Click the Save Report button or select File > Save Report togenerate a Microsoft® Excel formatted report.E: Representative DataFigure 1 shows representative raw data <strong>and</strong> st<strong>and</strong>ard curve generatedusing the <strong>Dip</strong> <strong>and</strong> Read <strong>Residual</strong> <strong>Protein</strong> A <strong>Detection</strong> <strong>Kit</strong>.b Choose <strong>Residual</strong> <strong>Protein</strong> A from the Sensor Type dropdownmenu.cIf desired, add biosensor information in the table on theright.6 in tab 3:aEnter the location <strong>and</strong> folder name into which the datashould be saved.b Enter a delay if needed to complete the 5-minute minimumsample equilibration time.4
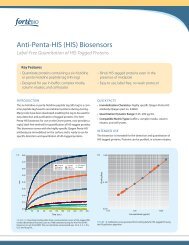
Technical Note 18Binding, nm2.62.42.22.01.81.61.41.21.00.80.60.40.20.00 20 40 60 80 100 120 140 160 180 200 220 240 260 280 300Time (sec)Recombinant <strong>Protein</strong> ACalibrator Concentration25 ng/mL10 ng/mL5 ng/mL2.5 ng/mL1.0 ng/mL0.5 ng/mL0.25 ng/mL0.1 ng/mL0 ng/mL3.02.82.62.42.22.0Binding, nm1.81.61.41.21.00.80.60.40.20.00 1 2 3 4 5 6 7 8 9 10 11 12 13 14 15 16 17 18 19 20 21 22 23 24 25Concentration (ng/mL)Figure 1: Typical binding data <strong>and</strong> resulting st<strong>and</strong>ard curve from Recombinant <strong>Protein</strong> A calibrator levels at 25, 10, 5, 2.5, 1, 0.5, 0.25, <strong>and</strong> 0.1 ng/mL.5
<strong>Dip</strong> <strong>and</strong> Read <strong>Residual</strong> <strong>Protein</strong> A <strong>Detection</strong> <strong>Kit</strong>F Consolidated Assay ProtocolEquilibrate all reagents <strong>and</strong> samples to room temperature prior touse (at least 30 minutes). Preheat the heating block to 100 °C.Sample <strong>and</strong> Calibrator Preparation (in Tubes)1 Prepare the Recombinant <strong>Protein</strong> A st<strong>and</strong>ard curve in SampleDiluent. The recommended concentrations for the Recombinant<strong>Protein</strong> A Calibrator are 25, 10, 5, 2.5, 1, 0.5, 0.25, 0.1, <strong>and</strong>0 ng/mL.2 Dilute the samples with Sample Diluent to fall within the rangeof the st<strong>and</strong>ard curve.3 Add Sample Denaturing Buffer to the samples at a 2:1 ratio. Forexample, add 80 µL denaturing buffer to 160 µL of sample.4 Mix thoroughly by vortexing.5 Incubate at room temperature for 5 minutes.6 Place the tubes in the heating block for 1minute.7 Remove the tubes from the heating block <strong>and</strong> vortex briefly.8 Centrifuge the tubes for 5 minutes at 14,000g.9 Transfer 180 µL of supernatant from each tube into a well of a96-well black microplate.10 Add 18 µL of Neutralization Buffer to each well containingsample <strong>and</strong> mix thoroughly.If desired, the assay can be paused at this point <strong>and</strong> stored overnight.1 Seal the microplate.2 Store at 2–8 °C. Do not store for more than 24 hours.Assay ProcedureIf samples were stored at 2–8 °C, equilibrate all reagents <strong>and</strong>samples to room temperature prior to use (at least 30 minutes).1 Incubate the <strong>Residual</strong> <strong>Protein</strong> A biosensors with the samples.If using a Sidekick shaker:aPlace the 96-well sample microplate on the shaker.b Remove the <strong>Residual</strong> <strong>Protein</strong> A biosensors from theirpouch <strong>and</strong> then remove the tray of biosensors from theblue bottom tray.cCarefully lower the tray of biosensors into the sample wells.d Incubate for 1 hour at 30 °C at 1000rpm.If using a st<strong>and</strong>ard microplate shaker or incubating overnightwithout shaking:b Remove the <strong>Residual</strong> <strong>Protein</strong> A biosensors from their pouch<strong>and</strong> then remove the tray of biosensors from the blue bottomtray.b Place the 96-well sample microplate on the blue biosensortray, aligning well A1 on both trays.cIncubate for 2–3 hours with moderate shaking (someoptimization may be necessary) or without shaking on thebenchtop overnight.2 Prepare a 96-well black microplate containing SampleDiluent+PEG buffer according to the sample plate layout.3 When incubation is complete:If using a Sidekick shaker:aRemove the biosensor tray <strong>and</strong> place the microplatecontaining only Sample Diluent+PEG buffer on the shaker.Lower the biosensor tray onto the microplate on the shaker<strong>and</strong> shake for 5 minutes.If using a st<strong>and</strong>ard plate shaker or incubating overnightwithout shaking:aRemove the biosensor tray assembly from the shaker,if using. Place the microplate containing only SampleDiluent+PEG buffer in the blue biosensor tray bottom <strong>and</strong>lower the tray of incubated biosensors into it. Place thetray assembly on the biosensor stage in the Octet instrument.Allow the biosensors to incubate without shakingfor 10 minutes.4 Prepare a 96-well black microplate with one column of SampleDiluent+PEG <strong>and</strong> one column <strong>Protein</strong> A <strong>Detection</strong> Reagent.For example: column 11 can contain the Diluent + PEG <strong>and</strong>column 12 can contain the detection reagent. Place the microplateon the sample stage in the Octet instrument.5 From the Experiment Wizard (ctrl+N) choose the AdvancedQuantitation option.6 In tab 1 of the Octet Data Acquisition software:aClick the Modify button <strong>and</strong> choose the <strong>Residual</strong> <strong>Protein</strong> A<strong>Detection</strong> method from the list on the left (must be createdbefore the assay can be run on an instrument, see instructionsabove). The settings in this list are default settings. Tomodify the settings use the up or down arrows.b Choose the Sample Plate radio button <strong>and</strong> right-click onthe Sample Plate map to open the contextual menu todefine the location of the samples, controls, <strong>and</strong> calibratorsin the sample plate (i.e., the microplate used during theoffline biosensor incubation step).cEnter Sample IDs, concentrations <strong>and</strong> dilution factors asdesired into the Sample Plate table.d Choose the Reagent Plate radio button <strong>and</strong> right-click onthe Reagent Plate map to open the contextual menu todefine the locations of the buffer (Sample Diluent+PEG)<strong>and</strong> the detection reagent (diluted <strong>Detection</strong> Reagent).6
Technical Note 187 In tab 2:aDefine the locations of the biosensors. Locations can bechanged by highlighting the biosensors <strong>and</strong> using theRemove, Fill or Fill Plate buttons.b Choose <strong>Residual</strong> <strong>Protein</strong> A from the Sensor Type dropdownmenu (must be created before the assay can be runon an instrument, see instructions above).cAdd biosensor information in the table on the right (ifdesired).8 In tab 3:aEnter the location <strong>and</strong> folder name in which the datashould be saved.b Enter a delay if needed to complete the 5-minute minimumsample equilibration time.9 Start the assay by clicking the Go button. The default settingswill ensure the data, method <strong>and</strong> runtime charts are savedautomatically.DATA ANALYSIS1 Start the Data Analysis software (version 6.1 or later).2 In tab 1:aLoad data by locating the data folder in the lower explorertree, right click on it, <strong>and</strong> choose Load Folder.b Select data to analyze by clicking on the data folder in theQuantitation section of the Loaded Data tree. Multiple datasets can be selected for analysis. All selected data sets willbe analyzed as a group.cOnce the data is loaded, sample ID, group, concentration<strong>and</strong> dilution factors can be modified in the table if needed.3 In tab 2:aSelect the desired st<strong>and</strong>ard curve.b Select R equilibrium as the binding rate equation. Thisequation will fit the binding curve generated during theexperiment <strong>and</strong> calculate a response at equilibrium as theoutput signal.cClick Calculate Binding Rate. Results will be displayed automaticallyin the table.4 Click the Save Report button or select File > Save Report togenerate a Microsoft® Excel formatted report.7
<strong>Dip</strong> <strong>and</strong> Read <strong>Residual</strong> <strong>Protein</strong> A <strong>Detection</strong> <strong>Kit</strong>8<strong>ForteBio</strong>, Inc.1360 Willow Road, Suite 201Menlo Park, CA 94025t: 888.OCTET-QKor 650.322.1360<strong>ForteBio</strong>, UK, Ltd.83 Victoria Street, Suite 407London, SW1H 0HW, UKt: +44-(0)20-31784425www.fortebio.com<strong>ForteBio</strong> (Aria Biotechnology Co. Ltd.)917 Halley Road, Bldg 4Zhangjiang High Tech ParkShanghai, China 201203t: +86-21-51320387© 2009 <strong>ForteBio</strong>, Inc. <strong>ForteBio</strong>, Octet, <strong>Dip</strong> <strong>and</strong> Read,<strong>and</strong> the <strong>ForteBio</strong> logo are trademarks <strong>and</strong>/orregistered trademarks of <strong>ForteBio</strong>, Inc. All othertrademarks belong to their respective owners.P/N TN-3018 Rev A