Athearn RTR Kato Motor Upgrade Revised 4-May ... - Ulrich Models
Athearn RTR Kato Motor Upgrade Revised 4-May ... - Ulrich Models
Athearn RTR Kato Motor Upgrade Revised 4-May ... - Ulrich Models

Create successful ePaper yourself
Turn your PDF publications into a flip-book with our unique Google optimized e-Paper software.
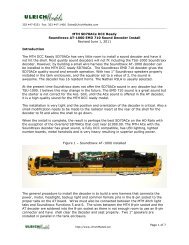
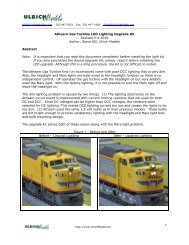
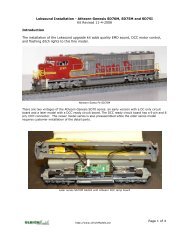
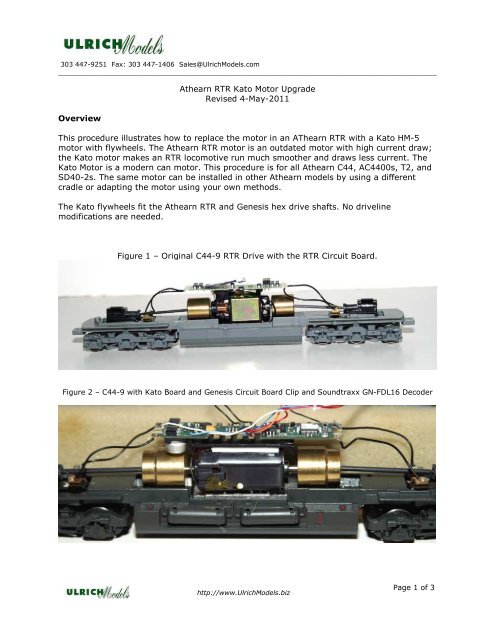
303 447-9251 Fax: 303 447-1406 Sales@<strong>Ulrich</strong><strong>Models</strong>.com____________________________________________________________________________________________Overview<strong>Athearn</strong> <strong>RTR</strong> <strong>Kato</strong> <strong>Motor</strong> <strong>Upgrade</strong><strong>Revised</strong> 4-<strong>May</strong>-2011This procedure illustrates how to replace the motor in an AThearn <strong>RTR</strong> with a <strong>Kato</strong> HM-5motor with flywheels. The <strong>Athearn</strong> <strong>RTR</strong> motor is an outdated motor with high current draw;the <strong>Kato</strong> motor makes an <strong>RTR</strong> locomotive run much smoother and draws less current. The<strong>Kato</strong> <strong>Motor</strong> is a modern can motor. This procedure is for all <strong>Athearn</strong> C44, AC4400s, T2, andSD40-2s. The same motor can be installed in other <strong>Athearn</strong> models by using a differentcradle or adapting the motor using your own methods.The <strong>Kato</strong> flywheels fit the <strong>Athearn</strong> <strong>RTR</strong> and Genesis hex drive shafts. No drivelinemodifications are needed.Figure 1 – Original C44-9 <strong>RTR</strong> Drive with the <strong>RTR</strong> Circuit Board.Figure 2 – C44-9 with <strong>Kato</strong> Board and Genesis Circuit Board Clip and Soundtraxx GN-FDL16 Decoderhttp://www.<strong>Ulrich</strong><strong>Models</strong>.bizPage 1 of 3
ProcedureThe procedure is fairly simple:Remove the ShellDisconnect all the wires to the <strong>RTR</strong> circuit board and set the shell aside.Remove the motor by pulling up on it with enough force to dislodge the rubber mountingstuds that hold the motor to the frame. Apply more force to one end than the other so onlytwo studs release at a time.Using Goop or another silicon adhesive, glue the cradle to the frame.Once the adhesive dries, stick a piece of double sided tape on the bottom of the cradle toraise the engine a small amount.Clip the copper strip leads on the <strong>Kato</strong> <strong>Motor</strong> next to the brush tabs. Then solder a blackwire to the bottom tab and a red wire to the top tab. The bottom tab is considered to be theone on the bottom when the motor label is right side up. The motor tabs will be positionedtowards the back of the frame when the motor is installed.Apply silicon adhesive to the bottom of the motor and set it into the cradle. Try not to getthe adhesive on the motor electrical tab to prevent the bottom tab from sticking to thecradle. Check the driveline clearance to be sure the drive shafts are not contactinganything.Once the motor adhesive sets, install the <strong>Athearn</strong> Genesis circuit board clip as shown. It canbe secured to the motor with double sided mounting tape or the silicon adhesive or acombination of both.With the clip in place, any <strong>Athearn</strong> compatible decoder board can be installed. Wire the redlead to the plus motor output and the black to the negative output. Connect the four trackleads to the board and it is ready to go except for the lighting wires. If the stock <strong>Athearn</strong>bulbs are used, connect the bulbs to the headlight and backup lights according to thedecoder documentation.If the lighting is to be converted to LED, we have an LED lighting resistor board that makesthe task much easier. We also have a variety of LED products.<strong>Athearn</strong> <strong>RTR</strong>s that do not have operational ditch lights If there are ditch light housings onthe model, they are dummy housings that do not support bulbs. LEDs can be installed forditch lights using our miniature LEDs with 6” leads. The dummy housing is removed andDetails West’s ditch light housings #229 (for GE), which we stock, are installed in place ofthe dummy housings.Test the locomotive before putting the shell back on. If it runs backwards, reverse themotor leadshttp://www.<strong>Ulrich</strong><strong>Models</strong>.bizPage 2 of 3
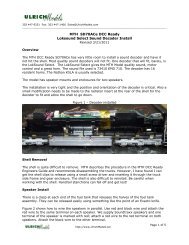
Figure 3 – Complete installation with LED Conversion and GN1000 DecoderUses Same Light kit as SD70ACe if ditch lights are added.http://www.<strong>Ulrich</strong><strong>Models</strong>.bizPage 3 of 3