The AVOXimete - Point of Care Testing - Duke University
The AVOXimete - Point of Care Testing - Duke University
The AVOXimete - Point of Care Testing - Duke University
- No tags were found...

Create successful ePaper yourself
Turn your PDF publications into a flip-book with our unique Google optimized e-Paper software.
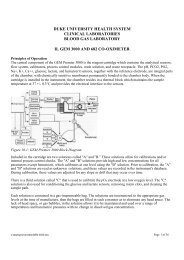
LABORATORY PROCEDUREPROCEDURENAME:EFFECTIVE DATE:REVIEW/REVISIONHISTORY:<strong>AVOXimete</strong>r 1000E07/04A. PRINCIPLE:<strong>The</strong> <strong>AVOXimete</strong>r 1000E (patent pending) quickly measures the oxyhemoglobin fraction, the totalhemoglobin concentration, and the oxygen content in a sample <strong>of</strong> whole blood in a disposable cuvette.Traditional oximeters determine the optical absorbance <strong>of</strong> blood to obtain a measure <strong>of</strong> the percentage <strong>of</strong>hemoglobin saturated with oxygen. Invasive cardiologists use such measurements chiefly for twopurposes: 1) to detect intracardiac and great-vessel shunts, and 2) to compute cardiac output by the FickPrinciple.<strong>The</strong> <strong>AVOXimete</strong>r measures both total hemoglobin concentration and oxyhemoglobin fraction. From thesemeasured quantities, it then automatically computes the oxygen concentration([O2]), which it displays inunits <strong>of</strong> ml O2/dL <strong>of</strong> blood. No sample preparation is required, and analysis is quickly accomplished byinjecting the sample into a disposable cuvette and inserting the cuvette into the instrument. <strong>The</strong><strong>AVOXimete</strong>r then illuminates the sample with multiple wavelengths, records the optical density <strong>of</strong> thesample at each <strong>of</strong> the wavelengths, and computes the results.A. SPECIMEN REQUIREMENTS:Sodium or lithium heparin is the anticoagulant <strong>of</strong> choice. Obtain sample in heparinized syringes and analyzethe sample promptly. No storage <strong>of</strong> samples is required due to analytical test time. When drawing blood samplesfrom a saline filled catheter, draw a 10cc minimum waste initially to make sure that only whole blood is sampled. Aminimum volume <strong>of</strong> 50 microliters whole blood is needed.B. EQUIPMENT AND MATERIALS:<strong>AVOXimete</strong>r 1000E whole blood oximeter with Dymo SE300 printerDisposable cuvettes (cat. # C-100B)Qualtiy control filters (yellow and orange)RNA Medical Co-Oximeter liquid controls (kept at room temp) (ref. # CC 527-1)1cc to 5cc heparinized syringesC. CALIBRATION:Because the <strong>AVOXimete</strong>r employs highly stable state-<strong>of</strong>-the-art light sources, it does not need to be recalibratedfrequently. In fact, factory tests and extensive clinical use indicate that the <strong>AVOXimete</strong>r easily maintains itscalibration for two or more years. <strong>The</strong> most frequent cause <strong>of</strong> error messages or erroneous readings is not loss <strong>of</strong>calibration but contamination <strong>of</strong> the optical detector by spilled blood or other debris. Re-calibration cannot solve theseproblems. <strong>The</strong>refore, the Quality Control Procedures are designed to determine quickly and conveniently whether the<strong>AVOXimete</strong>r’s optics have been fouled by spilled blood and to verify that it’s calibration has not changed.A. <strong>The</strong> yellow and orange optical filters supplied with the <strong>AVOXimete</strong>r give you a quick and easy way to showeach day <strong>of</strong> clinical use that the calibration has not changed, and serves as a test for spilled blood on the optics. Toperform the quick cal check:1) using a Kim Wipe, wipe <strong>of</strong>f one <strong>of</strong> the cuvette-shaped wellow or orange optical filters,2) observe that the <strong>AVOXimete</strong>r is displaying the “READY” message,File Name: h:\dhrh avoxproc.docPage 1 <strong>of</strong> 4
<strong>Duke</strong> Health Raleigh HospitalE. PROCEDURE:Entering User and Patient I.D.1. Each user will have a unique four digit I.D. number that will be entered into the instrument foreach patient use. <strong>The</strong> patient’s six digit medical record number will be used as a uniqueidentifier.2. To enter user and patient I.D.’s:A. press the Computer key,B. select choice “4. Data Management”,C. press Enter/On,D. select choice “2. Enter User and Patient I.D.”,E. press Enter/On,User I.D.1. select choice “1. Enter User I.D.”,2. press Enter/On,3. enter your 4-digit I.D.,4. press Enter/On,5. select choice “1. O.K.” if I.D. is correct, select choice “2. Enter New Value” ifincorrect, and repeat steps 1-5.6. Press Enter/On,Patient I.D.1. select choice “2. Enter Patient I.D.”,2. press Enter/On,3. type in the patient’s six digit medical record number4. press Enter/On.3. User and patient I.D. will reset to “NONE” each time the instrument is turned <strong>of</strong>f.4. Instrument Is turned OFF by pressing the Main Menu key and Cancel key at the same time.Analyzing Patient Samples1. Turn instrument on by pressing the Enter/On red key and allow instrument to initialize forapproximately one minute. Turn printer on using the toggle switch on the rear <strong>of</strong> the printer.2. <strong>The</strong> physician will obtain an appropriate sample (see Part B Sample Requirements above)3. Mix the sample thoroughly rolling the syringe between the palms <strong>of</strong> the hands. Unmixedsamples will yield incorrect results!4. NEVER INJECT BLOOD DIRECTLY INTO THE INSTRUMENT ITSELF. Always attach adisposable cuvette to the tip <strong>of</strong> the syringe.5. Attach a disposable cuvette to the tip <strong>of</strong> the syringe so that it is secure. <strong>Point</strong> the cuvettedownward at a 45 degree angle and observe the sample chamber in the cuvette. Press theplunger gently to fill the cuvette. Stop injecting the sample as soon as the blood reaches the airvent. NOTE: NEVER FORCE BLOOD INTO THE CUVETTES. If it does not fill easily, or hasbubbles, discard cuvette and fill another one.6. If any blood is on the exterior <strong>of</strong> the cuvette, use gauze to remove it.7. Keeping the syringe attached to the cuvette, insert the cuvette into the slot on the front <strong>of</strong> theinstrument for analysis.8. Do not disturb the instrument for approximately 10 seconds while the measurement is takingplace. Results will be displayed on the front panel LCD display, and will be printed on the printerautomatically.9. Withdrawal the cuvette and syringe as soon as possible after obtaining values and discard.10. Record the tHbg, %O2Hgb, and [O2] (oxygen content), on the patient data form andcommunicate the results verbally to the physician following step-up calculations. Attach allprintouts to the patient data form using a staple.11. Repeat each subsequent sample using the above procedure.F. PROCEDURE NOTES:1. Operator should take appropriate precautions when handling potentially infectious blood samples.2. Mixing the sample between the palms is prerequisite to obtaining accurate results. Improper orinsufficient mixing will yield erroneous results.Page 3 <strong>of</strong> 4
<strong>Duke</strong> Health Raleigh Hospital3. Do not leave the cuvette in the oximeter. Remove the cuvette as soon as the sample has beenanalyzed.4. When filling the cuvette, do not use excessive pressure or cause the vent patch to bulge outward.G. LIMITATIONS OF THE PROCEDURE:Lipemic samples are known to cause interference. Bubbles in the cuvette reading path will also causeerrors or erroneous results.I. REFERENCES:1. <strong>AVOXimete</strong>r 1000E Operator’s and Service Manual2. <strong>Duke</strong> <strong>University</strong> Medical Center <strong>AVOXimete</strong>r procedure adopted November 9 th , 1999, by BillyAbrams________________________________Sharon A. BrodieLaboratory Director__________________DateCROSS REFERENCE:APPLICABLE STANDARDS:DEVELOPED BY:POLICY PRIMARY:SCHEDULED REVIEW DATE:Jeff Abate M.T. (A.S.C.P.)Page 4 <strong>of</strong> 4