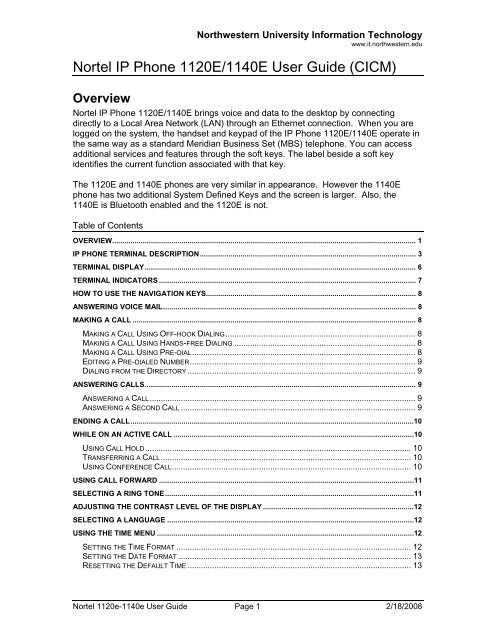
Nortel IP Phone 1120E/1140E User Guide (CICM) - Northwestern ...
Nortel IP Phone 1120E/1140E User Guide (CICM) - Northwestern ...
Nortel IP Phone 1120E/1140E User Guide (CICM) - Northwestern ...

Create successful ePaper yourself
Turn your PDF publications into a flip-book with our unique Google optimized e-Paper software.
<strong>Northwestern</strong> University Information Technologywww.it.northwestern.edu<strong>Nortel</strong> <strong>IP</strong> <strong>Phone</strong> <strong>1120E</strong>/<strong>1140E</strong> <strong>User</strong> <strong>Guide</strong> (<strong>CICM</strong>).Overview<strong>Nortel</strong> <strong>IP</strong> <strong>Phone</strong> <strong>1120E</strong>/<strong>1140E</strong> brings voice and data to the desktop by connectingdirectly to a Local Area Network (LAN) through an Ethernet connection. When you arelogged on the system, the handset and keypad of the <strong>IP</strong> <strong>Phone</strong> <strong>1120E</strong>/<strong>1140E</strong> operate inthe same way as a standard Meridian Business Set (MBS) telephone. You can accessadditional services and features through the soft keys. The label beside a soft keyidentifies the current function associated with that key.The <strong>1120E</strong> and <strong>1140E</strong> phones are very similar in appearance. However the <strong>1140E</strong>phone has two additional System Defined Keys and the screen is larger. Also, the<strong>1140E</strong> is Bluetooth enabled and the <strong>1120E</strong> is not.Table of ContentsOVERVIEW..................................................................................................................................................... 1<strong>IP</strong> PHONE TERMINAL DESCR<strong>IP</strong>TION.......................................................................................................... 3TERMINAL DISPLAY..................................................................................................................................... 6TERMINAL INDICATORS .............................................................................................................................. 7HOW TO USE THE NAVIGATION KEYS....................................................................................................... 8ANSWERING VOICE MAIL............................................................................................................................ 8MAKING A CALL ........................................................................................................................................... 8MAKING A CALL USING OFF-HOOK DIALING..................................................................................... 8MAKING A CALL USING HANDS-FREE DIALING ................................................................................. 8MAKING A CALL USING PRE-DIAL.................................................................................................... 8EDITING A PRE-DIALED NUMBER..................................................................................................... 9DIALING FROM THE DIRECTORY ...................................................................................................... 9ANSWERING CALLS..................................................................................................................................... 9ANSWERING A CALL....................................................................................................................... 9ANSWERING A SECOND CALL ......................................................................................................... 9ENDING A CALL...........................................................................................................................................10WHILE ON AN ACTIVE CALL ......................................................................................................................10USING CALL HOLD....................................................................................................................... 10TRANSFERRING A CALL................................................................................................................ 10USING CONFERENCE CALL........................................................................................................... 10USING CALL FORWARD .............................................................................................................................11SELECTING A RING TONE..........................................................................................................................11ADJUSTING THE CONTRAST LEVEL OF THE DISPLAY ..........................................................................12SELECTING A LANGUAGE .........................................................................................................................12USING THE TIME MENU ..............................................................................................................................12SETTING THE TIME FORMAT ......................................................................................................... 12SETTING THE DATE FORMAT ........................................................................................................ 13RESETTING THE DEFAULT TIME .................................................................................................... 13<strong>Nortel</strong> 1120e-1140e <strong>User</strong> <strong>Guide</strong> Page 1 2/18/2008
<strong>Northwestern</strong> University Information Technologywww.it.northwestern.eduUSING THE DIRECTORY .............................................................................................................................13ADDING OR EDITING A DIRECTORY ENTRY .................................................................................... 14DELETING AN ENTRY FROM THE DIRECTORY ................................................................................. 14USING THE INBOX .......................................................................................................................................15ACCESSING THE INBOX ................................................................................................................ 15VIEWING INBOX CALL INFORMATION .............................................................................................. 15STORING A NUMBER FROM THE INBOX .......................................................................................... 16USING THE INBOX TO MAKE A CALL .............................................................................................. 16RESETTING THE INBOX................................................................................................................. 16USING THE OUTBOX ...................................................................................................................................17ACCESSING THE OUTBOX............................................................................................................. 17VIEWING OUTBOX CALL INFORMATION .......................................................................................... 17STORING A NUMBER FROM THE OUTBOX....................................................................................... 18USING THE OUTBOX TO MAKE A CALL........................................................................................... 18RESETTING THE OUTBOX ............................................................................................................. 18USING THE DIAL-PAD TO ENTER TEXT ....................................................................................................18USING A KEYBOARD WITH AN <strong>IP</strong> PHONE ................................................................................................19BLUETOOTH HEADSET SETUP..................................................................................................................22HELP .............................................................................................................................................................22GENERAL PHONE SUPPORT ......................................................................................................... 22NUIT SERVICE CENTER (REPAIR) ................................................................................................ 22<strong>Nortel</strong> 1120e-1140e <strong>User</strong> <strong>Guide</strong> Page 2 2/18/2008
<strong>Northwestern</strong> University Information Technologywww.it.northwestern.edu<strong>IP</strong> <strong>Phone</strong> terminal description<strong>IP</strong> <strong>Phone</strong> <strong>1120E</strong> components (Fig 1)<strong>Nortel</strong> 1120e-1140e <strong>User</strong> <strong>Guide</strong> Page 3 2/18/2008
<strong>Northwestern</strong> University Information Technologywww.it.northwestern.edu<strong>IP</strong> <strong>Phone</strong> <strong>1140E</strong> components (Fig 2)<strong>Nortel</strong> 1120e-1140e <strong>User</strong> <strong>Guide</strong> Page 4 2/18/2008
<strong>Northwestern</strong> University Information Technologywww.it.northwestern.edu<strong>IP</strong> <strong>Phone</strong> connectors (Fig 3)<strong>Nortel</strong> Vo<strong>IP</strong> <strong>Phone</strong> <strong>1120E</strong>/<strong>1140E</strong> offers these features:• Six light-emitting diode (LED) indicator lampso message waiting lampo data waiting lampo mute lampo headset lampo hands-free lampo link lamp• Volume control keys• Standard telephone dial-pad• Four (<strong>1120E</strong>) or Six (<strong>1140E</strong>) system-defined feature keys• Four soft keys• Five navigation keyso upo down<strong>Nortel</strong> 1120e-1140e <strong>User</strong> <strong>Guide</strong> Page 5 2/18/2008
<strong>Northwestern</strong> University Information Technologywww.it.northwestern.eduoooleftrightsend (mapped to execute the current function assigned to the left soft key)• Four line keys• Multi-field LCD screeno adjustable contrasto backlight• Three audio modeso hands-free speak and listeno analog headset (auto-detect support)o handset• Automatic network configuration• Upgradeable firmware• Bluetooth compatible (<strong>1140E</strong> only)Terminal DisplayThe display on the <strong>IP</strong> <strong>Phone</strong> terminal has blue LED backlighting, which you can turn onand off. The backlight turns off automatically after a period of inactivity.<strong>Nortel</strong> <strong>IP</strong> <strong>Phone</strong> <strong>1120E</strong>/<strong>1140E</strong> display has three distinct areas:• The upper area shows line and feature key status.• The middle area shows single-line information for items such as caller number, callername, feature prompt strings, user-entered digits, date and time information, andtelephone information.• The lower area displays the labels for the soft keys.<strong>Nortel</strong> 1120e-1140e <strong>User</strong> <strong>Guide</strong> Page 6 2/18/2008
<strong>Northwestern</strong> University Information Technologywww.it.northwestern.eduTerminal indicators<strong>IP</strong> <strong>Phone</strong> <strong>1120E</strong> components (Fig 4)The <strong>IP</strong> <strong>Phone</strong> terminal uses light-emitting diodes (LEDs) of different colors to indicatethe current state of the terminal. The following table describes each color its associatedstate.A steady indicator means that the extension or feature beside it is active. A flashingindicator means the line is on hold or the feature is in the process of being programmed.Indicator LED color MeaningMessagewaitingData waitingRed (located at the top of theset)Blue (located at the top of theset)Lit when a message is waiting or a call is missed. Thelight turns off when after you retrieve your message.Lit when the terminal is on an active call.Hands freeHeadsetMuteLink/DataRed (located on the front nearthe Hands free key)Red (located on the front nearthe headset key)Red (located on the front nearthe mute key)Green (located on the backcover near the networkEthernet jack)Lit when the hands-free feature is active.Lit when the headset is in use.Lit when the mute feature is active.Lit when the link is alive and flashes to indicate activity.<strong>Nortel</strong> 1120e-1140e <strong>User</strong> <strong>Guide</strong> Page 7 2/18/2008
<strong>Northwestern</strong> University Information Technologywww.it.northwestern.eduHow to Use the Navigation KeysThe <strong>IP</strong> <strong>Phone</strong> terminal has five keys that you use to navigate the menus, and to help youto enter text in the display (see Fig 1 or Fig 2).When the menu system is active, the navigation keys behave this way:• Up key—return to the previous menu item• Down key—go to the next menu item• Left/right key—active when you can enter text. To move the cursor to the left,press the left key. Press the right key to move the cursor to the right.• Center key—select the menu itemAnswering Voice Mail1. Pick up the handset.2. Use the Navigations Keys to scroll to the Msg Wait.3. Press the key next to Msg Wait.4. Enter your mailbox password.Making a CallMaking a Call Using Off-hook DialingFollow this procedure to make a call using off-hook dialing.1. Lift the handset from the cradle. The primary line is active and you hear a dial tone.2. Use the dial-pad to enter the number.3. When the call is answered, begin speaking.Making a Call Using Hands-free DialingFollow this procedure to make a call using hands-free dialing (see Fig 1 or Fig 2).1. Press a line key. A line is selected and you hear a dial tone.2. Use the dial-pad to enter the number.3. When the call is answered, begin speaking.4. For privacy, lift the handset.5. To return to hands-free mode, press the hands-free key and place the handset in thecradle. The hands-free feature is active.Making a Call Using Pre-dialFollow this procedure to use the pre-dial feature to make a call.<strong>Nortel</strong> 1120e-1140e <strong>User</strong> <strong>Guide</strong> Page 8 2/18/2008
<strong>Northwestern</strong> University Information Technologywww.it.northwestern.edu1. Before you press a line key or lift the handset, use the dial-pad to enter the number.The number is entered into the terminal.2. When you want to make the call, press Ok. The number is dialed.3. When the call is answered, begin speaking.Editing a Pre-dialed NumberFollow this procedure to edit a number held in the pre-dialed state. A number must bepre-dialed before following the steps below.1. Perform one of these steps.• To delete numbers that appear to the left of the cursor, press Bkspc.• To delete numbers that appear to the right of the cursor, press Delete.2. Use the dial-pad to enter the new number.Dialing from the DirectoryFollow this procedure to dial from a Directory entry.1. Make sure the Handset is in the cradle position.2. Press the Directory key. The Directory screen appears, showing a list of storedentries.3. Select a number from the list.4. Press Ok. A list of options appears.5. Press Ok again. The number is dialed.Answering CallsFollow these procedures to answer calls. Incoming calls cause the telephone to soundand the message indicator lamp to flash..Answering a CallFollow this procedure to answer a call.Perform one of these actions to answer a call:• Lift the handset.• To answer a call using the hands-free feature, press the hands-free key.• To answer a call while wearing a headset, press the headset key.Answering a Second CallFollow this procedure to answer a call when you are engaged in a call. If another callcomes in while the primary line is engaged, the phone sounds and a message indicatoricon on the display flashes. While the indicator is flashing you have the opportunity to putthe first call on hold and answer the second call.<strong>Nortel</strong> 1120e-1140e <strong>User</strong> <strong>Guide</strong> Page 9 2/18/2008
<strong>Northwestern</strong> University Information Technologywww.it.northwestern.edu1. Press the hold key to put the active call on hold (see Fig 1 or Fig 2).2. Press the line key for the second call. The call is answered.Ending a CallFollow this procedure to terminate an active call. The Goodbye key is useful for droppingout of a conference call or exiting voice mail.Perform one of these actions:• Return the handset to the cradle.• Press the goodbye key. The call is ended.While On an Active CallFollow these procedures to put a call on hold, transfer a call, use the mute key, and usethe conference call feature.Using Call HoldThe Hold feature allows you to suspend a call without terminating it. Follow thisprocedure to use the hold feature.1. To put a call on hold, press the hold key. The call is suspended. On the display, anindicator flashes beside the line on which the call is held.2. Press the key beside the flashing indicator in the display. The call is active again.Transferring a CallFollow this procedure to transfer a call to another extension.1. During an active call, press the 3 Way Call key. The call is put on hold and a dialtone sounds. On the display, an indicator flashes beside the line on which the call isheld.2. Dial the number of the person you want to add to the call. At this time, you can talkprivately to the person you are adding, to announce the conference.3. Press the 3 Way Call key again to join all parties.4. Hang up to complete the call transfer.Using Conference CallFollow this procedure to engage in a conference call. The Three Way Call feature allowsyou to add three calls to a conference.<strong>Nortel</strong> 1120e-1140e <strong>User</strong> <strong>Guide</strong> Page 10 2/18/2008
<strong>Northwestern</strong> University Information Technologywww.it.northwestern.edu1. During a call, press the system defined 3 Way Call key. The call is put on hold and adial tone sounds. On the display, an indicator flashes beside the line on which thecall is held.2. Dial the number of the person you want to add to the call. At this time, you can talkprivately to the person you are adding, to announce the conference.3. Press the 3 Way Call key again to merge the calls.4. To end the conference press the 3 Way Call key.Using the Mute FeatureMuting prevents the transmission of sounds through the microphone. Follow thisprocedure to use the mute feature.1. While on a call, press the mute key. A red light is turned on to indicate the mutefeature is enabled.2. To turn off the feature, press the mute key again. The light is turned off, and thefeature is disabled.Using Call ForwardFollow this procedure to forward calls to another <strong>IP</strong> <strong>Phone</strong> when you are away from yourdesk.1. To activate call forward without lifting the handset, press the key to which theForward feature is assigned.2. Use the dial-pad to enter the extension to which you want to forward your incomingcalls.3. Press the forward key again. An icon appears in the display, beside the forward keylabel.4. To turn off call forward, press the forward key. The feature is deactivated and theicon disappears from the display.Selecting a Ring ToneFollow this procedure to select a ring tone. You can listen to a ring tone before youselect it, through the Play and Stop options.1. From the main menu, select and open Audio. The Audio menu opens.2. Scroll through the menu and select Play Ring Patterns. The list of ring tones opens.3. To hear a ring tone before you select it, select a ring tone from the list and pressPlay.4. Press Stop to stop the ring tone from playing.5. To select a ring tone, press Apply.<strong>Nortel</strong> 1120e-1140e <strong>User</strong> <strong>Guide</strong> Page 11 2/18/2008
<strong>Northwestern</strong> University Information Technologywww.it.northwestern.eduAdjusting the Contrast Level of the DisplayFollow this procedure to adjust the contrast level of the display.1. From the main menu, select and open Display The Contrast screen appears.2. Perform one of these actions:• To decrease the contrast, press the left navigation key. The percentage scale onthe screen shows the degree of change.• To increase the contrast, press the right navigation key. The level decreases orincreases each time you press the key.3. Stop pressing the key when you find the contrast you like.4. Press Ok. The current contrast level is saved and you return to the previous screen.Selecting a LanguageFollow this procedure to select your language preference.1. From the main menu, select and open Language. A list of available languagesappears.2. Scroll through the list and select your preferred language.3. Press Ok. The terminal now displays text in the selected language.4. Press Cancel. You return to the main menu.Using the Time MenuFollow procedures in this section to configure time and date formats.Setting the Time FormatFollow this procedure to set the time format the terminal uses to display the current time.The time format choices are:• 12-hour clock• French• 24-hour clock1. From the Main menu, open the Time menu.2. From the Time menu, select and open Time Format. The Time Format screenappears.<strong>Nortel</strong> 1120e-1140e <strong>User</strong> <strong>Guide</strong> Page 12 2/18/2008
<strong>Northwestern</strong> University Information Technologywww.it.northwestern.edu3. Scroll through the Time Format options to select the format you want. A check markappears beside the format currently in use.4. To enable a format, select it and press Ok. A check mark appears beside the option,to indicate that it is enabled. The time is displayed in the selected format. You returnto the previous screen.Setting the Date FormatFollow this procedure to set the date format the terminal uses to display the current date.When month (mmm) is selected, the display shows an abbreviated name, Oct forexample, and not a number.The date format choices are:• mmmdd• ddmmm• mm/dd• dd/mm1. From the main menu, open the Time menu.2. From the Time menu, select and open Date Format.3. Press Ok. The Date Format screen appears.4. Scroll through the Date Format options to select the format you want. A check markappears beside the format currently in use.5. To enable a format, select it and press Ok. A check mark appears beside the option,to indicate that it is enabled. The date is displayed in the selected format. You returnto the previous screen.Resetting the Default TimeFollow this procedure to reset the terminal to the default time.1. From the main menu, open the Time menu.2. Form the Time menu, select and open Reset. A confirmation screen appears.3. Confirm the action. The terminal reverts to the default time settings. You return to theprevious screen.Using the DirectoryFollow procedures in this section to use the directory feature (see Fig 1 or Fig 2).Note: <strong>1120E</strong>/<strong>1140E</strong> <strong>Phone</strong> will store up to sixteen directory entries.<strong>Nortel</strong> 1120e-1140e <strong>User</strong> <strong>Guide</strong> Page 13 2/18/2008
<strong>Northwestern</strong> University Information Technologywww.it.northwestern.eduAdding or Editing a Directory EntryFollow this procedure to add an entry to the directory. <strong>User</strong>s may also want to use aUSB Keyboard when adding or editing multiple directory entries (See page 19).1. Press the directory key to access the directory menu. The directory opens.2. Perform one of these actions:• If this is a new entry, press Ok.• If you are editing an existing entry, navigate through the list to select the entry,then press Ok. The Directory menu opens.3. From the Directory menu, select and open New Entry. The New Entry menu opens.4. To add or edit the number, perform these steps:a. From the New Entry menu, select and open Number.b. Use the dial-pad to enter the number.c. Press Ok. The number is entered in the directory, and you return to the NewEntry menu.5. To add or edit the surname, perform these steps:a. From the New Entry menu, select and open Surname.b. Use the dial-pad to enter the surname.c. Press Ok. The surname is entered in the directory, and you return to the NewEntry menu.6. To add or edit the first name, perform these steps:a. From the New Entry menu, select and open First Name.b. Use the dial-pad to enter the first name.c. Press Ok. The first name is entered in the directory, and you return to the NewEntry menu.7. When you finish entering or editing the information, select Save. You are asked toconfirm the action.8. Perform one of these actions:• To save, press Yes.• To edit the information, press No. The Resume Editing? message appears.Press Yes to edit the information. Press No to exit the directory without savingthe information.Deleting an Entry from the DirectoryFollow this procedure to delete an entry from the directory.1. Press the directory key to access the directory menu. The directory opens.2. From the directory list, select the name you want to delete.<strong>Nortel</strong> 1120e-1140e <strong>User</strong> <strong>Guide</strong> Page 14 2/18/2008
<strong>Northwestern</strong> University Information Technologywww.it.northwestern.eduUsing the InboxFollow these procedures to use the Inbox. The <strong>IP</strong> <strong>Phone</strong> <strong>1120E</strong>/<strong>1140E</strong> has a dedicatedfixed key for the Inbox. The system logs the incoming key number, time and date, aswell as the display shown on the <strong>IP</strong> <strong>Phone</strong> at the time of the incoming call. Theinformation from the display is captured only if the call lasts for more than two seconds.The Inbox can store a maximum of 10 calls. When the maximum is reached, the oldestcall is dropped. Calls appear in the list in the order in which they were received, with themost recent call at the top of the list.The Inbox call display consists of a time or date stamp, and a name or number. A timestamp appears beside calls you receive on the same day on which you view the Inbox. Adate stamp appears beside calls that arrive prior to the day of viewing. If no name ornumber was extracted from the display of the incoming call, a No Details messageappears.If you have a message waiting or you have missed a call, the message waiting lamp isturned on. The lamp turns off after you check your Inbox or retrieve the waitingmessage.Accessing the InboxFollow this procedure to access and use the Inbox (see Fig 1 or Fig 2).If you have a message waiting, the message waiting indicator lamp on the top rightcorner of the terminal is turned on. The light is turned off after you access the Inbox.1. Press the Inbox key. The Inbox screen appears, showing a list of the 10 most recentincoming calls.2. Select an item from the list and press Ok.3. Perform one of these actions:• Select Dial to call the number.• Select Display to view caller information.• Select Store to store the number in the directory.Viewing Inbox call informationFollow this procedure to view the information about a call in the Inbox (see Fig 1 or Fig2).1. Press the Inbox key. The Inbox screen appears, showing a list of the 10 most recentincoming calls.2. Select a number from the list.3. Press Ok. The Dial screen appears.4. Press the down navigation key.<strong>Nortel</strong> 1120e-1140e <strong>User</strong> <strong>Guide</strong> Page 15 2/18/2008
<strong>Northwestern</strong> University Information Technologywww.it.northwestern.edu5. Select Display. The Display screen appears.6. Press the down navigation key to view the information.Storing a Number from the InboxFollow this procedure to select a number from the Inbox and save it to the directory (seeFig 1 or Fig 2).1. Press the Inbox key. The Inbox screen appears, showing a list of the 10 most recentincoming calls.2. Select a number from the list.3. Press Ok. The Dial screen appears.4. Press the down navigation key to select Store. The directory submenu opens.Using the Inbox to Make a CallFollow this procedure to make a call from within the Inbox (see Fig 1 or Fig 2).1. Press the Inbox key. The Inbox screen appears, showing a list of the 10 most recentincoming calls.2. Select the number you want to dial.3. Press Ok.4. Select Dial.5. Press Ok. The Pre-dial screen appears with the number entered in the display.6. Perform one of these steps.• To edit the number, see Editing a Pre-dialed Number.• To make the call, see Making a Call Using Pre-dial.Resetting the InboxFollow this procedure to empty the contents of the Inbox.1. From the main menu, select and open the History menu.2. From the History menu, select Reset Inbox. A confirmation screen appears.3. Press Yes. The calls in the Inbox are deleted. You return to the previous menu.<strong>Nortel</strong> 1120e-1140e <strong>User</strong> <strong>Guide</strong> Page 16 2/18/2008
<strong>Northwestern</strong> University Information Technologywww.it.northwestern.eduUsing the OutboxThe <strong>IP</strong> <strong>Phone</strong> <strong>1120E</strong>/<strong>1140E</strong> has a dedicated fixed key for the Outbox. The system logsthe outgoing key number, time, and date. If the duration of the call is more than twoseconds, the system captures the display as it appeared when the call was made.The Outbox can store a maximum of 10 calls. When the maximum is reached, the oldestcall is dropped. Calls appear in the list in order in which they were made, with the mostrecent call at the top of the list.The Outbox call display consists of a time or date stamp and a name or number. A timestamp appears beside calls you make on the same day on which you view the Outbox. Adate stamp appears beside calls that were made prior to the day of viewing. If no nameor number was extracted from the display of the outgoing call, the number dialedappears. Use the navigation keys to scroll through the list. The list does not wraparound.Follow procedures in this section to use the Outbox feature.Accessing the OutboxFollow this procedure to access and use the Outbox.1. Press the Outbox key. The Outbox screen appears, showing a list of the 10 mostrecent outgoing calls.2. Select an item from the list and press Ok.3. Perform one of these actions:• Select Dial, to call the number.• Select Display to view caller information.• Select Store to store the number in the directory.Viewing Outbox Call InformationFollow this procedure to view the information about a call in the Outbox.1. Press the Outbox key. The Outbox screen appears, showing a list of the 10 mostrecent outgoing calls.2. Select a number from the list.3. Press Ok. The Dial screen appears.4. Press the down navigation key.5. Select Display. The Display screen appears.6. Press the down navigation key to view the information.<strong>Nortel</strong> 1120e-1140e <strong>User</strong> <strong>Guide</strong> Page 17 2/18/2008
<strong>Northwestern</strong> University Information Technologywww.it.northwestern.eduStoring a Number from the OutboxFollow this procedure to select a number from the Outbox and store it in the directory.1. Press the Outbox key. The Outbox screen appears, showing a list of the 10 mostrecent outgoing calls.2. Select a number from the list.3. Press Ok. A list of options appears.4. Press the down navigation key to select Store. The directory submenu appears.5. See Adding or editing a directory entry.Using the Outbox to Make a CallFollow this procedure to make a call from within the Outbox.1. Make sure the Handset is in the cradle position.2. Press the Outbox key. The Outbox screen appears, showing a list of the 10 mostrecent outgoing calls.3. Select the number you want to dial.4. Press Ok.5. Select Dial. The number is dialed.Resetting the OutboxFollow this procedure to empty the contents of the Outbox.1. From the main menu, select and open History.2. From the History menu, select Reset Outbox. A confirmation screen appears.3. Press Yes. The calls in the Outbox are deleted. You return to the previous menu.Using the Dial-pad to Enter TextFollow this procedure to use the dial-pad to enter text.On the dial-pad, keys numbered 2 through 9 each have three letters associated withthem. When entering text, press the key once to enter the first letter, twice to enter thesecond letter, and three times to enter the third letter.1. To enter text, find the number key associated with the letter you want to enter, andperform one of these actions:• To enter the first letter, press the key once.• To enter the second letter, press the key twice.<strong>Nortel</strong> 1120e-1140e <strong>User</strong> <strong>Guide</strong> Page 18 2/18/2008
• To enter the third letter, press the key three times.<strong>Northwestern</strong> University Information Technologywww.it.northwestern.edu2. To enter special characters perform theses actions. See Fig 5 for the list of specialcharacters that are available. Press the Symbol soft key. A list of symbols opens.3. Scroll through the list and select the symbol.4. Press Ok to enter the symbol.Special characters (Fig 5)Using a Keyboard with an <strong>IP</strong> <strong>Phone</strong>Follow this procedure to use a keyboard to enter alphanumeric characters, instead of thedial-pad. See Fig 3 for the location of the USB port.After you connect a keyboard to the <strong>IP</strong> <strong>Phone</strong>, you can:• use the keyboard to enter telephone numbers and special characters, such as *and # .• use the function keys to control the telephone while you are on a call.• use designated keys to perform specific actions.The following table lists the function keys and their associated action during telephonecalls:Key Action• F1: Enable the hands-free mode• F2: Enable the headset mode• F3: Put the call on hold• F4: Enable the mute feature• F5: Increase the volume<strong>Nortel</strong> 1120e-1140e <strong>User</strong> <strong>Guide</strong> Page 19 2/18/2008
• F6: Decrease the volume• F7: No action• F8: Quit• F9: Select Services key• F10: Connect to PC (XAS)• F11: Select DN/feature key 0• F12: Select DN/feature key 1• F13: (Shift + F1) Select DN/feature key 2• F14: (Shift + F2) Select DN/feature key 3• F15: (Shift + F3) Select DN/feature key 4• F16: (Shift + F4) Select DN/feature key 5• F17: (Shift + F5) Select soft key 1• F18: (Shift + F6) Select soft key 2• F19: (Shift + F7) Select soft key 3• F20: (Shift + F8) Select soft key 4• ESC: No action• 0-9: Select numbers 0-9• A-K: Select character (Shift+key to select uppercase)• Backspace: Move the cursor back one space• Delete: Delete characters after the cursor position• Up arrow: Move the cursor up• Down arrow: Move the cursor down• Left arrow: Move the cursor left• Right arrow: Move the cursor right<strong>Northwestern</strong> University Information Technologywww.it.northwestern.edu• Enter Performs one of these actions: select soft key 1 or confirm an action• Caps Lock: Select text in uppercase• Insert: No action• Home: No action• End: No action• Page Up: No action• Page Down No action• Print Screen No action• Scroll Lock No action• Break: No action• Ctrl: No action• Shift: No action<strong>Nortel</strong> 1120e-1140e <strong>User</strong> <strong>Guide</strong> Page 20 2/18/2008
<strong>Northwestern</strong> University Information Technologywww.it.northwestern.edu• Tab: No action• Alt: No action<strong>Nortel</strong> 1120e-1140e <strong>User</strong> <strong>Guide</strong> Page 21 2/18/2008
<strong>Northwestern</strong> University Information Technologywww.it.northwestern.eduBluetooth Headset SetupBluetooth headset will only work with the <strong>1140E</strong> Vo<strong>IP</strong> <strong>Nortel</strong> telephones.1. Press the Headset key twice. The Bluetooth Setup dialog box appears.2. Check both the Enable Bluetooth and Use Bluetooth boxes.3. Turn on the Bluetooth headset.4. Select Search Devices. The phone will now search for the Bluetooth headset.5. After the message Search Completed. Found Device. appears, select Pair Device.6. A pin number prompt will appear. Enter 0000, which is usually the default pinnumber for most Bluetooth headsets. Check the Bluetooth headset instructions if0000 does not work.7. Select OK by pushing the Down Navigation Key.8. Once the headset is paired to the phone, press the Exit soft key.9. The headset is now available to use with the phone.HelpGeneral <strong>Phone</strong> SupportNUIT <strong>User</strong> Services: 847-467-5560E-mail: it-services@northwestern.eduWeb: http://www.it.northwestern.edu/telephone/index.htmlNUIT Service Center (Repair)Call NUIT repair at 611 from any campus phone.Off Campus <strong>Phone</strong>: 847-467-6662<strong>Nortel</strong> 1120e-1140e <strong>User</strong> <strong>Guide</strong> Page 22 2/18/2008