Waterford Systems - Rick English - Swimming Pool Consultant
Waterford Systems - Rick English - Swimming Pool Consultant
Waterford Systems - Rick English - Swimming Pool Consultant

Create successful ePaper yourself
Turn your PDF publications into a flip-book with our unique Google optimized e-Paper software.
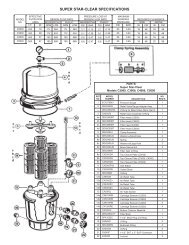
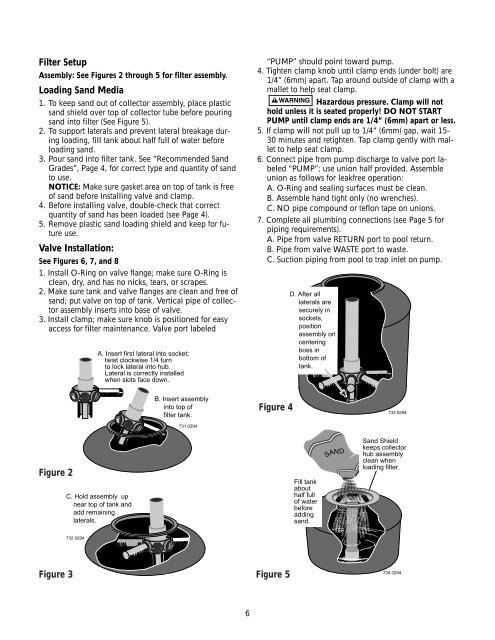
Filter SetupAssembly: See Figures 2 through 5 for filter assembly.Loading Sand Media1. To keep sand out of collector assembly, place plasticsand shield over top of collector tube before pouringsand into filter (See Figure 5).2. To support laterals and prevent lateral breakage duringloading, fill tank about half full of water beforeloading sand.3. Pour sand into filter tank. See “Recommended SandGrades”, Page 4, for correct type and quantity of sandto use.NOTICE: Make sure gasket area on top of tank is freeof sand before installing valve and clamp.4. Before installing valve, double-check that correctquantity of sand has been loaded (see Page 4).5. Remove plastic sand loading shield and keep for futureuse.Valve Installation:See Figures 6, 7, and 81. Install O-Ring on valve flange; make sure O-Ring isclean, dry, and has no nicks, tears, or scrapes.2. Make sure tank and valve flanges are clean and free ofsand; put valve on top of tank. Vertical pipe of collectorassembly inserts into base of valve.3. Install clamp; make sure knob is positioned for easyaccess for filter maintenance. Valve port labeledA. Insert first lateral into socket;twist clockwise 1/4 turnto lock lateral into hub.Lateral is correctly installedwhen slots face down.“PUMP” should point toward pump.4. Tighten clamp knob until clamp ends (under bolt) are1/4” (6mm) apart. Tap around outside of clamp with amallet to help seat clamp.Hazardous pressure. Clamp will nothold unless it is seated properly! DO NOT STARTPUMP until clamp ends are 1/4” (6mm) apart or less.5. If clamp will not pull up to 1/4” (6mm) gap, wait 15-30 minutes and retighten. Tap clamp gently with malletto help seat clamp.6. Connect pipe from pump discharge to valve port labeled“PUMP”; use union half provided. Assembleunion as follows for leakfree operation:A. O-Ring and sealing surfaces must be clean.B. Assemble hand tight only (no wrenches).C. NO pipe compound or teflon tape on unions.7. Complete all plumbing connections (see Page 5 forpiping requirements).A. Pipe from valve RETURN port to pool return.B. Pipe from valve WASTE port to waste.C. Suction piping from pool to trap inlet on pump.D. After alllaterals aresecurely insockets,positionassembly oncenteringboss inbottom oftank.B. Insert assemblyinto top offilter tank.731 0294Figure 4733 0294Figure 2C. Hold assembly upnear top of tank andadd remaininglaterals.732 0294Fill tankabouthalf fullof waterbeforeaddingsand.SAND::::::::::::::::::::::::::::::::::::::::::::::: :::: :::: :::::::: :::: :::::::: :::: :::::::::::: :::: :::: :::::::: :::: :::: :::: :::: :::: :::::::: :::: :::::::: :::::::: :::: :::::::::::: :::::::::::::::::::::::::::::::::::::::::::::::: :::::::: :::::::::::::::::::::::::::::::::::::::::::::::::::: :::: :::::::: :::: :::::::: :::: :::: :::: :::: :::: :::: :::: :::::::: :::: :::::::: :::: ::::Sand Shieldkeeps collectorhub assemblyclean whenloading filter.Figure 3Figure 5734 02946