Jandy CL series cartridge filter - Inyo Swimming Pool Products
Jandy CL series cartridge filter - Inyo Swimming Pool Products
Jandy CL series cartridge filter - Inyo Swimming Pool Products

You also want an ePaper? Increase the reach of your titles
YUMPU automatically turns print PDFs into web optimized ePapers that Google loves.
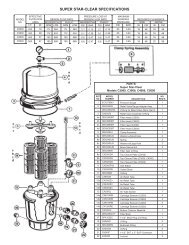
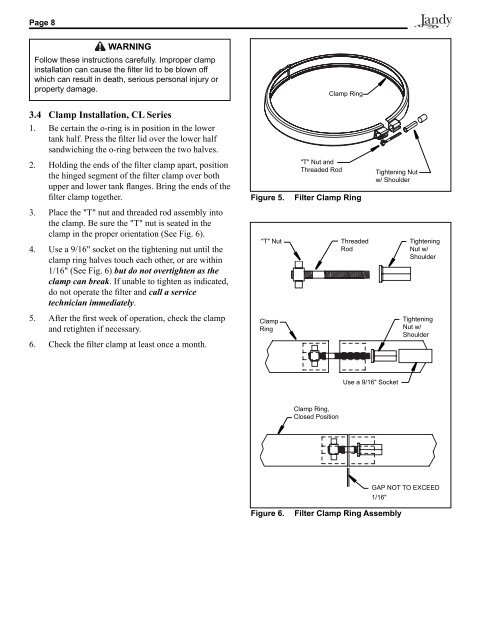
Page 8WARNINGFollow these instructions carefully. Improper clampinstallation can cause the fi lter lid to be blown offwhich can result in death, serious personal injury orproperty dam age.Clamp Ring3.4 Clamp Installation, <strong>CL</strong> Series1. Be certain the o-ring is in position in the lowertank half. Press the <strong>filter</strong> lid over the lower halfsandwiching the o-ring between the two halves.2. Holding the ends of the <strong>filter</strong> clamp apart, positionthe hinged segment of the <strong>filter</strong> clamp over bothupper and lower tank flanges. Bring the ends of the<strong>filter</strong> clamp together.Figure 5."T" Nut andThreaded RodFilter Clamp RingTightening Nutw/ Shoulder3. Place the "T" nut and threaded rod assembly intothe clamp. Be sure the "T" nut is seated in theclamp in the proper orientation (See Fig. 6).4. Use a 9/16" socket on the tightening nut until theclamp ring halves touch each other, or are within1/16" (See Fig. 6) but do not overtighten as theclamp can break. If unable to tighten as indicated,do not operate the <strong>filter</strong> and call a servicetechnician immediately."T" NutThread edRodTighteningNut w/Shoulder5. After the first week of operation, check the clampand retighten if necessary.6. Check the <strong>filter</strong> clamp at least once a month.ClampRingTighteningNut w/ShoulderUse a 9/16" SocketClamp Ring,Closed PositionGAP NOT TO EXCEED1/16"Figure 6.Filter Clamp Ring Assembly