- Page 1 and 2:
Microsoft Dynamics CRM 4.0 User’s
- Page 3 and 4:
Table of ContentsChapter 1: Getting
- Page 5 and 6:
Chapter 3: Marketing ..............
- Page 7 and 8:
Chapter 1: Getting StartedThis chap
- Page 9 and 10:
Customer Service ManagementThe Cust
- Page 11 and 12:
Information in the Resource Center
- Page 13 and 14:
ToPressMove to the next option or o
- Page 15 and 16:
utton .Use an asterisk (* ) as a wi
- Page 17 and 18:
In any list, select multiple record
- Page 19 and 20:
Clear, delete, or group search crit
- Page 21 and 22:
a. In the Activities list, in the T
- Page 23 and 24:
Delete a saved search3. On the Stan
- Page 25 and 26:
Microsoft Dynamics CRM.Business Uni
- Page 27 and 28:
NoteYou cannot update an attached f
- Page 29 and 30:
From the Reports areaa. In the Work
- Page 31 and 32:
3. Click Enter Value, and enter a v
- Page 33 and 34:
The following export formats are in
- Page 35 and 36:
DueEnter the date and time that the
- Page 37 and 38:
is displayed as long as the receipi
- Page 39 and 40:
NotesWhen you close an activity, th
- Page 41 and 42:
CustomerYou must click the Lookup b
- Page 43 and 44:
In the Assign to Queue or User dial
- Page 45 and 46:
Attach a fileCan I do this task?Thi
- Page 47 and 48:
5. On the General tab, in the Recor
- Page 49 and 50:
To search all records on all pages
- Page 51 and 52:
ooYou can use the Modified On colum
- Page 53 and 54:
2. Select the record or records tha
- Page 55 and 56:
You cannot create a new contact or
- Page 57 and 58:
Assign to another userClick the Loo
- Page 59 and 60:
Or, select multiple recordsSelect s
- Page 61 and 62:
use Track in CRM.Copy a shortcut. O
- Page 63 and 64:
width (in pixels) that you want, an
- Page 65 and 66:
There is potential for data loss if
- Page 67 and 68:
To ensure that the file is exported
- Page 69 and 70:
Notes and attachmentsYou can delete
- Page 71 and 72:
A record will only import if all Mi
- Page 73 and 74:
9. After reviewing the details, if
- Page 75 and 76:
The Created On and Modified On attr
- Page 77 and 78:
. Click Browse, select the comma-se
- Page 79 and 80:
TipIf you create a data map that yo
- Page 81 and 82:
Add any file or link to a Web page
- Page 83 and 84:
To adjust the width of a column, cl
- Page 85 and 86:
6. In the list of available records
- Page 87 and 88:
Configure sortingTo change the sort
- Page 89 and 90:
If you export a dynamic worksheet o
- Page 91 and 92:
If the recipients are in the same d
- Page 93 and 94:
To select a report from a record or
- Page 95 and 96:
To install the required control, cl
- Page 97 and 98:
Competitor Win Loss ReportUse this
- Page 99 and 100:
Web linksStatic filesDynamic files
- Page 101 and 102:
- OR -To start from a copy of an ex
- Page 103 and 104:
Column width. Width of the column h
- Page 105 and 106:
ooForms for related record typesRep
- Page 107 and 108:
Only reports that relate to the cur
- Page 109 and 110:
To page through the report, on the
- Page 111 and 112:
Add a report without using the Repo
- Page 113 and 114:
If you use the Microsoft Dynamics C
- Page 115 and 116:
share the.RDL file with the report
- Page 117 and 118:
g. To ungroup a group, click the Op
- Page 119 and 120:
If the report is enabled for pre-fi
- Page 121 and 122:
Create, edit, or copy a report usin
- Page 123 and 124:
a. For each row you want to group,
- Page 125 and 126:
oShow chart. To view data for a cha
- Page 127 and 128:
Make a report available for externa
- Page 129 and 130:
a. In the Microsoft Dynamics CRM Re
- Page 131 and 132:
Use Microsoft Office Word 2003Can I
- Page 133 and 134:
3. On the Actions menu, click Make
- Page 135 and 136:
TipTo share your new file with othe
- Page 137 and 138:
4. On the Actions toolbar, click Se
- Page 139 and 140:
7. If necessary, you can add or del
- Page 141 and 142:
While working with quotes, removing
- Page 143 and 144:
7. Click OK.Microsoft Dynamics CRM
- Page 145 and 146:
RegardingThis field is used to link
- Page 147 and 148:
DueIf you are not sending your e-ma
- Page 149 and 150:
Close an activityCan I do this task
- Page 151 and 152:
6. Click Save or Save and Close.Not
- Page 153 and 154:
Assign an activity to a user or que
- Page 155 and 156:
Work with Integrated Instant Messag
- Page 157 and 158:
More information: Creating and Usin
- Page 159 and 160:
Sending and Replying to E-Mail Mess
- Page 161 and 162:
To attach an articlea. To look up a
- Page 163 and 164:
This procedure does not create an O
- Page 165 and 166:
After a message is sent, the status
- Page 167 and 168:
Set the option to send and receive
- Page 169 and 170:
Convert an activity to a caseCan I
- Page 171 and 172:
You can enter a description of the
- Page 173 and 174:
Increasing Your EfficiencyPersonali
- Page 175 and 176:
2. In the Set Personal Options dial
- Page 177 and 178:
Create the duplicatesThis option al
- Page 179 and 180: Create or edit an e-mail templateCa
- Page 181 and 182: Set how your e-mail is trackedCan I
- Page 183 and 184: In the above options, if you chose
- Page 185 and 186: You can export to a static or dynam
- Page 187 and 188: Create, Edit, or Copy a Report Usin
- Page 189 and 190: However, rows with field values fro
- Page 191 and 192: oShow chart. To view data for a cha
- Page 193 and 194: From the Reports areaa. In the Work
- Page 195 and 196: . To group criteria, you must selec
- Page 197 and 198: ExcelView the report in Microsoft O
- Page 199 and 200: Parent ReportIf this report is a su
- Page 201 and 202: Lists for related record typesRepor
- Page 203 and 204: Edit the default filter for a repor
- Page 205 and 206: 2. Download the report from Microso
- Page 207 and 208: Create one-time or scheduled Report
- Page 209 and 210: - OR -To edit an existing report, s
- Page 211 and 212: Column width. Width of the column h
- Page 213 and 214: ooForms for related record typesRep
- Page 215 and 216: Edit a default report or create a R
- Page 217 and 218: language in their personal options.
- Page 219 and 220: Use Microsoft Office Word 2007Can I
- Page 221 and 222: 4. Continue with the Query Wizard.
- Page 223 and 224: Using the Knowledge BaseUsing Artic
- Page 225 and 226: View unpublished articlesCan I do t
- Page 227 and 228: Using workflowsYou use workflows by
- Page 229: Send an e-mail notificationStart a
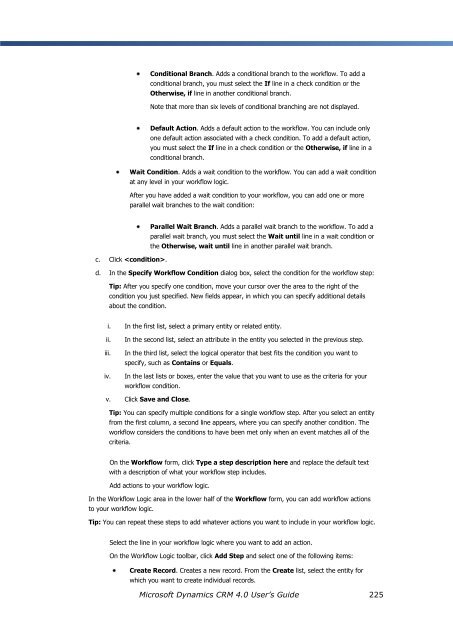
- Page 233 and 234: 5. Click the field where you want t
- Page 235 and 236: Create or edit an announcementCan I
- Page 237: c. In Common Tasks, click Add Colum
- Page 240 and 241: Managing Customer RelationshipsMana
- Page 242 and 243: postal code can provide basic geogr
- Page 244 and 245: ooFaxThe selected option simply pro
- Page 246 and 247: NoteYou cannot set up duplicate rel
- Page 248 and 249: Party 2Select the customer record t
- Page 250 and 251: For Selected RecordsSelect this opt
- Page 252 and 253: NoteThis topic documents the list o
- Page 254 and 255: oMailThe selected option simply pro
- Page 256 and 257: 5. Click Save or Save and Close.Rep
- Page 258 and 259: However, you can also click the Loo
- Page 260 and 261: For Selected RecordsSelect this opt
- Page 262 and 263: Use this report to identify account
- Page 264 and 265: Create or edit a leadCan I do this
- Page 266 and 267: oMailThe selected option simply pro
- Page 268 and 269: NotesBased on the security privileg
- Page 270 and 271: Reactivate a closed leadCan I do th
- Page 272 and 273: a. In the Navigation Pane, click Ma
- Page 274 and 275: Use this report to identify account
- Page 276 and 277: Work with OpportunitiesOpportunitie
- Page 278 and 279: When the Look Up Records dialog box
- Page 280 and 281:
To remove a relationship, open the
- Page 282 and 283:
Close an opportunityCan I do this t
- Page 284 and 285:
Default sales reportsThe following
- Page 286 and 287:
2. On the Actions toolbar, click Ne
- Page 288 and 289:
Add or remove opportunities for a c
- Page 290 and 291:
Default sales reportsThe following
- Page 292 and 293:
9. Under Details, click Documents.1
- Page 294 and 295:
Selecting recipients for the quick
- Page 296 and 297:
You cannot add additional records t
- Page 298 and 299:
When you first create a quote it ha
- Page 300 and 301:
You must manually enter the tax amo
- Page 302 and 303:
Price ListSearch for and select the
- Page 304 and 305:
The mail merge process creates two
- Page 306 and 307:
You must enter the date in the form
- Page 308 and 309:
Default sales reportsThe following
- Page 310 and 311:
CurrencySelect the currency in whic
- Page 312 and 313:
ecords are created every five minut
- Page 314 and 315:
CurrencySelect the currency in whic
- Page 316 and 317:
TipWhen the Look Up Records dialog
- Page 318 and 319:
Use this report to identify account
- Page 320 and 321:
Bill To AddressEnter the address wh
- Page 322 and 323:
Lock or unlock the price for an ord
- Page 324 and 325:
Use this report to identify account
- Page 326 and 327:
Running CampaignsPlanning Campaigns
- Page 328 and 329:
The Total Cost of Campaign Activiti
- Page 330 and 331:
8. In the Outsource Vendors box, cl
- Page 332 and 333:
Understanding Quick CampaignsYou ca
- Page 334 and 335:
NotesYou cannot add additional reco
- Page 336 and 337:
Importing Campaign ResponsesIn addi
- Page 338 and 339:
2. Open the campaign that contains
- Page 340 and 341:
Using Marketing ListsCreating and M
- Page 342 and 343:
Add members to a marketing listCan
- Page 344 and 345:
Remove members from a marketing lis
- Page 346 and 347:
5. Create a query to find the list
- Page 348 and 349:
Select this option to include all r
- Page 351 and 352:
Chapter 4: ServiceThis chapter expl
- Page 353 and 354:
ArrivedCanceledCompletedNo ShowBusy
- Page 355 and 356:
calendar in your Workplace.You can
- Page 357 and 358:
The Schedule Service Activity form
- Page 359 and 360:
Show Time AsIf you want to change t
- Page 361 and 362:
that another service activity or ap
- Page 363 and 364:
Change the status of a service acti
- Page 365 and 366:
You cannot create a recurring servi
- Page 367 and 368:
2. On the Actions toolbar, click Sc
- Page 369 and 370:
Find an available time with specifi
- Page 371 and 372:
2. On the Actions toolbar, click Ne
- Page 373 and 374:
Close or cancel a service activityC
- Page 375 and 376:
7. On the Details tab, you can sele
- Page 377 and 378:
. On the Actions toolbar, click New
- Page 379 and 380:
SubjectYou must enter a subject. Th
- Page 381 and 382:
The Schedule Service Activity form
- Page 383 and 384:
Show Time AsIf you want to change t
- Page 385 and 386:
example, you could enter the sympto
- Page 387 and 388:
a. In the Navigation Pane, click Wo
- Page 389 and 390:
- OR -To work with activities assoc
- Page 391 and 392:
Providing Customer Service with Con
- Page 393 and 394:
. In the Contract form, on the Acti
- Page 395 and 396:
3. Under Details, click Contract Li
- Page 397 and 398:
Renew a contractCan I do this task?
- Page 399 and 400:
Recording Entitlements Through Cont
- Page 401 and 402:
Resolve potential duplicate records
- Page 403 and 404:
3. On the Actions menu, click Resol
- Page 405 and 406:
Chapter 5: Microsoft Dynamics CRM f
- Page 407 and 408:
RemindersAfter synchronization with
- Page 409 and 410:
5. To save your changes and close t
- Page 411 and 412:
ContactsSelect this option if you w
- Page 413 and 414:
More information: Set Personal Opti
- Page 415 and 416:
when you are working offline, they
- Page 417 and 418:
If a tracked activity is deleted fr
- Page 419 and 420:
3. Save Outlook tasks as Microsoft
- Page 421 and 422:
In your personal options, you can s
- Page 423 and 424:
2. Do one of the following:Create a
- Page 425 and 426:
Outlook, the attachments do not syn
- Page 427 and 428:
6. You can also attach an article,
- Page 429 and 430:
This procedure does not create an O
- Page 431 and 432:
After a message is sent, the status
- Page 433 and 434:
Save Record.- OR -NotesIf your new
- Page 435 and 436:
NotesIf your new or updated record
- Page 437 and 438:
Before you go offline, you can sele
- Page 439 and 440:
The Data Group tab lists existing d
- Page 441 and 442:
More information: Set Personal Opti
- Page 443 and 444:
Set address book options in Microso
- Page 445 and 446:
Synchronize with Microsoft Outlook
- Page 447 and 448:
Resolve data synchronization errors
- Page 449 and 450:
TroubleshootingAccessing Parts of t
- Page 451 and 452:
Work with Security RolesControlling
- Page 453 and 454:
Importing DataHow do I link address
- Page 455 and 456:
What does the message mean that I g
- Page 457 and 458:
How can I find all records that don
- Page 459 and 460:
Export Data to ExcelRunning Reports
- Page 461 and 462:
4. In the Encoding list, click Unic
- Page 463 and 464:
e-mail activities created?Microsoft
- Page 465 and 466:
Why am I receiving e-mail messages
- Page 467 and 468:
Why can't I fix some of the synchro
- Page 469 and 470:
Why are Outlook appointments not ap
- Page 471 and 472:
General Issues with Microsoft Dynam
- Page 473 and 474:
Synchronizing InformationWhen I upg
- Page 475 and 476:
Why can't I go back online?This usu
- Page 477 and 478:
Running Reports - TroubleshootingCr
- Page 479 and 480:
Why do I receive the error "SRS soa
- Page 481 and 482:
GlossaryAaccept (To move a case int
- Page 483 and 484:
ase currency (The primary or defaul
- Page 485 and 486:
conditional branch (An element of w
- Page 487 and 488:
number of recipients. The e-mail go
- Page 489 and 490:
Import Data Wizard (A wizard used t
- Page 491 and 492:
opportunity (A potential revenue-ge
- Page 493 and 494:
qualify (To verify that a record fi
- Page 495 and 496:
subset of that type. )schedule (A l
- Page 497 and 498:
Tteam (A group of users who share a
- Page 499:
workflow scope (The range of record


