installation instructions cuh heavy duty unit heater - LUCKINSlive
installation instructions cuh heavy duty unit heater - LUCKINSlive
installation instructions cuh heavy duty unit heater - LUCKINSlive

Create successful ePaper yourself
Turn your PDF publications into a flip-book with our unique Google optimized e-Paper software.
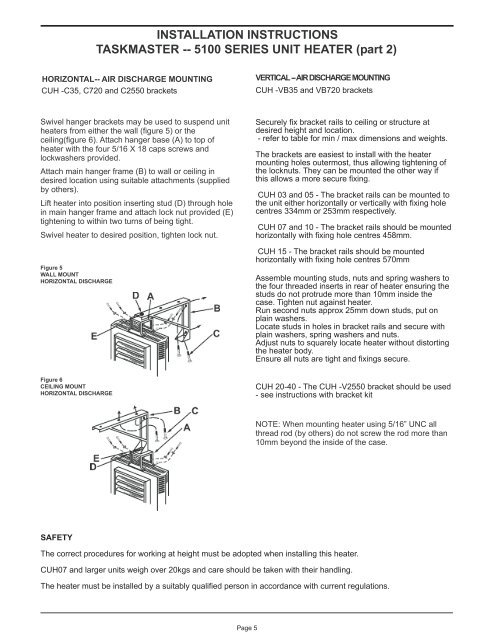
INSTALLATION INSTRUCTIONSTASKMASTER -- 5100 SERIES UNIT HEATER (part 2)HORIZONTAL-- AIR DISCHARGE MOUNTINGCUH -C35, C720 and C2550 bracketsVERTICAL--AIRDISCHARGEMOUNTINGCUH -VB35 and VB720 bracketsSwivel hanger brackets may be used to suspend <strong>unit</strong><strong>heater</strong>s from either the wall (figure 5) or theceiling(figure 6). Attach hanger base (A) to top of<strong>heater</strong> with the four 5/16 X 18 caps screws andlockwashers provided.Attach main hanger frame (B) to wall or ceiling indesired location using suitable attachments (suppliedby others).Lift <strong>heater</strong> into position inserting stud (D) through holein main hanger frame and attach lock nut provided (E)tightening to within two turns of being tight.Swivel <strong>heater</strong> to desired position, tighten lock nut.Figure 5WALL MOUNTHORIZONTAL DISCHARGESecurely fix bracket rails to ceiling or structure atdesired height and location.- refer to . table for min / max dimensions and weights.The brackets are easiest to install with the <strong>heater</strong>mounting holes outermost, thus allowing tightening ofthe locknuts. They can be mounted the other way ifthis allows a more secure fixing.CUH 03 and 05 - The bracket rails can be mounted tothe <strong>unit</strong> either horizontally or vertically with fixing holecentres 334mm or 253mm respectively.CUH 07 and 10 - The bracket rails should be mountedhorizontally with fixing hole centres 458mm.CUH 15 - The bracket rails should be mountedhorizontally with fixing hole centres 570mmAssemble mounting studs, nuts and spring washers tothe four threaded inserts in rear of <strong>heater</strong> ensuring thestuds do not protrude more than 10mm inside thecase. Tighten nut against <strong>heater</strong>.Run second nuts approx 25mm down studs, put onplain washers.Locate studs in holes in bracket rails and secure withplain washers, spring washers and nuts.Adjust nuts to squarely locate <strong>heater</strong> without distortingthe <strong>heater</strong> body.Ensure all nuts are tight and fixings secure.Figure 6CEILING MOUNTHORIZONTAL DISCHARGECUH 20-40 - The CUH -V2550 bracket should be used- see <strong>instructions</strong> with bracket kitNOTE: When mounting <strong>heater</strong> using 5/16” UNC allthread rod (by others) do not screw the rod more than10mm beyond the inside of the case.SAFETYThe correct procedures for working at height must be adopted when installing this <strong>heater</strong>.CUH07 and larger <strong>unit</strong>s weigh over 20kgs and care should be taken with their handling.The <strong>heater</strong> must be installed by a suitably qualified person in accordance with current regulations.Page 5