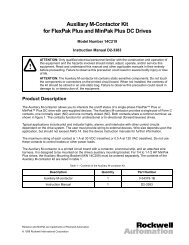
FlexPak 3000 Digital DC Drive Hardware ... - Reliance Electric
FlexPak 3000 Digital DC Drive Hardware ... - Reliance Electric
FlexPak 3000 Digital DC Drive Hardware ... - Reliance Electric
- No tags were found...

You also want an ePaper? Increase the reach of your titles
YUMPU automatically turns print PDFs into web optimized ePapers that Google loves.
CHAPTER 3<strong>Drive</strong> Setup and Adjustment!ATTENTION: Only qualified electrical personnel familiar with theconstruction of this equipment and the hazards involved should install,adjust, operate, and/or service this equipment. Read and understandthis section in its entirety before proceeding. Failure to observe thisprecaution could result in severe bodily injury or loss of life.3.1 Perform a Power Off InspectionInspect the drive and modification kits for possible physical damage or improperconnections.Verify that the wiring of the operator's station and the wiring to the drive is made withsufficient bare wire to make a good electrical connection. The removal of an excessivelength of insulation may needlessly expose conductors, resulting in the possibility ofshorts or safety hazards.3.2 Verify Control Transformer Tap SettingsBefore input power is applied to the drive, verify that the control transformer taps areset to match the input power. Note that most <strong>FlexPak</strong> <strong>3000</strong> drives ship from the factoryconfigured for 460 VAC input power (or 415 VAC for current-rated drives). Thesefactory settings can be changed to configure the drive for 230 VAC or 380 VAC inputpower. The conversion procedures are described in sections 3.2.1 and 3.2.2.3.2.1 Converting a <strong>Drive</strong> for 380 VAC Input Power!ATTENTION: 380/415 VAC-rated <strong>FlexPak</strong> <strong>3000</strong> drives can be configuredfor either 380 VAC or 415 VAC input power. Before input power is appliedto the drive, verify that the control transformer taps are set to match theinput power. Failure to observe this precaution could result in damageto, or destruction of, the equipment.380/415 VAC-rated drives are shipped from the factory configured for 415 VAC lineinput. Wire 782 is connected to terminal H1 and wire 783 is connected to terminal H3.To configure the drive for 380 VAC operation, perform the following steps:Step 1.Step 2.Step 3.Disconnect and lock out all incoming power to the drive.Move wire 783 to terminal H2. See figures 3.1 and 3.2 for terminal locations.Through the OIM, perform the Nominal AC Line Volts Adjust procedure asdescribed in section 3.9.<strong>Drive</strong> Setup and Adjustment 3-1