4081 19â rack-mount kit - AMS Neve
4081 19â rack-mount kit - AMS Neve
4081 19â rack-mount kit - AMS Neve

You also want an ePaper? Increase the reach of your titles
YUMPU automatically turns print PDFs into web optimized ePapers that Google loves.
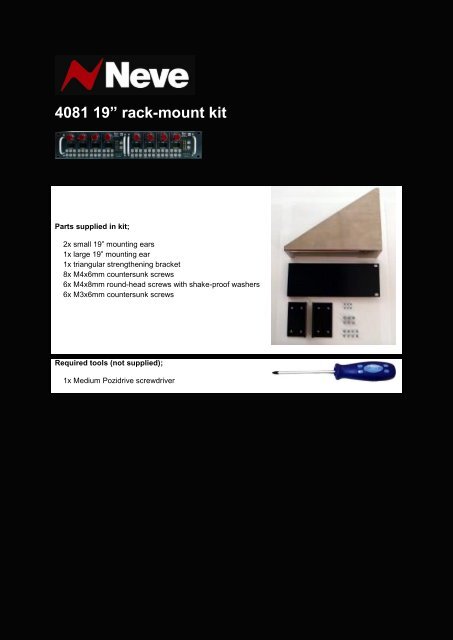
<strong>4081</strong> 19” <strong>rack</strong>-<strong>mount</strong> <strong>kit</strong>Parts supplied in <strong>kit</strong>;2x small 19” <strong>mount</strong>ing ears1x large 19” <strong>mount</strong>ing ear1x triangular strengthening b<strong>rack</strong>et8x M4x6mm countersunk screws6x M4x8mm round-head screws with shake-proof washers6x M3x6mm countersunk screwsRequired tools (not supplied);1x Medium Pozidrive screwdriver
Fitting instructions for one <strong>4081</strong> unitPlease note: the following parts are not usedin this installation;1x small 19” <strong>mount</strong>ing ear4x M4x6mm countersunk screwsRemove power and all cabling connections from rear of <strong>4081</strong> unitFasten the triangular strengthening b<strong>rack</strong>etto the desired side of the <strong>4081</strong> unit using the6x M4x8mm round-head screws with shakeproofwashersFasten the large 19” <strong>mount</strong>ing ear to thetriangular strengthening plate using the 6xM3x6mm countersunk screwsFasten 1x small 19” <strong>mount</strong>ing ear to theother side of the <strong>4081</strong> using 4x M4x6mmcountersunk screwsMount the <strong>4081</strong> unit assembly into a 19” <strong>rack</strong>using suitable <strong>rack</strong>-<strong>mount</strong>ing screws andconnect all cabling to the rear of the unit.Remove the 4 feet from the bottom of the<strong>4081</strong> unit if required
Fitting instructions for two <strong>4081</strong> unitsFitting instructions for two <strong>4081</strong> unitsPlease note: the following parts are not usedin this installation;1x large 19” <strong>mount</strong>ing ear1x triangular strengthening b<strong>rack</strong>et6x M3x6mm countersunk screws2x M4x8mm round-head screws with shakeproofwashersRemove power and all cabling connections from the rear of the 2x <strong>4081</strong> unitsRemove the 7 screws which fasten the lid to the <strong>4081</strong> unit which is to be <strong>mount</strong>ed to the right-handside and remove the lidPlace the <strong>4081</strong> units side-by-side and use 4xM4x8mm round-head screws with shakeproofwashers to fasten the units togetherReplace the lid and replace the 7 screws to fasten it in place.Fasten 1x small 19” <strong>mount</strong>ing ear to the sideof one of the <strong>4081</strong> units using 4x M4x6mmcountersunk screwsFasten 1x small 19” <strong>mount</strong>ing ear to theother <strong>4081</strong> unit using 4x M4x6mmcountersunk screwsMount the 2x <strong>4081</strong> unit assembly into a 19”<strong>rack</strong> using suitable <strong>rack</strong>-<strong>mount</strong>ing screwsand connect all cabling to the rear of theunits. Remove the 4 feet from the bottom ofthe <strong>4081</strong> unit if required