RangeMaster Ultrasonic Level Transmitter - Hawk Measurement ...
RangeMaster Ultrasonic Level Transmitter - Hawk Measurement ...
RangeMaster Ultrasonic Level Transmitter - Hawk Measurement ...
- No tags were found...
Create successful ePaper yourself
Turn your PDF publications into a flip-book with our unique Google optimized e-Paper software.
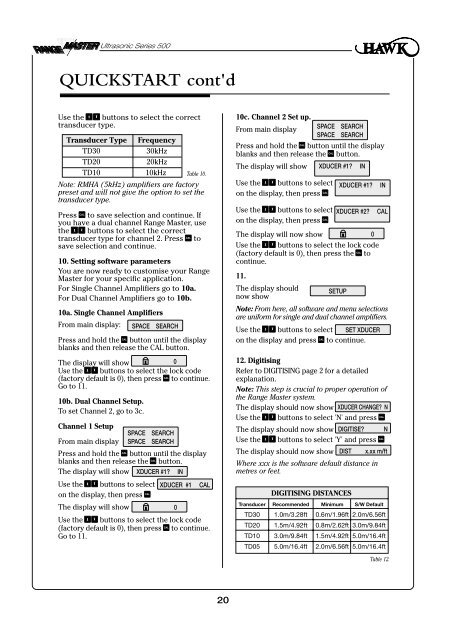
<strong>Ultrasonic</strong> Series 500QUICKSTART cont'dUse the buttons to select the correcttransducer type.Transducer Type FrequencyTD3030kHzTD2020kHzTD1010kHz Table 10.Note: RMHA (5kHz) amplifiers are factorypreset and will not give the option to set thetransducer type.Press to save selection and continue. IfCALyou have a dual channel Range Master, usethe buttons to select the correcttransducer type for channel 2. Press toCALsave selection and continue.10. Setting software parametersYou are now ready to customise your <strong>RangeMaster</strong> for your specific application.For Single Channel Amplifiers go to 10a.For Dual Channel Amplifiers go to 10b.10a. Single Channel AmplifiersFrom main display: SPACE SEARCHPress and hold the CAL button until the displayblanks and then release the CAL button.The display will show0Use the buttons to select the lock code(factory default is 0), then press to continue.CALGo to 11.10b. Dual Channel Setup.To set Channel 2, go to 3c.Channel 1 SetupSPACE SEARCHFrom main display SPACE SEARCHPress and hold the button until the displayCALblanks and then release the button.CALThe display will show XDUCER #1? INUse the buttons to select XDUCER #1 CALon the display, then press CALThe display will show0Use the buttons to select the lock code(factory default is 0), then press to continue.CALGo to 11.10c. Channel 2 Set up.From main displaySPACESPACEPress and hold the button until the displayCALblanks and then release the button.CALThe display will show XDUCER #1? INUse the buttons to selecton the display, then press CALSEARCHSEARCHXDUCER #1?Use the buttons to select XDUCER #2?on the display, then press CALThe display will now show0Use the buttons to select the lock code(factory default is 0), then press the toCALcontinue.11.The display shouldSETUPnow showNote: From here, all software and menu selectionsare uniform for single and dual channel amplifiers.Use the buttons to select SET XDUCERon the display and press to continue.CAL12. DigitisingRefer to DIGITISING page 2 for a detailedexplanation.Note: This step is crucial to proper operation ofthe Range Master system.The display should now show XDUCER CHANGE? NUse the buttons to select 'N' and press CALThe display should now show DIGITISE? NUse the buttons to select 'Y' and press CALThe display should now show DIST x.xx m/ftWhere xxx is the software default distance inmetres or feet.DIGITISING DISTANCESINCALTransducer Recommended Minimum S/W DefaultTD30 1.0m/3.28ft 0.6m/1.96ft 2.0m/6.56ftTD20 1.5m/4.92ft 0.8m/2.62ft 3.0m/9.84ftTD10 3.0m/9.84ft 1.5m/4.92ft 5.0m/16.4ftTD05 5.0m/16.4ft 2.0m/6.56ft 5.0m/16.4ftTable 12.20


