G-Series Model GH Cross Reference - MTS Sensors
G-Series Model GH Cross Reference - MTS Sensors
G-Series Model GH Cross Reference - MTS Sensors

Create successful ePaper yourself
Turn your PDF publications into a flip-book with our unique Google optimized e-Paper software.
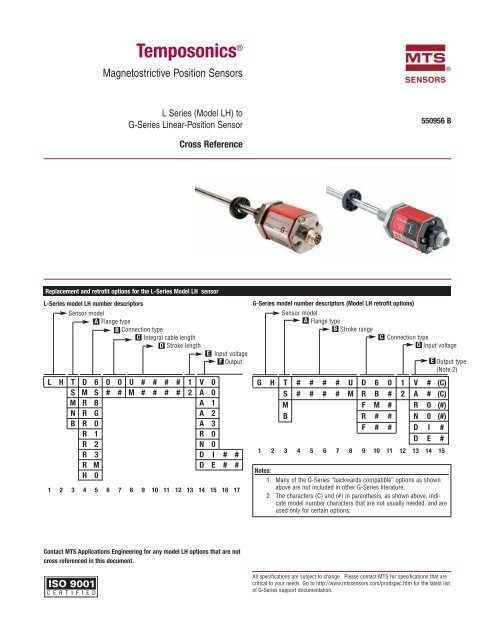
Temposonics ®Magnetostrictive Position <strong>Sensors</strong>L <strong>Series</strong> (<strong>Model</strong> LH) toG-<strong>Series</strong> Linear-Position Sensor550956 B<strong>Cross</strong> <strong>Reference</strong>Replacement and retrofit options for the L-<strong>Series</strong> <strong>Model</strong> LH sensorL-<strong>Series</strong> model LH number descriptorsSensor modelA Flange typeB Connection typeC Integral cable lengthD Stroke lengthE Input voltageF OutputL H T D 6 0 0 U # # # # 1 V 0S M S # # M # # # # 2 A 0M R B A 1N R G A 2B R 0 A 3R 1 R 0R 2 N 0R 3 D I # #R M D E # #H 01 2 3 4 5 6 7 8 9 10 11 12 13 14 15 16 17G-<strong>Series</strong> model number descriptors (<strong>Model</strong> LH retrofit options)Sensor modelA Flange typeB Stroke rangeC Connection typeD Input voltageG H T # # # # U D 6 0 1 V # (C)S # # # # M R B # 2 A # (C)M F M # R 0 (#)B R # # N 0 (#)F # # D I #D E #1 2 3 4 5 6 7 8 9 10 11 12 13 14 15Notes:1. Many of the G-<strong>Series</strong> “backwards compatible” options as shownabove are not included in other G-<strong>Series</strong> literature.2. The characters (C) and (#) in parenthesis, as shown above, indicatemodel number characters that are not usually needed, and areused only for certain options.EOutput type(Note 2)Contact <strong>MTS</strong> Applications Engineering for any model LH options that are notcross referenced in this document.All specifications are subject to change. Please contact <strong>MTS</strong> for specifications that arecritical to your needs. Go to http://www.mtssensors.com/prodspec.htm for the latest listof G-<strong>Series</strong> support documentation.
G-<strong>Series</strong> <strong>Cross</strong> <strong>Reference</strong>A Flange Type (and hydraulic application housing)LH model number example:L H T1 2 3 4 5 6 7 8 9 10 11 12 13 14 15 16 17G-<strong>Series</strong> equivalent model number example:G H T1 2 3 4 5 6 7 8 9 10 11 12 13 14 15LH <strong>Model</strong> <strong>GH</strong> DescriptionT T US cust. threads, raised-faced hexS S US cust. threads, flat-faced hexM M Metric threads, flat-faced hexN Not available Metric threads, raised-faced hexB B Sensor cartridge only (no hydraulic application housing)BConnection TypeLH model number example:L H T R 0 0 51 2 3 4 5 6 7 8 9 10 11 12 13 14 15 16 17G-<strong>Series</strong> equivalent model number example:G H T R 0 51 2 3 4 5 6 7 8 9 10 11 12 13 14 15Reverse-acting outputs, please note: If the G-<strong>Series</strong> sensor is replacing an L-<strong>Series</strong> sensor, where the reverse-acting output, 10 to 0 Vdc, 20 to 4 mA or 20 to0 mA is being used, then the wire connections must be changed at the controller. If an old or new D6 (D60) style extension cable will be used, reference theWiring/Connections section of the G-<strong>Series</strong> User’s Manual for the correct wiring at the controller. Otherwise, please reference the corresponding table and/ornotes for the connection option chosen below.LHD6RBRGMSR0R1 or R2R3<strong>GH</strong> retrofit optionsYour LH has an integral D6 male connector. To retrofit, the <strong>GH</strong> model has the same option available:Select option “D60” for integral 6-pin DIN male connector.Your LH has an integral RB male connector. To retrofit, the <strong>GH</strong> model has 3 options available:1. Select option “D60” for integral 6-pin DIN male connector, AND replace your complete extension cable (sold separately), or replace just theextension cable connector with the field-installed in-line 6-pin DIN female connector, part no. 370423, soldering required, (sold separately). SeeTable A on page 4.2. Select option “D60” for integral 6-pin DIN male connector, AND use the adapter cable part no. 253243-x or 253244-x, (sold separately). SeeTable B on page 4. (For reverse-acting outputs, see Note 2 under Table A.)3. Select option “RB#” for integral cable with in-line RB male connector. Select “RB1” for 1 foot integral cable length, (standard), or “RB2” for 5foot integral cable length. (For reverse-acting outputs, see Note 2 under Table A.)Your LH has an integral RG male connector. To retrofit, the <strong>GH</strong> model has 2 options available:1. Select option “D60” for integral 6-pin DIN male connector, AND replace your complete extension cable (sold separately), or replace just theextension cable connector with the field-installed in-line 6-pin DIN female connector, part no. 560700, soldering required, (sold separately). SeeTable C on page 4.2. Select option “D60” for integral 6-pin DIN male connector, AND use the adapter cable part number 253248-1 (1 foot) or 253248-2 (5 feet),(sold separately). (For reverse-acting outputs, see Note 1 under Table C on page 4).Your LH has an integral 10-pin MS male connector. To retrofit, the <strong>GH</strong> model has 3 options available:1. Select option “D60” for integral 6-pin DIN male connector, AND replace your complete extension cable (sold separately), or replace just theextension cable connector with the field-installed in-line 6-pin DIN female connector part number 560700, soldering required, (sold separately)See Table D on page 5.2. Select option “D60” for integral 6-pin DIN male connector, AND use the adapter cable part no. 253245-x, or 253246-x, (sold separately). SeeTable E on page 5. (For reverse-acting outputs, see Note 2 under Table D on page 5).3. Select option “FM#” for integral cable (polyurethane jacket) with the in-line MS male connector. Select “FM1” for 1 foot integral cable length,(standard) , or “FM2” for 5-foot integral cable length. (For reverse-acting outputs, see Note 2 under Table D on page 5.)Your LH has an integral cable, pigtail termination. To retrofit, the <strong>GH</strong> model has 1 option available:Select option “R##” for integral cable, pigtail termination, encode ## with the desired cable length (01 to 99 ft.) (For reverse-acting outputs,reference the Wiring/Connections section of the G-<strong>Series</strong> User’s Manual for the correct wiring at the controller.).Your LH has an integral cable and an in-line 6-pin MS male connector. To retrofit, the <strong>GH</strong> model has 2 options available:1. See Table F on page 5 or contact <strong>MTS</strong> Applications Engineering to see if you can connect the <strong>GH</strong> model sensor directly to yourcontroller / interface card, and no longer use the Analog Output Module (AOM), or the Digital Interface Box (DIB) that is in your system.2. If the AOM or DIB is still required in your system, select option “D60” for integral 6-pin DIN male connector, AND use the adapter cable part no.253302-1 (for R1) or 253302-2 (for R2), (sold separately).3. If the AOM or DIB is still required in your system, select option “R##” for integral cable with pigtail termination, (encode ## for cable length),AND install an in-line 6-pin MS female connector, part no. 370015, soldering required, (sold separately). See Table G on page 6.Your LH has an integral cable and an in-line 10-pin MS male connector. To retrofit, the <strong>GH</strong> model has 3 options available:1. Select option “D60” for integral 6-pin DIN male connector, AND replace your complete extension cable (sold separately).2. Select option “D60” for integral 6-pin DIN male connector, AND use the adapter cable part no. 253245-3, (1 foot length), or 253246-3, (5 footlength), (sold separately).3. Select option “R##” for integral cable with pigtail termination, (encode ## for cable length) AND install an in-line 10-pin MS male connector,part no. 370160, soldering required, (sold separately). See Table H on page 6.2
G-<strong>Series</strong> <strong>Cross</strong> <strong>Reference</strong>C Integral cable lengthLH model number example:L H T R 0 0 51 2 3 4 5 6 7 8 9 10 11 12 13 14 15 16 17G-<strong>Series</strong> equivalent model number example:G H T R 0 51 2 3 4 5 6 7 8 9 10 11 12 13 14 15LH <strong>Model</strong> <strong>GH</strong> Description01 to 99 ft. 01 to 99 ft. Cable length in feet01 to 30 meters 01 to 30 meters Cable length in metersNote:Encode length in feet if using US customary stroke length, in meters if using metric stroke length.D Stroke lengthLH model number example:L H T R 0 0 5 U 0 1 2 01 2 3 4 5 6 7 8 9 10 11 12 13 14 15 16 17G-<strong>Series</strong> equivalent model number example:G H T 0 1 2 0 U R 0 51 2 3 4 5 6 7 8 9 10 11 12 13 14 15LH <strong>GH</strong> DescriptionU — — — . — — — — . — U Stroke length in inches and tenths, 2 to 300 in. (Encode in 0.1 in. increments)M — — — — — — — — M Stroke length in millimeters, 50 to 7620 mm. (Encode in 5 mm increments)E Input voltageLH model number example:L H T R 0 0 5 U 0 1 2 0 11 2 3 4 5 6 7 8 9 10 11 12 13 14 15 16 17G-<strong>Series</strong> equivalent model number example:G H T 0 1 2 0 U R 0 5 1 21 2 3 4 5 6 7 8 9 10 11 12 13 14 15Notes:1. For LH model sensors with input voltage option “1”, either +15 or +24 volt power supplies could be used. Choose the <strong>GH</strong> sensor option based onthe actual power supply used in the application, (see table below). If you are not certain about the correct option, choose option “2” for the extendedvoltage range.2. For the LH sensor with input voltage option “2”, select the <strong>GH</strong> option “1”.Option LH <strong>GH</strong>1 +13.5 to 26.4 Vdc (For stroke lengths < or = 60 inches) +24 Vdc nominal (20.4 - 28.8), standard2 +24 Vdc (+10%, - 10%) (For stroke lengths > 60 inches) +9.0 to +28.8 VdcF Output typeLH model number example:L H T R 0 0 5 U 0 1 2 0 11 2 3 4 5 6 7 8 9 10 11 12 13 14 15 16 17G-<strong>Series</strong> equivalent model number example:G H T 0 1 2 0 U R 0 5 1 21 2 3 4 5 6 7 8 9 10 11 12 13 14 15LH <strong>GH</strong> DescriptionStart/StopR0 R0(#) Start/Stop output. If the sensor has more than one magnet, the (#) denotes the number of magnets inhexadecimal, (i.e. 2 - F). If the sensor has only one magnet, leave the 15th character in the model number blank.N0 N0(#) Start/Stop output wired for square wave neuter (“+Stop” signal used for compatible neuter output pulse). If thesensor has more than one magnet, the (#) denotes number of magnets in hexadecimal, (i.e. 2 - F). If the sensorhas only one magnet, leave the 15th character in the model number blank.Pulse-Width Modulated (PWM)D — — —a b cD — —a bPWM output. The first character (a) indicates the type of interrogation, (E = external, I = internal), for both LHand the <strong>GH</strong> model. The other characters (b-c) for LH indicate the number of circulations. For the <strong>GH</strong> modelencode this value, (now limited between 1 and 15), for the single character (b) using hexadecimal, (1 to F).Analog Voltage (format below is: “Voltage [value at Null (Setpoint 1)] to [value at Span (Setpoint 2)]”V0 V0 0 to +10 Vdc (If the 10 to 0 Vdc output is being used, select option “V1”. See note for reverse-acting outputsunder section B, “Connection Type”.)A0 A0 4 to 20 mAA1 A1 20 to 4 mA (See note for reverse-acting outputs under section B, “Connection Types”.)A2 A2 0 to 20 mAA3 A3 20 to 0 mA (See note for reverse-acting outputs under section B, “Connection Types”.)C0 or CC suffixNon-standard output. Consult <strong>MTS</strong> Application Engineering. Usually signifies custom analog setpoints.3
G-<strong>Series</strong> <strong>Cross</strong> <strong>Reference</strong>TablesTable AWire color code for RB style extension cable Replace RB connector on extension cable by Installing 6-pin DIN female connector, part no. 370423RB pin no. Wire colors Pin-out for Analog output Pin-out for Digital-Pulse output Pin-out for Neuter output only1 White 6 6 62 Brown No Connection No Connection No Connection3 Gray 2 1 1 (Note 1)4 Pink 1 2 No Connection5 Red 5 5 56 Blue No Connection No Connection No Connection7 Black 3 (Note 2) No Connection No Connection (Note 3)8 Violet 4 (Note 2) No Connection 29 Yellow No Connection 3 3 (Notes 4, 5)10 Green No Connection 4 4 (Notes 4,5)Notes:1. The G-<strong>Series</strong> output signal, “(-) Stop”, is not used when providing the backwards –compatible neuter type connection. However, this signal wire /connector pin is used for “RS-422 TX-“ during serial programming of the sensor. When the sensor output is active, (not in programming mode),this signal must be left unconnected to allow the proper neuter type output.2. If the G-<strong>Series</strong> sensor is replacing a L-<strong>Series</strong> sensor where the reverse-acting output, 10 to 0 Vdc, is being used, then the wire connections must bechanged at the controller. The black wire (RB pin 7) will now be used for “Programming (RS-485+)” by the G-<strong>Series</strong> sensor instead of the 10 to 0Vdc reverse-acting output. Also, the violet wire (RB pin 8) will now be used for “Programming (RS-485-)” by the G-<strong>Series</strong> sensor instead of thereturn connection for the reverse-acting output. The input connections at the controller will now need to use the pink wire (RB pin 4) for the 10 to 0Vdc sensor signal, and the gray wire (RB pin 3) for the output return connection.3. If the black wire (RB pin 7) was originally used as DC ground for the L-<strong>Series</strong> sensor being replaced then the DC ground connection at the controllermust be changed to use the white wire (RB pin 1).4. When connecting to an Analog Output Module (AOM), or to a Digital Interface Box (DIB), or to a custom interface/controller that requires singleendedinterrogation, always connect the unused interrogation lead, “(+) Start” or “(-) Start” to ground at the AOM / DIB / controller.5. For improved noise rejection and stable operation when using external interrogation use the positive and negative interrogation signals, “(+) Start”and “(-) Start”, to provide differential inputs to the sensor.Table BFemale straight exit D6 to male RB connection adapter cables1 ft. cable length, standard, for G-<strong>Series</strong> analog output sensors Part no. 253243-11 ft. cable length, standard, for G-<strong>Series</strong> digital-pulse and neuter output sensors Part no. 253243-25 ft. cable length, for G-<strong>Series</strong> analog output sensors Part no. 253244-15 ft. cable length, for G-<strong>Series</strong> digital-pulse and neuter output sensors Part no. 253244-2Note:For reverse-acting outputs, see Note 2 under Table A.Table CWire color code for RG style extension cable Replace RG connector on extension cable by installing 6-pin DIN female connector, part no. 560700RG pin no. Color Pin-out for Analog outputs and for Digital-pulse outputs1 Gray 12 Pink 23 Yellow 3 (Note 1, 2, 3)4 Green 4 (Note 1, 2, 3)5 Red or Brown 56 White 67 No connection No connectionNotes:1. If the G-<strong>Series</strong> sensor is replacing a L-<strong>Series</strong> sensor where the reverse-acting output, 10 to 0 Vdc, 20 to 4 mA or 20 to 0 mA, is being used, then thewire connections must be changed at the controller. The yellow wire (RG pin 3) will now be used for “Programming (RS-485+)” by the G-<strong>Series</strong>sensor instead of the reverse-acting output. Also, the green wire (RG pin 4) will now be used for “Programming (RS-485-)” by the G-<strong>Series</strong> sensorinstead of the return connection for the reverse-acting output. The input connections at the controller will now need to use the gray wire (RG pin 1)for the 10 to 0 Vdc, 20 to 4 mA or 20 to 0 mA sensor signal, and the pink wire (RG pin 2) for the output return connection.2. When connecting to an interface/controller that requires single-ended interrogation, always connect the unused interrogation lead, “(+) Start” or “(-)Start” to ground at the controller.3. For improved noise rejection and stable operation when using external interrogation use the positive and negative interrogation signals, “(+) Start”and “(-) Start”, to provide differential inputs to the sensor.4
G-<strong>Series</strong> <strong>Cross</strong> <strong>Reference</strong>Tables continuedTable DWire color code for MS style extension cable (10-pin MS connector)Replace 10-pin MS connector on extension cable by installing 6-pin DIN femaleconnector, part no. 560700MS pin no. Color Pin-out for Analog output Pin-out for Digital-Pulse outputA White 6 6B No connection No connection No connectionC Gray 2 1D Pink 1 2E Red 5 5F No connection No connection No connectionG & J (Note 1) Yellow 3 (Note 2) 3 (Notes 3, 4)H & K (Note 1) Green 4 (Note 2) 4 (Notes 3, 4)Notes:1. The MS style extension cable is assembled with the yellow wire connected to pin G only, and the green wire connected to pin H only. However, pinsG & J are connected together, and H & K are connected together via the interconnect board within the L-<strong>Series</strong> sensor model having the MS styleconnection.2. If the G-<strong>Series</strong> sensor is replacing a L-<strong>Series</strong> sensor where the reverse-acting output, 10 to 0 Vdc, 20 to 4 mA or 20 to 0 mA, is being used, then thewire connections must be changed at the controller. The yellow wire (MS pin G) will now be used for “Programming (RS-485+)” by the G-<strong>Series</strong>sensor instead of the reverse-acting output. Also, the green wire (MS pin H) will now be used for “Programming (RS-485-)” by the G-<strong>Series</strong> sensorinstead of the return connection for the reverse-acting output. The input connections at the controller will now need to use the pink wire (MS pin D)for the 10 to 0 Vdc, 20 to 4 mA or 20 to 0 mA sensor signal, and the gray wire (MS pin C) for the output return connection.3. When connecting to an interface/controller that requires single-ended interrogation, always connect the unused interrogation lead, “(+) Start” or “(-)Start” to ground at the controller.4. For improved noise rejection and stable operation when using external interrogation use the positive and negative interrogation signals, “(+) Start”and “(-) Start”, to provide differential inputs to the sensor.Table EFemale straight exit D6 to male MS connection adapter cables1 ft. cable length, standard, for G-<strong>Series</strong> analog output sensors Part no. 253245-11 ft. cable length, standard, for G-<strong>Series</strong> digital-pulse sensors Part no. 253245-25 ft. cable length, for G-<strong>Series</strong> analog output sensors Part no. 253246-15 ft. cable length, for G-<strong>Series</strong> digital-pulse sensors Part no. 253246-2Note:For reverse-acting outputs, see Note 2 under Table D.Table FIf your system has an Analog Output Module (AOM)You can connect the <strong>GH</strong> model sensor directly to your controller/interfacecard (bypassing the AOM) if:1. The AOM output is displacement only (voltage or current).2. There is no velocity output from the AOM.3. There are no dual channel outputs from the AOM.4. There are no external null or scale adjustment potentiometer inputs tothe AOM.If your system has a Digital Interface Box (DIB)You can connect the <strong>GH</strong> model sensor directly to your controller/interfacecard (bypassing the DIB) if:The DIB is configured to use 15 or less recirculations.Contact <strong>MTS</strong> Applications Engineering for the appropriate retrofit <strong>GH</strong> model number,or if you have questions.Contact <strong>MTS</strong> Applications Engineering for the appropriate retrofit <strong>GH</strong> model number,or if you have questions.5
G-<strong>Series</strong> <strong>Cross</strong> <strong>Reference</strong>Tables continuedTable G<strong>GH</strong> <strong>Model</strong>Installing 6-pin MS female connector, part no. 370015, onto <strong>GH</strong> model sensor with integral cableIntegral WireColor CodeOutput for “Square Wave”Neuter (Using “+Stop”)For “R1” connection type:(positive interrogation)For “R2” connection type:(negative interrogation)Gray (-) Stop No Connection (note 1) No Connection (note 1)Pink(+) Stop (Compatible Neuter OutputPulse)CCYellow (+) Start E B (note 2)Green (-) Start B (note 2) ERed or Brown Supply Voltage (+Vdc) F FWhite DC Ground (for supply) B BNotes:1. The G-<strong>Series</strong> output signal, “(-) Stop”, is not used when providing the backwards-compatible neuter type connection. However, this signal wire isrequired for “RS-422 TX –“ during serial programming of the sensor. Pin A of the 370015 connector can not be used for this signal since theAnalog Output Module (AOM), or the Digital Interface Box (DIB), provides +12 to +14.5 volts output on this pin when connected. Upon installing the370015 connector the gray wire must be left disconnected, and the serial programming feature of the sensor is no longer available.2. When connecting to an AOM, or to a DIB, or to a custom interface/controller that requires single-ended interrogation, always connect the unusedinterrogation lead to ground at the AOM/DIB/Controller.Table H<strong>GH</strong> <strong>Model</strong>Installing 10-pin MS male connector, part no. 370160 (for R3 connectiontype only), onto the <strong>GH</strong> model sensor with integral cableIntegral Wire Color Code Digital pulse Output Pin No.Gray(-) Gate for PWM(-) Stop for Start/StopKPink(+) Gate for PWM(+) Stop for Start/StopGYellow(+) Interrogation for PWM (note 1)(+) Start for Start/StopE (See Note below)Green(-) Interrogation for PWM (note 1)(-) Start for Start/StopD (See Note below)Red or Brown Supply Voltage (+Vdc) HWhite DC Ground (for supply) ANote:For improved noise rejection and stable operation when using external interrogation, use the positive and negative interrogation signals, “(+) Start” and “(-)Start”, to provide differential inputs to the sensor.Part Number: 09-05 550956 Revision B<strong>MTS</strong> and Temposonics are registered trademarks of <strong>MTS</strong> Systems Corporation.All other trademarks are the property of their respective owners.All Temposonics sensors are covered by US patent number 5,545,984. Additional patents are pending.Printed in USA. Copyright © 2005 <strong>MTS</strong> Systems Corporation. All Rights Reserved.UNITED STATES<strong>MTS</strong> Systems Corporation<strong>Sensors</strong> Division3001 Sheldon DriveCary, NC 27513Tel: (800) 633-7609Fax: (919) 677-0200(800) 498-4442www.mtssensors.comsensorsinfo@mts.comGERMANY<strong>MTS</strong> Sensor TechnologieGmbH & Co. KGAuf dem Schüffel 9D - 58513 LüdenscheidTel: +49 / 23 51 / 95 87-0Fax: +49 / 23 51 / 56 491info@mtssensor.dewww.mtssensor.deJAPAN<strong>MTS</strong> <strong>Sensors</strong> TechnologyCorporationUshikubo Bldg.737 Aihara-cho, Machida-shiTokyo 194-0211, JapanTel: +81 (42) 775 / 3838Fax: +81 (42) 775 / 5512www.mtssensor.co.jpinfo@mtssensor.co.jp