Memory Positions and Settings per Battery Type - Hyperion HK
Memory Positions and Settings per Battery Type - Hyperion HK
Memory Positions and Settings per Battery Type - Hyperion HK

You also want an ePaper? Increase the reach of your titles
YUMPU automatically turns print PDFs into web optimized ePapers that Google loves.
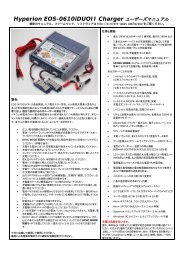
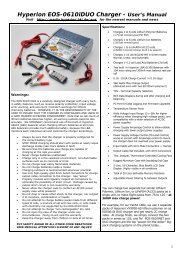
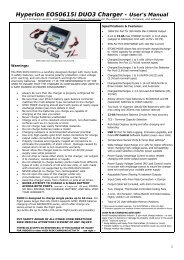
Hy<strong>per</strong>ion EOS0720iNET 3 Charger - User’s ManualFirmware version 3.2. Visit http://media.hy<strong>per</strong>ion.hk/dn/eos for the newest manuals, firmware, <strong>and</strong> softwareSpecifications & Features:12-bit Resolution for max accuracy250W max CHARGE Output0.1A to 20.0A max Charge Current in 0.1A steps(constrained by 250W max with 14.5V+ DC Input)Warnings:USB Cable also included but not picturedThe EOS 0720iNET3 is a carefully-designed charger with manybuilt-in safety features, such as reverse polarity protection,input voltage error warning, <strong>and</strong> cell-count mismatchwarnings for lithium chemistry batteries. HOWEVER, IT ISTHE RESPONSIBILITY OF THE USER TO INSURE THAT THECHARGER IS CONFIGURED AND USED IN A SAFE MANNERAND IN A PROPER ENVIRONMENT.Always be sure that the charger is pro<strong>per</strong>lyconfigured for the correct battery type.Be sure that your lithium battery pack balanceconnector matches the multi-adapter type connectedto the charger.Be sure that the batteries you charge are capable ofcharging at the rate you select.Never charge batteries unattended.Charge only in a fire-resistant environment, nonflammablesurfaces such as on concrete or brick.Do not charge near easily flammable materials.Do not charge batteries inside a model.Charging outdoors is recommended wheneverpractical.Use only high-quality gold 4mm bullet connectors forcharge output cable connection to the charger. See“setup”.Pro<strong>per</strong>ly insulate <strong>and</strong> regularly inspect all connectorsto eliminate the possibility of short circuit. Damagecaused by output short circuit is not covered bywarranty.Never allow the charger case to contact an AC/DCpower supply case while powered.Do not drop or cause other shock to the charger, norsubject it to moisture, condensation or liquids.Do not attempt to charge battery packs made fromdifferent types of cells, a mixture of old <strong>and</strong> newcells, or cells made with chemistry not supported bythe EOS 0720i NET3.NEVER attempt to charge “non-rechargeable” cellsDo not open the case of the charger under anycircumstances. Doing so will void the warranty.Keep the charger away from children <strong>and</strong> pets at alltimes.HIGH RISK CHARGING ADVISORYAvoid charging batteries indoors. If you must charge indoors – or any placeinjury to <strong>per</strong>sons or damage to pro<strong>per</strong>ty could occur in the event of fire –then be sure to:* Keep battery well away from flammables (2 meters or more)* Contain battery in a heavy fireproof container (such as a brick box)* Always monitor the chargeHYPERION ACCEPTS NO RESPONSIBILITY FOR DAMAGEOR INJURY DURING INDOOR, NON-MONITORED or otherHIGH RISK CHARGE ACTIVITY80W/10A max DISCHARGE limits STORE MODE allows fast <strong>and</strong> simple discharge to ~60%capacity for pro<strong>per</strong> storage of Lithium <strong>Battery</strong> types =longer battery life.Charges/Discharges 1 to 7 cells Lithium Polymer BatteriesPer Port (3.7V/cell nominal types)Charges/Discharges 1 to 7 cells Lithium Ion Batteries PerPort (3.6V/cell nominal types)Charges/Discharges 1 to 7 LiFePO4 (A123) cells(LiFePO4 3.3V/cell nominal, A123 3.3v support)Charges/Discharges/Cycles 1-16 cell NiCd/Ni-MH in threemodes: Normal, Linear, <strong>and</strong> AutomaticCharges/Discharges 1~12 cell Lead Acid Batteries (Pb,2V/cell)Allows Lithium-<strong>Type</strong> batteries to 50,000mAh <strong>and</strong> PB(lead/acid) batteries to 100Ah capacityBuilt-in Hy<strong>per</strong>ion LBA10 Balancer with 300mA max balancerate/cell <strong>and</strong> new 12-Bit measurement resolutionTCS - Terminal Capacity SelectionRich Data Displays during <strong>and</strong> after charging <strong>and</strong> balancingUSB PC Port for Data Logging, Firmware upgrades, <strong>and</strong>future Charger Control Software System (Nov1~Dec1 2009)Tem<strong>per</strong>ature Sensor Ports & Temp Stop settings*Wide Voltage Input Range 11v~28v for higher efficiencywhen charging high-voltage packs, <strong>and</strong> compatibility with awider selection of AC/DC power suppliesPower Supply Am<strong>per</strong>age Control to allow reliable chargingwith lower-output power suppliesPower Supply Voltage Control (PS Load Control) works inconcert with Am<strong>per</strong>age control to insure the charger doesnot overload your power supplyInput Cable with 4mm Male Connectors + ClampsOutput Cable Set Included, with 4mm ConnectorsIntegral, Thermostat-Controlled Cooling FansRugged Aluminum Case with Insulating End Caps2-Line, 16-Character, Yellow Backlit LCD Data Display.Highly visible in all conditions20 User-definable <strong>Memory</strong> <strong>Positions</strong>Firmware upgradable via Win PC**. USB Cable included.EOS0720iNET3 is designed to charge single Lithium-basedpacks up to 7S max. For flight packs larger than 7S, Networktwo NET3 in SYNC MODE to balance charge two separate packs,which after charge are series-wired to make the flight pack.(so 2x2S=4S up to 2x7S=14S series flight packs are possible)* Temp sensors available separate: #HP-EOSTMPSEN or EOS1210i-SEN** Firmware upgrades only available if/when improvements are identified in future.PUT SAFETY AHEAD OF ALL OTHER CONSIDERATIONS!SEEK MEDICAL ATTENTION IN EVENT OF ANY INJURY!1
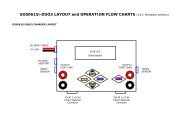
GENERAL SETUP <strong>and</strong> NOTESThe EOS0720iNET3 comes with male 4mm Bullet connectors (aka ‘banana plugs’) attached to the power INPUT cables.These cables are appropriate for attaching directly to most high-quality AC-DC power supply units, such as the BK Precision(USA) model 1692(15V, 40A, 600W). Also included are large Terminal Clips with matching 4mm female bullet connectors, forattaching directly to 12V~24V lead-acid batteries.The Output side 4mm Male Connector + Cable assemblies (#HP-EOSOUTCORD) are also supplied. Carefully solder yourpreferred battery connector to the free ends, with correct Red (+) / Black (-) Polarity. If you make up additional output cables,note that MINIMUM inner cable diameter should be 2.5mm (14ga) <strong>and</strong> MAXIMUM cable length is 20cm (12”).It is critically important that you use either a fully charged 12V~24V lead-acid automobile battery (or better, deep-cyclemarine battery) - or a high quality AC-DC power supply in the range of 12V to 28V DC output, with minimum current rating of10A. When charging high voltage batteries at high current the AC/DC Power Supply (PS) should be 14.5V minimum with ratingof 350W or more, to insure best <strong>per</strong>formance. Note that PS load control features DO allow you to use lower-rated power suppliesreliably, but that total charger output wattage will be limited accordingly. (See details later in this manual).If you have any trouble charging after confirming that input <strong>and</strong> output cables are pro<strong>per</strong>ly connected <strong>and</strong> of the pro<strong>per</strong>materials, be sure to check the charger on an automotive battery. Many problems are associated with poor quality orinadequate switching AC-DC power supplies. Use PS Load control as needed to reduce load on your PS, or upgrade your PS.If, after carefully reading the following pages on usage, you have any difficulty using the charger please refer to thetroubleshooting guide <strong>and</strong> warranty terms at the end of these instructions. It is best to carefully check your charger beforemaking a return, as problems in setup, cabling, or power supply are much more common than defects in the charger. Chargersreturned by the user <strong>and</strong> later found not defective will only be returned to the user at the user’s expense <strong>and</strong> may incur a servicecharge.<strong>Memory</strong> <strong>Positions</strong> for Charging, <strong>and</strong> <strong>Settings</strong> <strong>per</strong> <strong>Battery</strong> <strong>Type</strong>Twenty MEMORY positions allow you to set <strong>and</strong> store parameters for CHARGING your various packs, such as BATTERY TYPE[NiMH, NiCd, LiPo, LiIon, LiFePO4, (A123), Lead-Acid], battery CAPACITY, Charge RATE, Cutoff Voltage, Tem<strong>per</strong>ature, <strong>and</strong> more.BATTERY CHARGING - Let’s try it once to learn it….(Example: LiPo battery with balance connector. Follow the flow charts as you go…)MODE: Before Charging/Discharging is started: Scrolls between MENUS for MEMORY (Charging), USERSETUP, DATA VIEW, BALANCER. MODE also selects SOLO <strong>and</strong> SYNC modesMODE: During Charging/Discharging: Scrolls between VIEW MODES: MEMORY, DATA VIEW, And DATAQUICK VIEW screens.UP/DOWN: Scroll through the settings within Menus, Data Views, <strong>and</strong> Selects values for <strong>Settings</strong>ENTER: Selects any Setting to CHANGE (short push) <strong>and</strong> Charge START / Charge STOP (long push)Attach the charger to an appropriate DC power supply. Connect the Output Cable 4mm bullet connectors to the Red (+) <strong>and</strong>Black (-)output port on right side of the charger. Connect your <strong>Battery</strong> Main Connector to the Mating Connector you havepreviously soldered to the Output Cable set. Connect your Lithium Polymer battery Balance Connector to the EOS BalanceMulti-Adapter. ALWAYS USE THE BALANCER(s) WHEN CHARGING LITHIUM BASED PACKS FOR SAFETY!!(See end of these instructions for more information on balance multi-adapters for various-br<strong>and</strong> lithium packs).Note: Always connect the Output Cable set to charger first, then battery. After charging is finished, always disconnect the<strong>Battery</strong> main wire connectors from Output Cable set first, then disconnect Output Cable set from charger. Shorting of mainleads can damage the charger <strong>and</strong> will not be covered under warranty.After the Welcome screen, the charger will display the most recently used memory position.(see flowchart (2) MEMORY DISPLAY at this time)Pressing ENTER once will make the <strong>Memory</strong> Position start flashing. Flashing values can be changed with UP / DOWN keys.While Mem Position is flashing, Press DOWN to scroll through the ten available memory positions.Press ENTER again to confirm the memory position that you wish to use.From the memory screen, now press DOWN to get to BATT TYPE, press ENTER to start BATT TYPE flashing for selection.Press DOWN until you see your desired <strong>Battery</strong> <strong>Type</strong> (LiPo in this case). Press ENTER to confirm.Press DOWN again to select Pack Voltage which matches your batteryNote: the Charger shows both pack voltage <strong>and</strong> the number of cells in Series (S) on this screen, matching the Voltage <strong>and</strong><strong>Battery</strong> <strong>Type</strong> you have selected. If the “S” <strong>and</strong> the Voltage don’t match your battery, you have the Wrong <strong>Battery</strong> <strong>Type</strong>selected (like confusing LiIon 3.6v with LiPo 3.7v types). Use UP key to reach BATT TYPE again, <strong>and</strong> reset BATT TYPE pro<strong>per</strong>ly.Press DOWN to get to BATT CAPACITY; press ENTER to make the mAh value flash <strong>and</strong> adjust with the UP or DOWN buttonsuntil it matches your battery, by increments of 100mAh (to max of 50,000mAh). Press ENTER to confirm.If your battery is 730mAh, for example, you could set this to 700mAh. The common CHARGE RATE (set in next screen) forlithium is 1C of capacity (equal to 0.7A for a 700mAh setting).Press DOWN to get to CHG CURRENT. Max allowed charge rate for Lithium Polymer (LiPo 3.7v/cell) is 2C default, but selectablein USER SETUP, LIPO MAX C setting (1C~5C). CAUTION! For other cell types, there is no restriction, up to the 20A limit of thecharger, so BE SURE you know what CHG CURRENT setting to use for your battery (see also below text on cell types).Press DOWN to TEMPERATURE CUT-OFF. Requires option part #HP-EOSTMPSEN temp sensor; this is most often used byadvanced users for NiMH charging. The Default setting is 50 degrees Celsius.2
Press DOWN to SAFETY TIMER - Adjustable between 20 <strong>and</strong> 300 minutes. An alarm will sound during charging after selectedtime interval during charging has elapsed. Set the time for about 30% longer than it should take your pack to charge.Keep in mind that a badly balanced pack may take longer than normal to charge, so don’t set this too tight. A Lipo pack at 1Crate might take as much as 120 minutes to charge, so timer of about 160~180 minutes may be appropriate. Note that whileother safety checks based on capacity <strong>and</strong> voltage are also working for you, charging should never be left unattended in anycase.Press DOWN to TCS CAPACITY – For LiPo <strong>and</strong> LiIon battery types Terminal Capacity Selection is available from 50% to 100% ofpack capacity. During the charge, the EOS 0720i NET3 will continually estimate capacity in the pack, <strong>and</strong> either terminate thecharge or sound a signal tone (<strong>and</strong> continue charging) when your selected TCS <strong>per</strong>centage is reached, depending on the valuefor you set for TCS END ACTION. See end of manual for more details on TCS.Press DOWN to TCS END ACTION – Values are CONTINUE <strong>and</strong> STOP. CONTINUE is the default. In this case, when TCS% isreached for settings 50% to 95%, the charger will “beep” 10 times, but continue charging to 100% until stopped. If TCSACTION is set to STOP, the charger will stop charging at that TCS setting <strong>and</strong> - if balancing is complete – then give COMPLETE(END) Buzzer according to you buzzer settings. (or continue till balanced, then give End buzzer).Press DOWN to TVC = YOUR RISK! NEVER change this from default 0mV setting, unless you have CAREFULLY read <strong>and</strong>understood the information on TVC function given on pages 5&6, AND FULLY ACCEPT ANY CONSEQUENCES AND ALL RISKS!Press DOWN to DSCH CURRENT – If you’ll be discharging, you’ll set the discharge current here. Note that depending on the voltage of thepack, the current you set may not be obtainable if the total Volts multiplied by Current (A) exceeds 80W.Press DOWN to DSCH VOLTAGE <strong>per</strong> cell – Lithium types should only be discharged for storage, so we recommend that you use STOREMODE for that. Otherwise, you need to be sure of the V/cell setting yourself, according to your battery type. Over-discharge can damage packs.Pressing DOWN for a last time returns you to the ‘<strong>Memory</strong> Select’ screen.At this point, see flowchart (7) LiIo / LiPo / A123 BATTERY START. Holding the ENTER key pressed down for two secondsor more will start the CHARGE, STORE, or DISCHARGE process (select with UP/DOWN Keys) for LiPo, LiIon, <strong>and</strong> A123 types, nomatter where in the MEMORY (CHARGE) screens you may be. Additionally- if balancer circuits are connected <strong>and</strong> you have twoNET3 chargers networked by data cable – SYNC MODE is available via ENTER (short push) <strong>and</strong> UP/DOWN arrow keys.With “CHARGE START SOLO MODE” selected, hold down ENTER for 2 seconds. Hold down ENTER again, the charger will thenread **BATTERY CHECK** <strong>and</strong> then ask you to confirm the number of cells in your battery pack. Press ENTER (short press) fora final time to start charging. (if balancer is connected, a 10-second countdown occurs, then auto start). If TVC Function is setto anything other than the default 0mV, the TVC setting will show on the screen for a few seconds before charging begins. IFthe TVC setting is NOT as you wish (default STRONGLY SUGGESTED), STOP <strong>and</strong> reset TVC, then begin charge again!(see pages 5&6 for full details on TVC function)Note: If the Lithium-based pack is NOT connected to the balancer port, the Charger will read NO BALANCER. We stronglyrecommend using the balancer at ALL times.Holding down ENTER (2 seconds) at any time while charging a battery will then STOP charging (or discharging, etc…).MODE SELECTIONSBefore Charging/Discharging/Store are in progress, Pressing the MODE button will scroll you through the MEMORY, DATA VIEW,BALANCER <strong>and</strong> USER SETUP screens, allowing you to change parameters as you like (see charts for each)During Charging/Discharging/Store , Pressing the MODE button will scroll you through the MEMORY, BALANCER <strong>and</strong> QUICKVIEW Data screens. (see chart (9) OPERATION <strong>and</strong> FINISH DISPLAY)* MEMORY – Short-press UP/DOWN buttons to scroll through the data presented. At the top memory screen (showing C: A),you can press ENTER <strong>and</strong> UP/DOWN to change charge current if desired. You can also LONG-press (2-seconds) UP button tosee each screen presented in turn at two-second intervals.* BALANCER – UP/DOWN buttons to see detailed information on cell balancing, <strong>and</strong> individual cell voltages* QUICK VIEW – Shows the following useful info on a single screen:CAPACITY mAh/Ah (Charged in “C” or Discharged out “D”)INPUT VOLTAGE (Vi)PACK VOLTAGE (V)CHARGE CURRENT (A)CAPACITY (%) of the pack at current time.---- DATA VIEWPress the MODE button until you reach the DATA VIEW screen. (see chart (3) Data View Display)Use the UP or DOWN key to scroll through the various information presented:*INPUT – Current input voltage from the power supply*OUTPUT – The output voltage of charger while charging, or pack voltage of the battery while connected but not charging*BAT. RES – The internal resistance (IR) of the battery pack in mΩ.(IR value appears some seconds after charge is started, <strong>and</strong> will become more accurate as charge progresses)*TEMP <strong>and</strong> PEAK TEMP – Current Temp, <strong>and</strong> Peak Temp recorded during the charge (requires optional temp sensor)*CHARGE TIME, CHARGE CURRENT*PEAK CHARGE VOLTAGE(see chart #3 for other information screens available under Data View)3
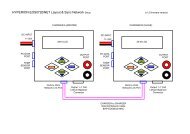
---- BALANCER MODE (Lithium types only)Try it out with a LITHIUM battery pack which has the pro<strong>per</strong> Balance Connector attached. Attach the charger to an appropriateDC power supply, <strong>and</strong> connect your battery pack’s main <strong>and</strong> balance connectors to charger as previously described.Press the MODE button until you reach the BALANCER Mode screen.*Press DOWN once to reach the SELECT VOLTAGE screen. This screen simply shows you a very accurate voltage for each cell inthe pack, in turn. You will see [1CL] at up<strong>per</strong> right, <strong>and</strong> a voltage displayed below, to three decimal places; for example: 3.982.*Press ENTER to make the [1CL] flash, <strong>and</strong> UP to see the voltage for the second cell, third cell, etc…*When you have seen the voltage for the last cell in the pack, press DOWN to reach the next screen:AVG. V shows the average voltage <strong>per</strong> cell, across the whole pack.V. GAP shows the difference between the highest <strong>and</strong> lowest volt cells in the pack*Press the DOWN button to reach the next screen, showing voltage for every cell in the pack to two decimal places (e.g. 3.98).Press ENTER for two seconds. You will see BALANCE START / SOLO MODE - SYNC MODE--- If you are using a single charger only. Use UP or DOWN to select SOLO MODE. Hold down the ENTER button, thecharger will check the battery, <strong>and</strong> then ask you to confirm the number of cells in the pack. If correct, press ENTER once to startbalance charging.--- If you are using two NET3 chargers, <strong>and</strong> want to balance two packs (of same type <strong>and</strong> capacity,) as a single unit – suchas 4S VX4000 <strong>and</strong> 5S VX4000 to make a 9S series-connected flight pack –hold down the ENTER <strong>and</strong> DOWN key to change fromSOLO MODE to SYNC MODE. Hold down the ENTER to start BATTERY CHECK. The number of cells in each pack will be shownone above the other. If both are correct, press ENTER to begin balancing.After Balancing has begun, you may return (using UP or DOWN keys) to the screen which shows all cell voltages together. Cellswhich are higher in voltage will show the decimal point alternating to a larger square shape, indicating that these cells are beingdischarged, while the lower voltage cells are not. Hold down the ENTER to stop balancing at any time.NOTE!! SYNC MODE Charging (selected in similar way to SYNC BALANCING above) is intended to be used only with two packs ofthe same br<strong>and</strong>, capacity, type, <strong>and</strong> lifecycle history! For example, two packs of CX5000 4S lithium polymer purchased at thesame time <strong>and</strong> used together as a 8S flight pack in series when flying a particular model. At the start of SYNC MODE charging,both packs should be at roughly the same discharge state. Otherwise, you should SOLO MODE charge each pack separately, <strong>and</strong>when both are done use SYNC MODE balancing before connecting in series for flight.---- USER SETUP (these settings are “sticky” until you change them again)Press the MODE button until you reach the USER SETUP - TEMP MODE screen.* Press ENTER <strong>and</strong> use UP or DOWN keys to select tem<strong>per</strong>ature display in degrees Fahrenheit or CelsiusPress DOWN to scroll through the following screens, <strong>and</strong> ENTER then UP or DOWN to change settings on each screen:* BUTTON SOUND screen - ON or OFF* FINISH SOUND TIME screen - OFF, ON (continuous), 1 Minute, 15 Seconds, 5 Seconds* FINISH SOUND MELODY screen – Choices 1 to 10 (Will also play each Melody)* LIPO MAX C screen – Choices of 1C to 5C in 1C steps, 2C Default. Allows limiting max LiPo charge C-rate as you desire.* POWER SUPPLY VOLTAGE screen – Set to limit max WATTS INPUT (typically for variable voltage PS units only)* POWER SUPPLY CURRENT screen – Set at the rated CURRENT (A) of your power source [set to 40A if car battery]Power Supply Voltage <strong>and</strong> Current together comprise PS Load Control. The EOS0720iNET3 is an extremely powerful charger,<strong>and</strong> can – particularly when charging high-voltage packs at high rate settings - pull more am<strong>per</strong>age than many power suppliescan deliver. To avoid stressing your PS <strong>and</strong> having charges terminated prematurely, you can tell the charger the rating of yoursupply, to limit the load on the supply. If you find the PS is still overloaded, reduce the setting for POWER SUPPLY CURRENT untilthe problem goes away (or buy a stronger Power Supply unit!).* You have a fixed Voltage AC/DC PS with 20A rating: Set PS CURRENT to 20A (or less).* You have an AC/DC PS with variable voltage from 12V-18V, <strong>and</strong> 300W limit: Set your PS to 18V, set PS VOLTAGE to 18, setPS CURRENT to 300W/18= ~16A (or less).BATTERY CHARGING - EXTENDED DETAILConsult the documentation or labels provided with your battery to determine the correct capacity setting. It is very important toget this right, as the charger uses the capacity setting to determine nominal charge rate (am<strong>per</strong>age), TCS <strong>per</strong>centage, <strong>and</strong>safety termination. Incorrect settings could damage the battery, <strong>and</strong> could even cause an accident.----- For Lithium types CAPACITY is selected in mAh. Selection is in increments of 100mAh. CURRENT is set in Am<strong>per</strong>e (atCHG CURRENT screen), so divide mAh by 1000 to get Am<strong>per</strong>age. For 700mAh, current is 0.7A for 1C, up to 1.4A for 2C etc. For1800mAh, 1.8A for 1C, <strong>and</strong> 3.6A for 2C <strong>and</strong> so on. See more info on Page 5.----- Lithium Polymer (3.7v) vs. Lithium Ion (3.6v) Please make absolutely sure that you pro<strong>per</strong>ly identify the type oflithium battery you are charging, the capacity in mAh, <strong>and</strong> the number of cells wired in series <strong>and</strong> the pack voltage! Lithium Ion(3.6v nominal) should never exceed 1C charge rate. Never charge Li Ion 3.6V types by LIPO 3.7V charger mode!----- A123 / LiFePO4 Cells: The A123/LiFePO4 charge/discharge modes are intended for cells with 3.3V nominal produced byA123 Company, Hy<strong>per</strong>ion, or other-br<strong>and</strong> LiFePO4 cells which are recognized to be of good quality from well-known makers. InMEMORY MODE, choose A123 for BATT TYPE, for charging such cells. The A123 charge mode MAY work with “no-name br<strong>and</strong>”LiFePO4 cells having 3.3V nominal voltage, but Hy<strong>per</strong>ion has found some “knock off” cells in the market of very questionablequality. Customers who use A123 mode (LiFePO4 mode) to charge such off-br<strong>and</strong> cells assume all risk.4
LiFePO4 (a123) CHG CURRENT (A) setting: The EOS 0615iDUO3 does NOT limit max charge rate for LiFePO4 based oncapacity. It is our position that ~4C rate is the target MAX for Hy<strong>per</strong>ion or A123 LiFe, as of this writing. Consult battery makerdocumentation for other LiFePO4 types.NiCd <strong>and</strong> NiMH: Set BATT TYPE from MEMORY MODE screen as we did before in the LiPo example. Consult the batterymanufacturer’s documentation to determine the pro<strong>per</strong> settings for VOLTAGE, CAPACITY, <strong>and</strong> CHG CURRENT.In addition to the charge settings we have already seen in LiPo Mode, three additional settings exist for NiCd <strong>and</strong> NiMH batterytypes. These are essentially “ex<strong>per</strong>t” settings, <strong>and</strong> should be left at defaults unless you know why you want to change them:PEAK SENS (peak sensitivity – delta V) – default for NiCd is 7mV/C <strong>and</strong> NiMH is 5mV/CTRICKLE – sets a low current at which the charger will continue to charge the pack AFTER normal charge is endedPEAK DELAY – Short interval after peak is detected during which the charger will continue to charge before terminatingSTARTING CHARGE / SELECTING CHARGE TYPE: After setting MEMORY MODE charge parameters, holding down ENTERtakes you to a Sub-Menu with three options for NiCd/NiMH charge type. Press ENTER once to start the current setting flashing,<strong>and</strong> use DOWN key to scroll through the three choices. Hold down the START button after your selection to start charging.AUTOMATIC – Essentially ignores your setting for CURRENT, but charges at rate determined by the internal resistance of thebattery pack. Especially useful when you don’t know what settings you should make due to lack of documentation.LINEAR – Charges at whatever rate you have selected from start to finish (if the charger detects no problem with settings).NORMAL – Charges according to your RATE setting but uses an intelligent algorithm to alter current as needed during charge.Lead Acid Batteries: Set Pb for BATT TYPE, correct voltage at the BATT VOLTS screen <strong>and</strong> the Ah at the BATT CAPACITYscreen, <strong>and</strong> am<strong>per</strong>age at the CHG CURRENT screen. Consult the battery manufacturer’s documentation to determine thesesettings.TCS Feature (Terminal Capacity Selection % for Lithium battery types)TCS has two settings: TCS CAPACITY %, <strong>and</strong> TCS END ACTION.* The TCS CAPACITY Setting is selected from the MEMORY screen by pressing UP button four times (or DOWN seven times).TCS Capacity can be set from 50% to 100% in 5% increments (default is 100%, a full charge). The charger uses your settingfor <strong>Battery</strong> Capacity in addition to sophisticated measurements <strong>and</strong> calculations to make a close estimate for the currentlycharged capacity in the pack during charging.* TCS END ACTION can be set to CONTINUE (default) <strong>and</strong> STOP. If CONTINUE, when TCS% is reached for settings 50% to95%, the charger will “beep” 10 times, but continue charging to 100% until stopped. If TCS ACTION is set to STOP, the chargerwill stop charging at that TCS setting <strong>and</strong> - if balancing is complete – then give COMPLETE (END) Buzzer according to yourbuzzer settings. (or continue till balanced, then give End buzzer)There are three good reasons why you might want to charge a Lithium <strong>Battery</strong> to something less than full capacity:* The first is for long-term storage. Lithium batteries are best stored after charging to 55%~65% of nominal capacity. However,rather than using TCS for this goal, it is easier <strong>and</strong> better to always use the STORE MODE function. STORE MODE automaticallycharges or discharges as needed to reach 60% TCS, then stops.* The second aim is to get more flight time in during a typical day at the field, by stopping the charge when the battery is 90%to 95% full, for example. Due to the CC/CV method by which LiPo are charged, charging the last few mAh back into the packtakes a LOT more time than the first few mAh did… So if you want to get in the air ASAP, <strong>and</strong> don’t mind a shorter flight then setTCS at 90%~95% could save you a good bit of charge time. In this case we suggest END ACTION setting of CONTINUE, thatway the charger will sound 10 beeps when TCS is reached, so you can stop charging <strong>and</strong> fly. If you don’t catch the warning, thecharger will continue to charge to full capacity, as a safety measure in case you have forgotten that TCS is set below 100%.* The third possibility is that evidence suggests that charging to 90%~95% can increase battery cycle life, compared to 100%charges. So in this case set TCS ACTION to STOP.TVC Function (Terminal Voltage Control <strong>per</strong> each memory slot, LIPO <strong>and</strong> LIFE/A123)The TVC function allows adjustment of final CHARGE voltage for LIPO <strong>and</strong> LIFE battery types for each memory position:+0mV(default, therefore no change. Lipo=4.200V terminal, LIFE(A123)=3.600V terminal)+5mV to +80mV (5mV steps, so LIPO for example terminates at 4.205V~4.280V)-5mV to -20mV (5mV steps, so LIPO for example terminates at 4.195V~4.180V)Uses for TVC FUNCTION:-5mV to -20mV: Reducing Terminal Voltage should only be done in case MEASURED cell voltage at your battery pack (withquality digital voltmeter) shows Terminal voltage exceeding 4.2V for Lipo (or default 3.6V for LIFE/A123 types). This essentiallyacts as a calibration function, <strong>and</strong> should normally be unneeded when using EOS st<strong>and</strong>ard, supplied output leads <strong>and</strong> balanceharnesses. However, if you have made your own longer harnesses, the additional length in leads creates the possibility of extrainduced resistance, <strong>and</strong> therefore a reading at the charger lower than is actually found at the battery. This could cause an overvoltagecharge. If you find terminal voltage over 4.2V/cell for any LIPO cell, reduce TVC setting on each memory position untilyour MEASURED max cell voltage (at battery) is at 4.2V or lower if LIPO, or 3.6V or lower if LIFE.+5mV to +80mV: Ability to set terminal voltage above defaults is only at the request of competition car, boat, <strong>and</strong> aircraftusers, <strong>and</strong> only if the race sanctioning body allows terminal voltage for Lipo above 4.2V, or LIFE(A123) above 3.6V.No LIPO battery maker or seller recommends or allows Terminal Voltage to be set higher than 4.200V, to our knowledge.Hy<strong>per</strong>ion does not recommend or allow G3 Lipo to be Terminal Voltage to be set higher than 4.200V. Therefore any + settingabove 0mV VOIDS your WARRANTY for your LIPO battery pack. Whenever ALL cells in a pack exhibit puffing, over-voltagecharging is indicated <strong>and</strong> warranty will not be honored.5
WARNING! By setting the TVC to any POSITIVE SETTING above 0mV, you ACCEPT ALL RESPONSIBILITY for Damage to yourbattery, Fire, Injury, <strong>and</strong> any other Loss which may result. If you do not agree to accept all risk, DO NOT OPERATE YOURCHARGER UNLESS ALL MEMORY POSITIONS ARE SET TO DEFAULT 0mV TVC position! Furthermore, it is yourresponsibility to insure that no other <strong>per</strong>son uses your charger if TVC is set to greater than +0mV, <strong>and</strong> to reset ALL memorypositions to TVC 0mV default before selling your charger or giving it to others.Positive settings (+5mV or higher) may be desired by racers looking for competitive advantage, <strong>and</strong> therefore +TVC has beendem<strong>and</strong>ed as a feature by racers. However, it is the official position of Hy<strong>per</strong>ion that Competition Sanctioning Bodies areirresponsible in allowing over-voltage changing via their rulebooks, <strong>and</strong> therefore that both users <strong>and</strong> their sanctioning bodiesare FULLY responsible for any Loss, Damage, or Injury that may occur due to over-voltage charging of batteries. Let’s say itagain: If you want to use Positive TVC settings, go ahead. But ONLY if you <strong>per</strong>sonally deem it desirable, AND you are takingFULL RESPONSIBILITY for any <strong>and</strong> all results which may arise. We encourage you to petition your sanctioning body to STOPallowing LIPO terminal voltages in excess of 4.200V, which are both potentially unsafe <strong>and</strong> without significant benefit, we believe.Note: After confirming CELL COUNT <strong>and</strong> START for LIPO/LIFE charging, if TVC setting is not default, TVC setting will be shownfor a few seconds before the charger begins the charge. Be sure to note the displayed TVC setting at this time, <strong>and</strong> STOP thecharge to reset TVC to default whenever so desired. TVC settings <strong>per</strong> memory slot are retained when charger is turned off.Lithium CareTo maximize your investment in Lithium <strong>Battery</strong> packs, do the following:* ALWAYS Store your packs at ~60% capacity. After a day of flying, use STORE Mode to achieve this. It is especially harmfulto store lithium packs fully charged, <strong>and</strong> should be avoided for more that a day or two at most.* AVOID discharging cells beyond 90% of capacity (80% is even better). NEVER fully discharge lithium packs.* STORE your packs in a cool, relatively dry location.Charging Lithium Polymer in Excess of 1C Rate (3.7v Nominal LiPo types)LIPO MAX C – Under USER SETUP menu you will find a setting to allow setting of Maximum “C” charge rate for LithiumPolymer (3.7v/cell type) batteries, with options of 1C to 5C (2C is Default). Note that MAX C attainable will depend on theAmps Max <strong>and</strong> Watt Max rating of your charger, <strong>and</strong> pack capacity.NOTE: It is entirely YOUR responsibility to determine the SAFE Max C for your LiPo pack.HYPERION original LCL, LCX, LVX, LVZ types 2C max charge rate.HYPERION GENERATION 3 25C/35C packs, 5C max charge rateHYPERION GENERATION3 5C Rx packs, 4C max charge rate (20C Rx packs, 5C max charge)HYPERION SWIFT G3 CAR PACKS - 5C max charge rate(ALL Swift Car packs ever produced support 5C rate, regardless of 2C charge cautions appearing on first-production packaging)If using other than Hy<strong>per</strong>ion lithium packs, consult your battery’s documentation for allowed C rates, before exceeding 1C chargerate. If you don’t know the allowed max CHARGE rate for your pack, never exceed 1C rates.0720iNET3 FAQ* The discharge function is supposed to be 10A Max, but when I discharged my pack I got less. Why?Both charge <strong>and</strong> discharge functions are limited by both watts <strong>and</strong> am<strong>per</strong>age; whichever comes first.Charge: 250W <strong>and</strong> 20A maxes (500W when 2xNET3 are in SYNC mode)Discharge: 80W <strong>and</strong> 10A (160W when 2xNET3 are in SYNC mode)- For example, if you are discharging a pack which starts at 10V, the initial max current(A) would be: 80W/10V=8A(note that as the battery voltage drops during discharge, current may rise)- Or if charging a pack which starts at 10V, then current calculation would be: 250W/10V=25A, BUT current is limited to20A, so the absolute max you could get will be 20A, since the current limit is reached before wattage limit…(Lithium batteries use CC/CV charge curves, so current will fall as the battery becomes more charged.)* Why does the charger not give the END buzzer (or FLAT CHECK error), even though the pack has been attached for along time? (I have checked <strong>and</strong> buzzer is set ON)- LIPO/LiFePO4: Most likely, you have set a charge rate lower than 1C, <strong>and</strong> the charger cannot terminate CC/CV as requiredcurrent at that point is too low. Assuming your battery is of decent quality <strong>and</strong> condition (if not, do NOT charge it!) there is NOreason to charge at rates below 1C. Charge again at 1C <strong>and</strong> observe results. Note also that END buzzer will NOT sound until thecharger achieves target cell balance. For badly out-of-balance packs or large capacity packs, this could take up to an hour.- NiCd/NiMH: Same answer as Lipo/LifePO4 above (for a different reason). Try charging at a higher rate. We have found thatmany NiMH packs on the market today are poorly made, <strong>and</strong> do not signal delta-v (indicating end charge) pro<strong>per</strong>ly whencharged at low rates, <strong>and</strong> sometimes even at higher rates. Try setting delta-v in your charger menu to a lower value. Trycharging at a higher rate (check battery for over-temp!). If nothing works, get a pack of cells from a known quality br<strong>and</strong> (Sanyo,GP, etc) <strong>and</strong> test your charger.* Why do I see “0” current flowing during charge at regular intervals? Is it a “Pulse” charger?No, the 0720i simply pauses charging at intervals in order to make extremely accurate readings of cell/pack condition.6
Troubleshooting(1) Ensure that the battery you are trying to charge <strong>and</strong> the settings on the EOS 0720i NET3 match. <strong>Battery</strong> type (such as NiMHor LiPo), battery capacity, number of cells (charge voltage), <strong>and</strong> charge rate must all be correct.(2) Check that the input cable <strong>and</strong> output cables:*Have pro<strong>per</strong> connectors <strong>and</strong> are in good condition*Are the pro<strong>per</strong> gauge (output 2.5mm, 14ga)*Are not frayed, worn, cut, or damaged*Are pro<strong>per</strong> length