
Create successful ePaper yourself
Turn your PDF publications into a flip-book with our unique Google optimized e-Paper software.
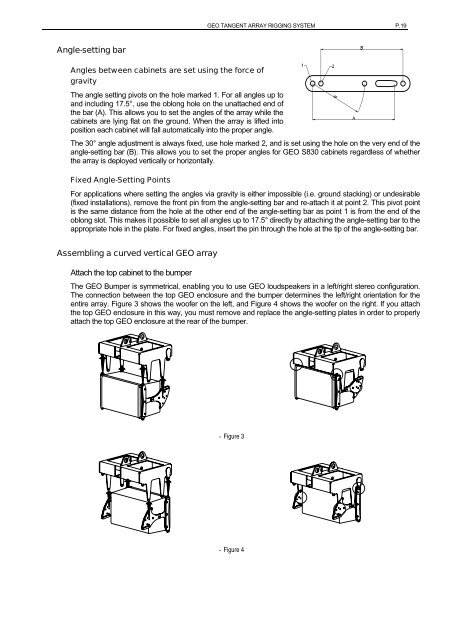
<strong>GEO</strong> TANGENT ARRAY RIGGING SYSTEM P.19Angle-setting barAngles between cabinets are set using the force ofgravityThe angle setting pivots on the hole marked 1. For all angles up toand including 17.5°, use the oblong hole on the unattached end ofthe bar (A). This allows you to set the angles of the array while thecabinets are lying flat on the ground. When the array is lifted intoposition each cabinet will fall automatically into the proper angle.The 30° angle adjustment is always fixed, use hole marked 2, and is set using the hole on the very end of theangle-setting bar (B). This allows you to set the proper angles for <strong>GEO</strong> S830 cabinets regardless of whetherthe array is deployed vertically or horizontally.Fixed Angle-Setting PointsFor applications where setting the angles via gravity is either impossible (i.e. ground stacking) or undesirable(fixed installations), remove the front pin from the angle-setting bar and re-attach it at point 2. This pivot pointis the same distance from the hole at the other end of the angle-setting bar as point 1 is from the end of theoblong slot. This makes it possible to set all angles up to 17.5° directly by attaching the angle-setting bar to theappropriate hole in the plate. For fixed angles, insert the pin through the hole at the tip of the angle-setting bar.Assembling a curved vertical <strong>GEO</strong> arrayAttach the top cabinet to the bumperThe <strong>GEO</strong> Bumper is symmetrical, enabling you to use <strong>GEO</strong> loudspeakers in a left/right stereo configuration.The connection between the top <strong>GEO</strong> enclosure and the bumper determines the left/right orientation for theentire array. Figure 3 shows the woofer on the left, and Figure 4 shows the woofer on the right. If you attachthe top <strong>GEO</strong> enclosure in this way, you must remove and replace the angle-setting plates in order to properlyattach the top <strong>GEO</strong> enclosure at the rear of the bumper.- Figure 3- Figure 4