


You also want an ePaper? Increase the reach of your titles
YUMPU automatically turns print PDFs into web optimized ePapers that Google loves.
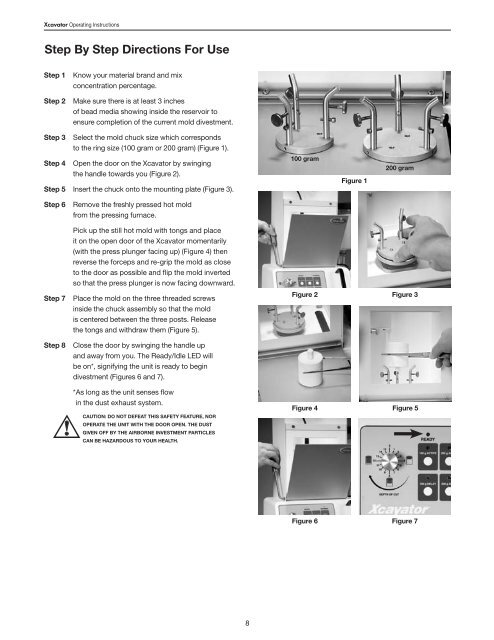
<strong>Xcavator</strong> Operating <strong>Instruction</strong>sStep By Step Directions For UseStep 1Step 2Know your material brand and mixconcentration percentage.Make sure there is at least 3 inchesof bead media showing inside the reservoir toensure completion of the current mold divestment.Step 3Step 4Select the mold chuck size which correspondsto the ring size (100 gram or 200 gram) (Figure 1).Open the door on the <strong>Xcavator</strong> by swingingthe handle towards you (Figure 2).Step 5 Insert the chuck onto the mounting plate (Figure 3).100 gramFigure 1200 gramStep 6Remove the freshly pressed hot moldfrom the pressing furnace.Pick up the still hot mold with tongs and placeit on the open door of the <strong>Xcavator</strong> momentarily(with the press plunger facing up) (Figure 4) thenreverse the forceps and re‐grip the mold as closeto the door as possible and flip the mold invertedso that the press plunger is now facing downward.Step 7Place the mold on the three threaded screwsinside the chuck assembly so that the moldis centered between the three posts. Releasethe tongs and withdraw them (Figure 5).Figure 2Figure 3Step 8Close the door by swinging the handle upand away from you. The Ready/Idle LED willbe on*, signifying the unit is ready to begindivestment (Figures 6 and 7).* As long as the unit senses flowin the dust exhaust system.CAUTION: Do not defeat this safety feature, norOPERATE the unit with the door open. The dustgiven off by the airborne investment particlescan be hazardous to your health.Figure 4Figure 5Figure 6Figure 78


