general ledger - Emory Finance
general ledger - Emory Finance
general ledger - Emory Finance

Create successful ePaper yourself
Turn your PDF publications into a flip-book with our unique Google optimized e-Paper software.
GENERAL LEDGERThe General Ledger chapter of this guide contains the following sections:Types of Journal Entries Processed in CompassOnline Journal EntriesGeneral Ledger: 01/19/10<strong>Emory</strong> Confidential and Proprietary Information
Types of Journal Entries Processed in CompassThis topic provides a basic overview of the types of journal entries that can be processed in CompassFinancials. For complete instructions on processing online journal entries, refer to Entering an OnlineJournal Entry.The chart below lists each type of journal entry. These entries represent an “actual” transfer, not abudget transfer, meaning that an actual transaction or dollars are being transferred from oneChartField set (SmartKey) and account to another ChartField set (SmartKey) and account.Expense andRevenueTransfersFundsTransfersWhen to process:When an original transaction has posted to the <strong>general</strong> <strong>ledger</strong>, and now thattransaction needs to be transferred to a different ChartField set (SmartKey).Examples:Hightower reimbursements, Woodruff Research/Travel reimbursements,transactions charged to a SmartKey in error.Support Documentation Required:Transaction detail showing the original transaction posted to the <strong>general</strong> <strong>ledger</strong>.You can attach a print screen of an Inquiry screen or a transaction screen.Note:Personnel costs cannot be transferred in this way. They must be transferred viaretroactive salary transfers.Accounts to Debit and Credit:Expense TransferRevenue TransferWhen to process:Account to Debit (+)Enter the amount as a positivenumber5xxxxx6xxxxx7xxxxx8xxxxxDebit to Increase Expense4xxxxxDebit to Decrease RevenueAccount to Credit (-)Enter the amount as a negativenumber5xxxxx6xxxxx7xxxxx8xxxxxCredit to Decrease Expense4xxxxxCredit to Increase RevenueWhen “funds” need to be transferred from one ChartField set (SmartKey) toanother ChartField set (SmartKey). Funds transfers are not required to bespecifically connected to an original transaction; it is essentially the movement ofcash from one project or department to another.Examples:Co-sponsorships between operating units, Commitments for faculty research,General Ledger: 01/19/10<strong>Emory</strong> Confidential and Proprietary Information
startup packages.Support Documentation Required:A letter, memo, or email explaining the commitment. If such documentationdoesn’t exist, then provide a detailed description on the journal entry header.Accounts to Debit and Credit:Account to Debit (+)Enter the amount as a positivenumberFunds Transfer 91100Debit to Transfer Funds OutAccount to Credit (-)Enter the amount as a negativenumber91120Credit to Transfer Funds InRechargeTransfersWhen to process:When a service center or department provides goods/services to otherdepartments. The service center or department initially incurs the costs forgoods/services, then “recharges” the costs out to the other departments.Examples:FM work order charges.Support Documentation Required:A billing statement outlining the costs for a specific period of time.Note:Recharge transfers are initiated by the service center. For additionaldocumentation regarding a recharge transfer, contact the service center directly.Accounts to Debit and Credit:Recharge TransferAccount to Debit (+)Enter the amount as a positivenumber85xxxDebit to Recharge customerAccount to Credit (-)Enter the amount as a negativenumber85xxxCredit to Recharge cost centerGeneral Ledger: 01/19/10<strong>Emory</strong> Confidential and Proprietary Information
Online Journal EntriesThe Online Journal Entries section of the General Ledger chapter contains the following topics:Online Journal Entry process flowEntering an Online Journal EntryPrinting a Journal with a BarcodeLocating a Specific Journal EntryCopying a Journal EntryDeleting Journal Entries Prior to PostingGeneral Ledger: 01/19/10<strong>Emory</strong> Confidential and Proprietary Information
Online Journal Entries: Process FlowGeneral Ledger: 01/19/10<strong>Emory</strong> Confidential and Proprietary Information
Entering an Online Journal EntryEntering an Online Journal EntryWhether you have a simple adjustment to enter or need a journal that involves transferring items between funds,the Compass General Ledger journal entry pages allow you to enter your transaction quickly and easily withoutcompromising control or accuracy.To enter an online journal entry into Compass and submit the transaction into Workflow, follow the instructionsgiven below.Step 1: Navigate to theJournal Entries ComponentStep 2: Add a New JournalEntry• From the Compass home page, use the following path to navigate to theJournal Entries component:General Ledger > Journals > Journal Entry > Create/Update JournalEntriesThe Add a New Value tab displays.Step 3: Complete the fieldson the Header page• Enter your Business Unit. Note: Your Business Unit defaults if it has beenadded to your User Preferences. For instructions on changing the default,refer to Defining User Preferences.• The Journal ID defaults to Next.• The Journal Date field defaults to the current date. Accept the default. Note:In certain situations, Central <strong>Finance</strong> users may need to change the date.• Click the Add button.The Header page displays.General Ledger: 01/19/10<strong>Emory</strong> Confidential and Proprietary Information
Entering an Online Journal EntryStep 4: Enter the JournalEntry LinesThe Header page displays basic information that uniquely identifies thejournal, such as the business unit, journal ID, description, <strong>ledger</strong>, and datesfor posting. It also contains options for setting, adjusting, and reversingentries.Tip: To avoid some of the horizontal scrolling when working with journals,click the Collapse Menu button. You can also customize the page to hidecertain journal line detail columns not <strong>general</strong>ly changed, For instructions,refer to Customizing Compass pages.• Enter a detailed description about the purpose for the journal entry in theLong Description field.• Enter Actuals in the Ledger Group field.• Enter ONL (Online Journal Entry) in the Source field.• Click the Lines tab.The Lines page displays.Use the Lines page to record transactions that comprise a journal. A singlejournal entry must be at least two lines in length because the total debitsmust equal total credits for a single journal entry.• Type the correct information into the SmartKey field and press the Enterkey. This action will automatically populate the applicable fields. Note: Youcan also use the Look up button to verify and select the SmartKey.Tip: If you type the SmartKey in the field and click in a different field, thedefault information will not automatically populate in the applicable fields.Press Enter to populate all applicable fields.• Enter the Account for the first line of the journal entry. The account numbersyou enter here classify the nature of the transaction.• To transfer funds from one SmartKey to another, the Account numbermust be in the 9xxxx range on both sides.• To transfer an expense, use the same account on both sides that wasused in the original charge.• To enter a recharge, the Account must be in the 8xxxx range on bothsides.General Account Categories1xxxxAssetsGeneral Ledger: 01/19/10<strong>Emory</strong> Confidential and Proprietary Information
Entering an Online Journal Entry2xxxx3xxxx4xxxx5xxxx to 8xxxx9xxxxLiabilitiesFund BalancesRevenueExpenses (recharges are in the 8xxxxrange and should net to zero)Transfers (must net to zero)Step 5: Initiate the EditProcess• Enter the Amount for the first line of the journal entry.• To increase or charge expenses, enter a positive amount.• To decrease or credit expenses, enter a negative amount.• Enter a good, but short, description for the line in the Journal LineDescription field on the far right side of the page.• Click the plus button to add a second line to the journal entry. Enter theSmartKey, Account, Amount, and Journal Line Description for thisjournal entry line.• Enter additional journal entry lines as needed to balance the journal entry.Note: Prior to saving the journal entry, the Total Debits or Total Creditsfield may display the total of both debits and credits entered for the journalentry. Once the data is saved, the amounts will display correctly in the TotalDebits and Total Credits fields.• Click the Save button.The Journal is Saved dialog box displays.• Click the OK button.• Click the Lines tab.• At the top of the page in the Process box, select Edit Journal and click theProcess button.When you initiate the edit process, the system runs several checks andwarns you if the journal cannot be posted. During the edit, the system verifiesthe following:• Accounting period is open.• Debits equal credits (if the journal is for a balanced <strong>ledger</strong>).• ChartField values are valid.• ChartField combinations are valid.• Runs the Budget Checks Journals process.If the edit process is successful, the Journal Status and Budget Status bothdisplay as Valid and the WrkFlw Preview and Submit buttons display.You will likely see extra lines added to the entry. These lines should all useaccount 11000 (Claim on Cash) as the system is adjusting the cash balancefor the Business Unit(s), Operating Unit(s), Department(s), Fund Code(s) andGeneral Ledger: 01/19/10<strong>Emory</strong> Confidential and Proprietary Information
Step 6: Preview theApproval MapEntering an Online Journal EntryProjects impacted by the journal entry.Step 7: Upload SupportingDocumentationBefore you submit the transaction into Workflow, you can preview theApproval Map.• Click the Wrkflw Preview button.The Workflow page displays. The Approval Map shows who will approve thetransaction and in what order.Step 8: Submit theTransaction into Workflow• To attach supporting documentation, click the Upload button and select thefile you want to attach.• Adobe PDF is the preferred attachment file format. If Microsoft Excel isattached, it must be saved to be compatible with Excel 97-2003.• Important: No sensitive information should be included in the attachment(for example, patient’s name, SSN, student name, etc.). If necessary, youcan black out this information before uploading.Warning: The transaction is not complete until you complete Step 8.• Click the Lines tab.• To submit the transaction into Workflow, click the Submit button.The Workflow page displays.• Click the Save button.The Journal Entry is saved and submitted into Workflow.General Ledger: 01/19/10<strong>Emory</strong> Confidential and Proprietary Information
Printing a Journal with a BarcodePrinting a Journal with a BarcodeTo print a journal with a barcode, follow the instructions given below.Step 1: Navigate to theJournal Entries ComponentStep 2: Search for theJournal to Print• From the Compass home page, use the following path to navigate to theJournal Entries component:General Ledger > Journals > Journal Entry > Create/Update JournalEntriesThe Add a New Value tab displays.• To search for a journal, click the Find an Existing Value tab.Step 3: Print the Report• Enter your Business Unit. Note: Your Business Unit defaults if it has beenadded to your User Preferences. For instructions on changing the default,refer to Defining User Preferences.• Enter the Journal ID you want to print.Note: If you do not know the Journal ID, you can search by other criteria,such as Journal Date.• Select a Journal Header Status, or select the blank option to search allstatuses.• Click the Search button.The Header page displays.• Click the Lines tab.• Click the Generate Journal with Barcode link.Tip: You may need to scroll to the right to see the link.A printer-friendly PDF version of the Journal displays in a new window.• Use the Print button on your browser to print the journal page.• Close the new window.General Ledger: 01/19/10<strong>Emory</strong> Confidential and Proprietary Information
Locating a Specific Journal EntryLocating a Specific Journal EntryYou can easily locate a journal to review and modify once you enter it into Compass. You can locate and updateany journal using the Journal Entries component.Note: You can also use Journal Inquiry to search for a journal entry. Journal Inquiry allows you to search byUser ID, which is helpful if you don’t remember the Journal ID. For instructions on running a journal inquiry, referto the Desktop Reference Guide on Journal and Ledger Inquiries.To locate a specific journal entry, follow the instructions given below.Step 1: Navigate to theJournal Entries ComponentStep 2: Search for aSpecific Journal Entry• From the Compass home page, use the following path to navigate to theJournal Entries component:General Ledger > Journals > Journal Entry > Create/Update JournalEntriesThe Add a New Value tab displays.• To search for a journal, click the Find an Existing Value tab.• Enter your Business Unit. Note: Your Business Unit defaults if it has beenadded to your User Preferences. For instructions on changing the default,refer to Defining User Preferences.• Enter the Journal ID to you want to locate.Tip: To save a few keystrokes, enter the % sign instead of the leadingzeroes in the Journal ID (%54321 instead of 0000054321).Tip: If you don’t know the entire ID, search by Journal ID contains.Tip: You can use Reference IDs to narrow the search results. If you enter aReference ID in the Journal ID field, only journals starting with that ID will bereturned in the search results. For a complete list of Reference IDs, refer tothe Journals column on the Journal Sources and Reference IDsspreadsheet.Tip: If you don’t know the Journal ID, leave this field blank and use othersearch fields to locate the journal.General Ledger: 01/19/10<strong>Emory</strong> Confidential and Proprietary Information
Locating a Specific Journal Entry• Select a Journal Header Status, or select the blank option to search allstatuses.• Enter a Source or leave the field blank to search all sources.Tip: This field can be used to find all journal entries from a particular source,like AP or DAR. If you put a value in this field, only journals from that sourcewill be returned in the search results. For a complete list of sources, refer tothe Interfaces column on the Journal Sources and Reference IDsspreadsheet.• Select additional search criteria as needed.• Click the Search button.The Header page displays if only one journal entry matches your searchcriteria.A search results list displays if more than one journal entry matches yoursearch criteria. The Header page displays when you select an item from thelist.• Review or update the journal as needed.General Ledger: 01/19/10<strong>Emory</strong> Confidential and Proprietary Information
Copying a Journal EntryCopying a Journal Entry Using the Copy Journal Entry PageTo save time retyping the same information for similar or identical journals, you can use an existing journal asthe basis for a new journal entry. You can copy posted journals as well as journals that are not posted, and thenchange the header or detail lines, as required. There are two ways to copy a journal entry. The first way is byusing the Copy Journal Entry page to make an online copy. This way allows you to copy one journal at a time.To copy a journal entry using the Copy Journal Entry page, follow the instructions given below. For instructionson the other method, refer to Copying a Journal Entry Using a Run Control.Step 1: Navigate to theJournal Entries ComponentStep 2: Search for theJournal Entry to copyStep 3: Copy the JournalEntry• From the Compass home page, use the following path to navigate to theJournal Entries component:General Ledger > Journals > Journal Entry > Create/Update JournalEntriesThe Add a New Value tab displays.• Click the Find an Existing Value tab.• Enter your Business Unit. Note: Your Business Unit defaults if it has beenadded to your User Preferences. For instructions on changing the default,refer to Defining User Preferences.• Enter the Journal ID to copy.• Select a Journal Header Status, or select the blank option to search allstatuses.• Click the Search button.The Header page displays.• Click the Lines tab.Tip: To avoid some of the horizontal scrolling when working with journals,click the Collapse Menu button. You can also customize the page to hidecertain journal line detail columns not <strong>general</strong>ly changed, For instructions,refer to Customizing Compass pages.• At the top of the page in the Process box, select Copy Journal and click theProcess button.The Journal Entry Copy page displays.General Ledger: 01/19/10<strong>Emory</strong> Confidential and Proprietary Information
Copying a Journal Entry Using the Copy Journal Entry PageNote: You can change the default values on this page if necessary.• Click the OK button.The Lines page displays the copied journal entry.• Edit the journal entry lines as needed.• Click the Save button.A validation message displays.• Click the OK button.General Ledger: 01/19/10<strong>Emory</strong> Confidential and Proprietary Information
Copying a Journal Entry Using a Run ControlTo save time retyping the same information for similar or identical journals, you can use an existing journal asthe basis for a new journal entry. You can copy posted journals as well as journals that are not posted, and thenchange the header or detail lines, as required. There are two ways to copy a journal entry. One way is by usinga Run Control. This method allows you to copy either one journal at a time or multiple journals at one time.To copy a journal entry using a Run Control, follow the instructions given below. For instructions on the othermethod, refer to Copying a Journal Entry Using the Copy Journal Entry Page.Step 1: Navigate to theJournal Entries ComponentStep 2: Add or Enter a RunControl ID• From the Compass home page, use the following path to navigate to theJournal Entries component:General Ledger > Journals > Journal Entry > Copy JournalsThe Find an Existing Value tab displays.• If this is the first time you are using a Run Control to copy a journal entry,click the Add a New Value tab to create a new Run Control.Step 3: Enter the ProcessRequest Parameters• Complete the Run Control ID field. Type something that will remind you ofthe task you are completing. For example, Copy_Journal.• Click the Add button.Note: Once you have set up a Run Control for this report, you do not need toadd a new value. Simply enter the existing Run Control ID in the Search byfield, click the Search button, and select the desired Run Control ID fromthe search results at the bottom of the page.The Copy Journals Request page displays.Tip: To avoid some of the horizontal scrolling when working with journals,click the Collapse Menu button. You can also customize the page to hidecertain journal line detail columns not <strong>general</strong>ly changed, For instructions,refer to Customizing Compass pages.• Select Once from the Process Frequency drop-down list.• Enter your Business Unit. Note: Your Business Unit defaults if it has beenadded to your User Preferences. For instructions on changing the default,refer to Defining User Preferences.• Enter the Journal ID to copy.• Verify the New Date field is correct. If not, enter the correct date.• Click the Run button.The Process Scheduler Request page displays.General Ledger: 01/19/10<strong>Emory</strong> Confidential and Proprietary Information
Copying a Journal Entry Using a Run ControlStep 4: Set up the ProcessScheduler Request pageStep 5: Run the Process• Select a Server Name from the drop-down list to identify the server on whichthe process will run. For example, PSNT.Note: If you use the same Run Control ID for subsequent processes, theserver name you last used will default in this field.• Select HTM from the Format drop-down list.• Click the OK button.The Copy Journals Request page redisplays with a Process Instancenumber. This number helps you identify the process you have run whenchecking the status.• Click the Process Monitor link.The Process List page displays.Step 6: Review the CopiedJournalNote: The process is finished when the status is Success and thedistribution status is Posted.• If the status is not Success and/or the distribution status is not Posted,continue to click the Refresh button until both statuses are complete.• From the menu on the left side of the page, click Create/Update JournalEntries.The Add a New Value page displays.• Click the Find an Existing Value tab.• Enter your Business Unit. Note: Your Business Unit defaults if it has beenadded to your User Preferences. For instructions on changing the default,General Ledger: 01/19/10<strong>Emory</strong> Confidential and Proprietary Information
Copying a Journal Entry Using a Run Controlrefer to Defining User Preferences.• Enter the Journal Date for the copied journal.• Select a Journal Header Status, or select the blank option to search allstatuses.• Click the Search button.The Header page displays.• Click the Lines tab.The Lines page displays the copied journal entry.• Edit the journal entry lines as needed.Note: Use the Lines page to modify values for various journal entry fields,such as Amount and ChartField. You can also insert or delete rows, ifrequired.• Click the Save button if you make any changes to the journal entry.A validation message displays when you save the journal entry.• Click the OK button.General Ledger: 01/19/10<strong>Emory</strong> Confidential and Proprietary Information
Deleting a Journal Entry Prior to PostingDeleting a Journal Entry Prior to PostingIf necessary, you can delete a journal entry prior to posting. You cannot delete a journal entry that has posted tothe <strong>ledger</strong>.To delete a journal prior to posting, follow the instructions given below.Step 1: Navigate to theJournal Entries ComponentStep 2: Search for theJournal to DeleteStep 3: Delete the JournalEntry• From the Compass home page, use the following path to navigate to theJournal Entries component:General Ledger > Journals > Journal Entry > Create/Update JournalEntriesThe Add a New Value tab displays.• To search for a journal, click the Find an Existing Value tab.• Enter your Business Unit. Note: Your Business Unit defaults if it has beenadded to your User Preferences. For instructions on changing the default,refer to Defining User Preferences.• Enter the Journal ID you want to delete.Note: If you do not know the Journal ID, you can search by other criteria,such as Journal Date.• Select a Journal Header Status, or select the blank option to search allstatuses.• Click the Search button.The Header page displays.• Click the Lines tab.Tip: To avoid some of the horizontal scrolling when working with journals,click the Collapse Menu button. You can also customize the page to hidecertain journal line detail columns not <strong>general</strong>ly changed, For instructions,refer to Customizing Compass pages.• At the top of the page in the Process box, select Delete Journal and clickthe Process button.A message displays.• Click the Yes button to confirm the delete.A validation message displays.General Ledger: 01/19/10<strong>Emory</strong> Confidential and Proprietary Information
Deleting a Journal Entry Prior to Posting• Click the OK button.General Ledger: 01/19/10<strong>Emory</strong> Confidential and Proprietary Information
Customizing Compass PagesCustomizing Compass PagesThe Compass system allows you to customize some Compass pages by hiding columns that do not interestyou. You can use this feature to avoid some of the horizontal scrolling necessary on certain Compass pages.To customize Compass pages, follow the instructions given below. Note: This explanation will show how tocustomize the Lines page in the Journal Entries component. The same procedure can be used on other pageswhere the Customize link displays.Step 1: Navigate to theJournal Entries component.Step 2: Search for anexisting journal.• From the Compass home page, use the following path to navigate to theJournal Entries component:General Ledger > Journals > Journal Entry > Create/Update JournalEntriesThe Add a New Value tab displays.• To search for a journal, click the Find an Existing Value tab.Step 3: Customize theLines page.• Enter your Business Unit. Note: Your Business Unit defaults if it has beenadded to your User Preferences. For instructions on changing the default,refer to Defining User Preferences.• Enter a Journal ID.Note: If you do not know the Journal ID, you can search by other criteria,such as Journal Date.• Select a Journal Header Status, or select the blank option to search allstatuses.• Click the Search button.The Header page displays.• Click the Lines tab.The Lines page displays.• Scroll to the right side of the page and click the Customize link.The Personalize Column and Sort Order page displays.Compass Fundamentals: 01/19/10<strong>Emory</strong> Confidential and Proprietary Information
Customizing Compass Pages• Click the name of a column you want to hide, and then click the Hiddencheck box.• Repeat this step with additional columns you want to hide,• Click the OK button.The Lines page displays without the columns you hid.Compass Fundamentals: 01/19/10<strong>Emory</strong> Confidential and Proprietary Information
Defining User PreferencesDefining User PreferencesThe Compass system allows you to define user preferences in order to minimize the amount of data entry. If youdefine user preferences, the default data displays in the specified fields. If necessary, you can change thedefault information.To define user preferences, follow the instructions given below.Step 1: Navigate to the UserPreferences page.• From the Compass home page, use the following path to navigate to theAuthorize Users page:Set Up Financials/Supply Chain > Common Definitions > UserPreferences > Define User PreferencesThe Find an Existing Value page displays.Step 2: Access the OverallPreferences page.• Enter or validate your User ID in the User ID field.• Click the Search button.The User Preferences page displays.• Click the Overall Preference link.The Overall Preferences page displays.Step 3: Set up your OverallPreferences.• Enter or update the value in the Business Unit field.• Enter or update the value in the SetID field.• Click the Save button.The selected preferences are saved.Compass Fundamentals: 01/19/10<strong>Emory</strong> Confidential and Proprietary Information
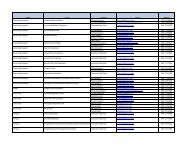
Interfaces:Journals:Source Description SourceReferenceIDDescrACC Accruals AM ADD Asset AdditionsADJ Accounting Adjustments AM ADJ Asset Adjustments & TransfersALO Allocation AM DEP Depreciation ExpenseAM Asset Management AM LPY Capital Lease PayablesAP Accounts Payable AM RAD Depreciation Reserve AdjustmntAR Accounts Receivable AM RCT Asset RecategorizationsAV Student Adm/Student Adv AM RET Asset RetirementsBBI Benefits Billing AP AP AP AccrualsBI Billing AP APC AP Closed VouchersBOK BooK Store (Follet) JE AP APL AP Cash ClearingsBSP Bank Statment Processing AP APP AP PaymentsCA Contracts AP APR Revaluation of PayablesCB Claimbacks AP APX AP Cancelled PaymentsCDX ECC IDX AR AR AR BillingCLO Closing Journal Source AR ARC AR Cash Control JournalCON Consolidation Process AR ARD AR Direct Cash JournalCOR CORE to BRS to PS Student Fina AR ARM AR MaintenanceCPS Campus Services (FM) Recharge AR ARP AR PaymentsCRD <strong>Emory</strong> Card JE AR ARR AR RevaluationDAR Dept of Aminal Resources AV AV Student Adm-Student AdvDM Deduction Management BBI BBI Benefits BillingDUR Dept. of University Relations BBI BBI ERROR-Benefits BillingECG Photographic Services BI BI BI BillingESL SA Feed BI BIA BI Accrue Unbilled RevenueETO ESA PTO Interface BOK BOK ERROR-Book Store (Follet) JEEX Expenses BOK BOK Book Store (Follet) JEFRG Fringe CA CAD CA DeferredGEP GE Capital/V-Payment CA CAR CA RevenueGEV GE Capital/P-Card Feed CA ESA ESAGM Grants CA REM Lease Admin Straightline EntryHQT HealthQuest G/L Feed CB CB Claimbacks AccrualHSP Health Sciences Publications U CDX CDX ERROR-ECC IDX ErrorsIDX IDX CDX CDX ECC IDXINV Inventory Processing CFO NEXT GL Commitment Control AdjustMCP MultiCurrency Processing CFO NEXT Entry Event for BudgetME Month-End Adjustments CON CNV <strong>Emory</strong> FAS GL ConversionOIT Network Communications Billing CON CNV <strong>Emory</strong> FAS GL Conversion GrantONL Online Journal Entry CON CNV <strong>Emory</strong> CODA ConversionPA Position Accounting COR COR CORE to BRS to PS SF Feed
Interfaces:Journals:Source Description SourceReferenceIDDescrPAY Payroll Processing COR COR ERROR-CORE to BRS-PS SF FeedPC Project Costing CPS CPS ERROR-Campus Services RechargePMA PMM - Accruals CPS CPS Campus Services RechargePMI PMM - Inventory CRD CRD ERROR-<strong>Emory</strong> Card JEPMT PMM - Sales Tax Accrual CRD CRD <strong>Emory</strong> Card JEPO Purchasing DAR DAR ERROR-DAR (Animal Resources)PRN Printing JE DAR DAR DAR (Animal Resources) JEPSI Postage RC JEs Iternational DUR DUR ERROR-DUR (ACE) JEPST Postage Recharge JES DUR DUR DUR (ACE) JERST Labor Distribution RST Feed ECG ECG Photographic Services RechargeSF Student Adm/Student Financials ECG ECG ERROR-Photographic Srvc RchrSFS Bursar Accounting Feed - Yrend ELM ELM ELM Enrollment Jrnl TemplateSOM School of Medicine ESL ESL SA FeedSSB State Street Bank Upload ESL ESL ERROR-SA FeedSSG State Street Global Services ETO ETO ERROR-ESA PTO AccrualSWP Payroll Liability Sweep ETO ETO ESA PTO AccrualTR Treasury EX EX Expense AccrualsYRK Yerkes Recharge JE EX EXC Expense Sheet CloseEX EXP Expense PaymentsEX EXX Expense Canceled PaymentsEXT EXT Generic Journal TemplateFRG FRG ERROR-FringeFRG FRG FringeGEP GEP GE Capital V PaymentGEP GEP ERROR-GE Capital V-PaymentGEV GEV GE Capital P-Card FeedGEV GEV ERROR-GE Capital P-Card FeedGM CAG CA GRANTSGM GM F&A CalculationHQT HQT ERROR-HealthQuestHQT HQT HealthQuestHSP HSP ERROR-Health Sciences PublcnHSP HSP Health Sciences PublicationsIDX IDX ERROR-IDXIDX IDX IDXINV INV Inventory TransactionsINV INV Excise-Duty Tax TransactionsOIT OIT ERROR-OITOIT OIT Office of Information Tech
Journals:SourceReferenceIDDescrPAY GP Global Payroll TemplatePAY PAY Payroll Journal TemplatePC CAP CA ProjectsPC PC ProjectsPC PCA Project AdjustmentsPC PCEE Entry Event for PC BudgetPMA PMA ERROR-PMM AccrualsPMA PMA PMM - AccrualsPMI PMI PMM - InventoryPMI PMI ERROR-PMM InventoryPMT PMT ERROR-PMM Sales Tax AccrualPMT PMT PMM - Sales Tax AccrualPO EEP Entry Event for PurchasingPO PO Accrue Unmatched PO ReceiptsPRN PRN ERROR-Printing JEPRN PRN Printing JEPSI PSI ERROR-Postage RC JEs IterntlPSI PSI Postage RC JEs IternationalPST PST ERROR-Postage Recharge JEsPST PST Postage Recharge JEs (IKON)RST RST Labor Distribution RST FeedRST RST ERROR-Labor Distribution RSTSF SF Student Adm-Student FinancialsSFS SFS ERROR-Bursar Accounting-YE RevSFS SFS Bursar Accounting Feed-YE RevSOM SOM ERROR-Bio-Medical Media RechSOM SOM Bio-Medical Media Recharge JESSB SSB State Street Bank UploadSSB SSB ERROR-State Street Bank UploadSSG SSG ERROR-State Street Global SVSSSG SSG State Street Global SVS UploadSWP SWP ERROR-Payroll Liability SweepSWP SWP Payroll Liability SweepTD TD Promotion Management AccrualTR TR Treasury JournalYRK YRK Yerkes Recharge JEYRK YRK ERROR-Yerkes Recharge JE