Digital Photoelectric Sensor PS-N10 Series Instruction Manual ...
Digital Photoelectric Sensor PS-N10 Series Instruction Manual ...
Digital Photoelectric Sensor PS-N10 Series Instruction Manual ...

You also want an ePaper? Increase the reach of your titles
YUMPU automatically turns print PDFs into web optimized ePapers that Google loves.
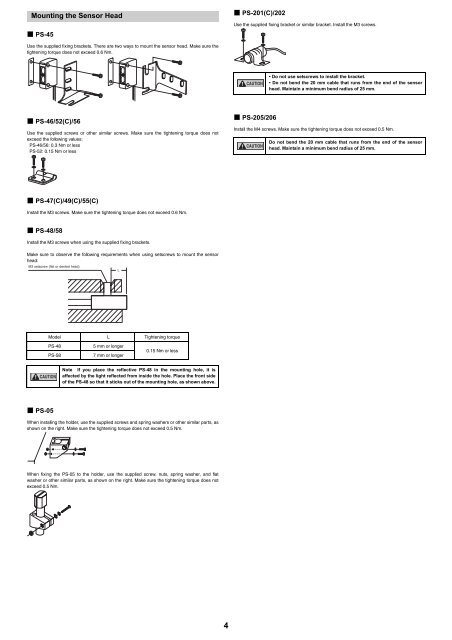
Mounting the <strong>Sensor</strong> Head• <strong>PS</strong>-45• <strong>PS</strong>-201(C)/202Use the supplied fixing bracket or similar bracket. Install the M3 screws.Use the supplied fixing brackets. There are two ways to mount the sensor head. Make sure thetightening torque does not exceed 0.6 Nm.CAUTION• Do not use setscrews to install the bracket.• Do not bend the 20 mm cable that runs from the end of the sensorhead. Maintain a minimum bend radius of 25 mm.• <strong>PS</strong>-46/52(C)/56Use the supplied screws or other similar screws. Make sure the tightening torque does notexceed the following values:<strong>PS</strong>-46/56: 0.3 Nm or less<strong>PS</strong>-52: 0.15 Nm or less• <strong>PS</strong>-205/206Install the M4 screws. Make sure the tightening torque does not exceed 0.5 Nm.CAUTIONDo not bend the 20 mm cable that runs from the end of the sensorhead. Maintain a minimum bend radius of 25 mm.• <strong>PS</strong>-47(C)/49(C)/55(C)Install the M3 screws. Make sure the tightening torque does not exceed 0.6 Nm.• <strong>PS</strong>-48/58Install the M3 screws when using the supplied fixing brackets.Make sure to observe the following requirements when using setscrews to mount the sensorhead:M3 setscrew (flat or dented head)LModel L Tightening torque<strong>PS</strong>-48<strong>PS</strong>-585 mm or longer7 mm or longer0.15 Nm or lessCAUTIONNote If you place the reflective <strong>PS</strong>-48 in the mounting hole, it isaffected by the light reflected from inside the hole. Place the front sideof the <strong>PS</strong>-48 so that it sticks out of the mounting hole, as shown above.• <strong>PS</strong>-05When installing the holder, use the supplied screws and spring washers or other similar parts, asshown on the right. Make sure the tightening torque does not exceed 0.5 Nm.When fixing the <strong>PS</strong>-05 to the holder, use the supplied screw, nuts, spring washer, and flatwasher or other similar parts, as shown on the right. Make sure the tightening torque does notexceed 0.5 Nm.4