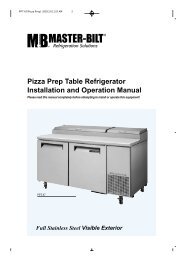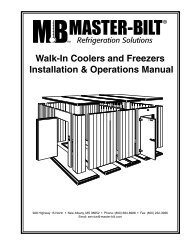
Installation & Operations Manual - Master-Bilt
Installation & Operations Manual - Master-Bilt
Installation & Operations Manual - Master-Bilt

Create successful ePaper yourself
Turn your PDF publications into a flip-book with our unique Google optimized e-Paper software.
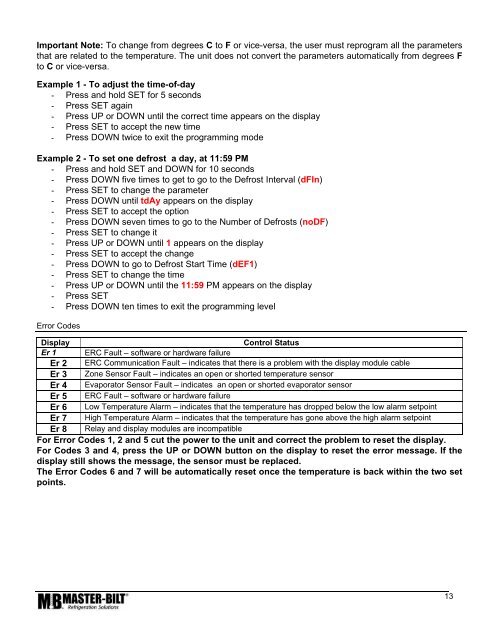
Important Note: To change from degrees C to F or vice-versa, the user must reprogram all the parametersthat are related to the temperature. The unit does not convert the parameters automatically from degrees Fto C or vice-versa.Example 1 - To adjust the time-of-day- Press and hold SET for 5 seconds- Press SET again- Press UP or DOWN until the correct time appears on the display- Press SET to accept the new time- Press DOWN twice to exit the programming modeExample 2 - To set one defrost a day, at 11:59 PM- Press and hold SET and DOWN for 10 seconds- Press DOWN five times to get to go to the Defrost Interval (dFIn)- Press SET to change the parameter- Press DOWN until tdAy appears on the display- Press SET to accept the option- Press DOWN seven times to go to the Number of Defrosts (noDF)- Press SET to change it- Press UP or DOWN until 1 appears on the display- Press SET to accept the change- Press DOWN to go to Defrost Start Time (dEF1)- Press SET to change the time- Press UP or DOWN until the 11:59 PM appears on the display- Press SET- Press DOWN ten times to exit the programming levelError CodesDisplayControl StatusEr 1 ERC Fault – software or hardware failureEr 2 ERC Communication Fault – indicates that there is a problem with the display module cableEr 3 Zone Sensor Fault – indicates an open or shorted temperature sensorEr 4 Evaporator Sensor Fault – indicates an open or shorted evaporator sensorEr 5 ERC Fault – software or hardware failureEr 6 Low Temperature Alarm – indicates that the temperature has dropped below the low alarm setpointEr 7 High Temperature Alarm – indicates that the temperature has gone above the high alarm setpointEr 8 Relay and display modules are incompatibleFor Error Codes 1, 2 and 5 cut the power to the unit and correct the problem to reset the display.For Codes 3 and 4, press the UP or DOWN button on the display to reset the error message. If thedisplay still shows the message, the sensor must be replaced.The Error Codes 6 and 7 will be automatically reset once the temperature is back within the two setpoints.13