PREFACE THE STRONG HIGHLIGHT II Xenon ... - Iceco.com
PREFACE THE STRONG HIGHLIGHT II Xenon ... - Iceco.com
PREFACE THE STRONG HIGHLIGHT II Xenon ... - Iceco.com

Create successful ePaper yourself
Turn your PDF publications into a flip-book with our unique Google optimized e-Paper software.
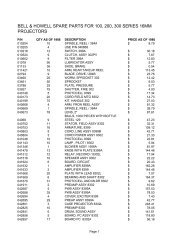
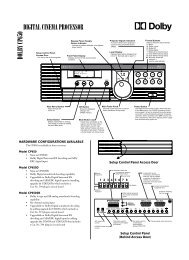
BULB INSTALLATION & OPERATION (continued)TO ALLOW FOR MANUFACTURING TOLERANCES in overall bulb length and/orfabrication of the stainless steel bulb enclosure, an additional degree of fine adjustment is available by changingthe position of the snap ring(s) retaining the bulb support collet in its bearing. Use this feature only if theproper focal position cannot be gained by use of the focus screw.TO REPOSITION <strong>THE</strong> COLLET, extinguish the bulb and allow the lamp to cool. Observingall safety precautions, remove the xenon bulb. From the rear of the bulb enclosure, remove the 21-48027Snap Ring (see Detail drawing, Figure 3 Parts List) and withdraw the collet from the inside of the bulbenclosure. Position the inner snap ring as required, and re-install the collet by securing the outer snap ring.IF <strong>THE</strong> PROJECTED IMAGE is not centered on the screen as illustrated, move the consoleor adjust the tilt to correct. It is necessary to dismount the off-operator side blower panel to access the left tiltlock. See the illustration on the WIRING INSTRUCTIONS page.REPLACE <strong>THE</strong> PROJECTION LENS and install a CinemaScope aperture plate. Turnthe center focus adjustment until the desired light distribution is projected to the screen. Avoid running theprojector in this manner for an extended period of time without frequently closing the lamphouse douser.Without film, the heat from the xenon bulb can damage the projection lens.<strong>THE</strong> IDEAL “FLAT” FIELD denotes a pattern of light without a distinct “hot” spot inthe center of the screen, and only a slight reduction of light in the four corners. Establish the desired fieldusing the 35mm CinemaScope aperture plate, and DO NOT alter the bulb focus when projecting a “flat”35mm print. An optional Beam Expander Kit is required for 70mm operation; see the following sectionentitled “70mm OPERATION” for further details.IF A “HOT” SPOT REMAINS in an otherwise even field, turn the LAMP switch OFF andallow the xenon bulb to cool. Open the access door and remove the side cover plate of the bulb <strong>com</strong>partment.Loosen the set screw locking the position of the bulb support yoke, and move the yoke to “point” the front endcap of the bulb away from the “hot” spot. Replace the bulb <strong>com</strong>partment cover, close and lock the accessdoor, and re-ignite the xenon bulb. Repeat the manipulation of the bulb adjustment mechanism to establishan even field.TO EXTINGUISH the xenon bulb, turn the LAMP rocker switch on the lamphousecontrol panel to its OFF position. The LAMP ON indicator light (when used) will extinguish. Leave theconsole power ON to permit the blowers to operate and cool the bulb. Allow the blowers to operate for atleast ten minutes after turning off the xenon bulb. A forced-air cooling cycle is required by xenon bulbmanufacturers in order to <strong>com</strong>ply with bulb warranty requirements.RECORD <strong>THE</strong> HOURS of xenon bulb operation on the inside back cover of this manual.Use the (HR) figure displayed on the digital unit, as this figure indicates total system hours. Instructions forre-setting the (BLB) display follow in the DIGITAL DISPLAY section.HL2/014