Tucson 8702 ST and DX Manual - Hearthstone Stoves
Tucson 8702 ST and DX Manual - Hearthstone Stoves
Tucson 8702 ST and DX Manual - Hearthstone Stoves

Create successful ePaper yourself
Turn your PDF publications into a flip-book with our unique Google optimized e-Paper software.
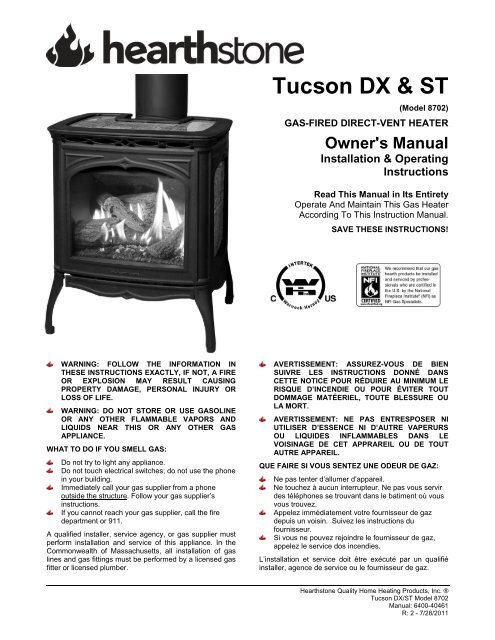
<strong>Tucson</strong> <strong>DX</strong> & <strong>ST</strong>(Model <strong>8702</strong>)GAS-FIRED DIRECT-VENT HEATEROwner's <strong>Manual</strong>Installation & OperatingInstructionsRead This <strong>Manual</strong> in Its EntiretyOperate And Maintain This Gas HeaterAccording To This Instruction <strong>Manual</strong>.SAVE THESE IN<strong>ST</strong>RUCTIONS!WARNING: FOLLOW THE INFORMATION INTHESE IN<strong>ST</strong>RUCTIONS EXACTLY, IF NOT, A FIREOR EXPLOSION MAY RESULT CAUSINGPROPERTY DAMAGE, PERSONAL INJURY ORLOSS OF LIFE.WARNING: DO NOT <strong>ST</strong>ORE OR USE GASOLINEOR ANY OTHER FLAMMABLE VAPORS ANDLIQUIDS NEAR THIS OR ANY OTHER GASAPPLIANCE.WHAT TO DO IF YOU SMELL GAS:Do not try to light any appliance.Do not touch electrical switches; do not use the phonein your building.Immediately call your gas supplier from a phoneoutside the structure. Follow your gas supplier’sinstructions.If you cannot reach your gas supplier, call the firedepartment or 911.A qualified installer, service agency, or gas supplier mustperform installation <strong>and</strong> service of this appliance. In theCommonwealth of Massachusetts, all installation of gaslines <strong>and</strong> gas fittings must be performed by a licensed gasfitter or licensed plumber.AVERTISSEMENT: ASSUREZ-VOUS DE BIENSUIVRE LES IN<strong>ST</strong>RUCTIONS DONNÉ DANSCETTE NOTICE POUR RÉDUIRE AU MINIMUM LERISQUE D’INCENDIE OU POUR ÉVITER TOUTDOMMAGE MATÉERIEL, TOUTE BLESSURE OULA MORT.AVERTISSEMENT: NE PAS ENTRESPOSER NIUTILISER D’ESSENCE NI D’AUTRE VAPERURSOU LIQUIDES INFLAMMABLES DANS LEVOISINAGE DE CET APPRAREIL OU DE TOUTAUTRE APPAREIL.QUE FAIRE SI VOUS SENTEZ UNE ODEUR DE GAZ:Ne pas tenter d’allumer d’appareil.Ne touchez à aucun interrupteur. Ne pas vous servirdes téléphones se trouvant dans le batiment où vousvous trouvez.Appelez immédiatement votre fournisseur de gazdepuis un voisin. Suivez les instructions dufournisseur.Si vous ne pouvez rejoindre le fournisseur de gaz,appelez le service dos incendies.L’installation et service doit être exécuté par un qualifiéinstaller, agence de service ou le fournisseur de gaz.<strong>Hearthstone</strong> Quality Home Heating Products, Inc. ®<strong>Tucson</strong> <strong>DX</strong>/<strong>ST</strong> Model <strong>8702</strong><strong>Manual</strong>: 6400-40461R: 2 - 7/28/2011
Intentionally Blank
<strong>Hearthstone</strong> Quality Home Heating Products, Inc. <strong>Tucson</strong> <strong>DX</strong>/<strong>ST</strong> Model <strong>8702</strong>Information SheetUse this page to record all relevant information concerning the purchase, installation, <strong>and</strong> maintenance of your<strong>Tucson</strong> Model <strong>8702</strong> Direct -Vent heater. This information will facilitate servicing, purchase of replacement parts,<strong>and</strong> warranty claims (if necessary). Keep your original receipt in a safe place as proof of purchase.Serial Number:Fuel type: Natural Gas Liquid PropaneSold by:Address:Phone:E-mailInstalled by:Address:Phone:E-mailGas Supplier:Address:Phone:E-mailDate of Purchase:Website:Date of Installation:Website:Website:Read this Owner’s <strong>Manual</strong> before installing, or operating your TUCSON. Retain this manual for futurereference.SERVICE RECORDDate Who Performed Work Work Performed Notes:WHATFirebox Cleaning.............Glass Cleaning................Door Gasket....................WHENannuallyas neededReplacement as needed3
<strong>Hearthstone</strong> Quality Home Heating Products, Inc. <strong>Tucson</strong> <strong>DX</strong>/<strong>ST</strong> Model <strong>8702</strong>Table of ContentsINTRODUCTION ...........................................................................................................................................................4SAFETY INFORMATION ................................................................................................................................................6PROFLAME CONTROL SY<strong>ST</strong>EM & FEATURES................................................................................................................8<strong>Tucson</strong> <strong>8702</strong> <strong>ST</strong> Model Overview............................................................................................................................... 8<strong>Tucson</strong> <strong>8702</strong> <strong>DX</strong> Model Overview .............................................................................................................................. 9Control Functions ..................................................................................................................................................... 10SPECIFICATIONS.......................................................................................................................................................12IN<strong>ST</strong>ALLATION PREPARATION....................................................................................................................................13Codes ....................................................................................................................................................................... 13Items Required for Installation.................................................................................................................................. 13Packing List .............................................................................................................................................................. 13Unpacking <strong>and</strong> Inspection ........................................................................................................................................ 13CLEARANCES TO COMBU<strong>ST</strong>IBLES..............................................................................................................................16Clearance to Combustibles....................................................................................................................................... 16Hearth Requirement/Floor Protection ....................................................................................................................... 16VENTING INFORMATION.............................................................................................................................................18Venting Components ................................................................................................................................................ 18Minimum Venting Installation Instructions ................................................................................................................ 21ELECTRICAL SY<strong>ST</strong>EM INFORMATION ..........................................................................................................................24GAS SUPPLY & CONNECTIONS..................................................................................................................................27Gas Connections ...................................................................................................................................................... 28HEAT WAVE BAFFLE, LOG SET, & SCREEN PLACEMENT............................................................................................29Installation of the Heat Wave Baffle.......................................................................................................................... 29Installation of the Log Set ......................................................................................................................................... 30Installation of the Optional Screen............................................................................................................................ 31Removal of Log Set .................................................................................................................................................. 31Completing the Installation ....................................................................................................................................... 31<strong>ST</strong>ONE IN<strong>ST</strong>ALLATION...............................................................................................................................................32LIGHTING & OPERATION ...........................................................................................................................................34Lighting Instructions.................................................................................................................................................. 34Initial Adjustments .................................................................................................................................................... 34Daily Operation......................................................................................................................................................... 36ROUTINE MAINTENANCE AND CARE...........................................................................................................................38Cleaning ................................................................................................................................................................... 38Monthly:.................................................................................................................................................................... 38Annually:................................................................................................................................................................... 38As Needed:............................................................................................................................................................... 39PARTS LI<strong>ST</strong>..............................................................................................................................................................40TROUBLESHOOTING..................................................................................................................................................41RATING LABEL .........................................................................................................................................................43Introduction4
<strong>Hearthstone</strong> Quality Home Heating Products, Inc. <strong>Tucson</strong> <strong>DX</strong>/<strong>ST</strong> Model <strong>8702</strong>Your <strong>Tucson</strong> is a very attractive <strong>and</strong> extremelyefficient heater, utilizing today’s best technologies.By following a few simple safety precautions <strong>and</strong> byperforming minimal maintenance, the unit will remainappealing while providing years of qualityperformance.The installation must conform to local codes or, inthe absences of local codes, the current NationalFuel Gas Code, ANSI Z223.1 (NFPA 54) orCAN/CGA B149 Installation Code. (Installerl’appareil selon les codes ou réglements locaux, ou,en l’absence de tells réglements, selon les Codesd’installation CAN/CGA B149.)CAUTION: DO NOT USE THIS APPLIANCE IF ANYPART WAS UNDER WATER. IMMEDIATELY CALLA QUALIFIED SERVICE TECHNICIAN TO INSPECTTHE HEATER AND TO REPLACE ANY PART OFTHE CONTROL SY<strong>ST</strong>EM AND GAS CONTROLTHAT HAS BEEN UNDER WATER. (NE PAS SESERVIR DE CET APPAREIL S’IL A ÉTÉ PLONGÉDANS L’EAU, COMPLÉTEMENT OU EN PARTIE.APPELER UN TECHNICIEN QUALIFIÉ POURINSPECTOR L’APPAREIL ET REMPLACER TOUTEPARTIE DU SY<strong>ST</strong>ÉME DE CONTRÔLE ET TOUTECOMMANDE QUI ONT ÉTÉ PLUNGES DANSL’LAU.)During the first few hours of operation the appliancemay produce smoke <strong>and</strong>/or odor. This is normalduring the first several burns <strong>and</strong> also after longperiods when the stove is not burned. During theseinitial burns, open a window(s) to assist in theremoval of the smoke/odor.The appliance <strong>and</strong> its individual shutoff valve mustbe disconnected from the gas supply piping systemduring any pressure testing of that system at testpressures in excess of ½ psig. (3.5k Pa). Theappliance must be isolated from the gas supplypiping system by closing its individual manualshutoff valve during any pressure testing of the gassupply piping system at test pressures equal to orless than ½ psig (3.5k Pa).Fire HazardDo not store or use gasoline or other flammablevapors or liquids in the vicinity of this appliance.Locate the <strong>Tucson</strong> out of traffic areas <strong>and</strong> away fromfurniture, draperies, clothing, <strong>and</strong> flammablematerial.Safety InformationVent Only to the OutsideNever vent the gas heater to other rooms orbuildings.Service CautionIf you believe your <strong>Tucson</strong> is not, in any way,performing properly, immediately discontinueoperation until the unit is inspected <strong>and</strong> approved byqualified service personnel. Prior to servicing theunit, turn the gas to the valve off, <strong>and</strong> disconnectany electrical source. Ensure the unit is cool prior toservicing <strong>and</strong> cleaning. Replace any safety screen,guard, or component removed during servicing priorto operation. Use of any components not supplied by<strong>Hearthstone</strong> on the stove voids all warranties. Donot substitute components.Hot SurfacesCertain exposed surfaces of the <strong>Tucson</strong> will reachhigh temperatures during normal operation.Clearances to combustibles must be maintained, asspecified in the “Clearances To Combustibles”section of this manual.DUE TO HIGH TEMPERATURES THE APPLIANCESHOULD BE LOCATED OUT OF TRAFFIC ANDAWAY FROM FURNITURE, DRAPERIES,CLOTHING AND FLAMMABLE MATERIALS.CHILDREN AND ADULTS SHOULD BE ALERTEDTO THE HAZARDS OF HIGH SURFACETEMPERATURES AND SHOULD <strong>ST</strong>AY AWAY TOAVOID BURNS TO SKIN OR CLOTHING IGNITION.YOUNG CHILDREN SHOULD BE CAREFULLYSUPERVISED WHEN IN THE SAME ROOM AS THEAPPLIANCE.CLOTHING OR OTHER FLAMMABLE MATERIALSHOULD NOT BE PLACED ON OR NEAR THEAPPLIANCE.(SURVEILLE LES ENFANTS. GARDER LESVÊTEMENTS, LES MEUBLES, L’ESSENCE OUAUTRES LIQUIDES À VAPEUR INFLAMMABLESLIN DE L’APPAREIL.)CLEAN THE AREA AROUND, UNDER, ANDBEHIND THE UNIT ON A REGULAR BASIS TOPREVENT THE ACCUMULATION OF DU<strong>ST</strong> ANDLINT.6
<strong>Hearthstone</strong> Quality Home Heating Products, Inc. <strong>Tucson</strong> <strong>DX</strong>/<strong>ST</strong> Model <strong>8702</strong>Proper FuelThis gas heater is designed to burn natural gas (NG)or with conversion, liquid propane (LP). Never burnany fuel gas not intended for use with this unit.Never burn paper, wood, or other materials in thisappliance.This heater is factory equipped to burn natural gas(NG). To burn propane (LP), you must purchase anLP conversion kit (97-56100 {<strong>ST</strong>}, 97-56104 {<strong>DX</strong>}).This appliance is only for use with the type(s) of gasindicated on the rating plate. This appliance is notconvertible for use with other gases, unless acertified kit is used. Cet appareil doit être atiliséuniquement avec les types de gas indiqués sur laplaque signalétique. Ne pas l’utiliser avec d’autresgas sauf si un kited conversion certifié est installé. )WARNING: THIS GAS APPLIANCE MU<strong>ST</strong> NOT BECONNECTED TO A CHIMNEY FLUE SERVING ASEPARATE GAS OR SOLID-FUEL BURNINGAPPLIANCEWARNING: DO NOT OPERATE THE APPLIANCEWITH THE FRONT GLASS REMOVED, CRACKED,OR BROKEN. REPLACEMENT OF GLASSSHOULD BE DONE BY A LICENSED ORQUALIFIED SERVICE PERSON. ONLY OPENFRONT FOR ROUTINE SERVICE. DO NOT SLAMFRONT OR <strong>ST</strong>RIKE GLASS.WARNING: HEARTH<strong>ST</strong>ONE RECOMMENDS THATONLY AN NFI CERTIFIED SERVICE TECHNICIANIN<strong>ST</strong>ALLS, AND REPAIRS THIS APPLIANCE. AQUALIFIED SERVICE TECHNICIAN MU<strong>ST</strong>INSPECT THE APPLIANCE BEFORE USE, AND ATLEA<strong>ST</strong> ANNUALLY. MORE FREQUENT CLEANINGMAY BE REQUIRED DUE TO EXCESSIVE LINTFROM CARPETING, BEDDING MATERIAL, PETS,ETC. IT IS IMPERATIVE THAT THE CONTROLCOMPARTMENTS, BURNERS, AND CIRCULATINGAIR PASSAGES OF THE APPLIANCE ARE KEPTCLEAN AND FREE OF OB<strong>ST</strong>RUCTIONS.(S’ASSURER QUE LE BRÛLEUR ET LECOMPARTIMENT DES COMMANDES SONTPROPRES. VOIR LES IN<strong>ST</strong>RUCTIONSD’IN<strong>ST</strong>ALLATION ET D’UTILISATION QUIACCOMPAGNENT L’APPAREIL.)Ceramic Logs, Burner, & BaffleIf the decorative ceramic log, burner, or bafflematerial supplied with the <strong>Tucson</strong> is damaged orparts are missing, they must be replaced with thesame, or approved <strong>Hearthstone</strong> replacement parts.These components affect the combustion quality<strong>and</strong> safety of the heater. Do not replace ceramiclogs, the burner, or baffle with unapproved ceramiccomponents or any other material.We recommend you always wear gloves <strong>and</strong> safetygoggles while h<strong>and</strong>ling the ceramic log set, HeatWave baffle, <strong>and</strong> burner materials.Electrical HazardIf present, any three-prong grounded plug must beplugged directly into a properly grounded threeprongreceptacle. Do not cut or remove thegrounding prong from any plug or otherwise attemptto circumvent the grounding protection provided withthe unit. The <strong>Tucson</strong> must be electrically groundedin accordance with local codes, or in the absence oflocal codes, with the National Electrical Code,ANSI.NFPA 70 in the U.S. or CSA C22.1 CanadianElectrical Code in Canada.Do Not Light Pilot or Burner by H<strong>and</strong>The pilot light on this gas heater is lit by using anelectronic ignition module as described elsewhere inthis manual. Never attempt to light the pilot or mainburner by h<strong>and</strong> with a match or lighter.Mobile Home InstallationsThis appliance may be installed as an aftermarketappliance in a permanently located, manufactured(mobile) home, where not prohibited by local codes.(Cet appareil peut être installé dans un maisonpréfabriquée (mobile) déjá installée á demeure si lesréglements locaux le permettent.7
<strong>Hearthstone</strong> Quality Home Heating Products, Inc. <strong>Tucson</strong> <strong>DX</strong>/<strong>ST</strong> Model <strong>8702</strong>Proflame Control System & FeaturesNOTE: OPEN DOOR UNDER THE ASH LIP AND REMOVE MODE<strong>ST</strong>Y PANEL FOR ACCESS TO ELECTRICALAND GAS CONNECTIONS.<strong>Tucson</strong> <strong>8702</strong> <strong>ST</strong> Model OverviewPower SupplyFor the <strong>Tucson</strong> <strong>ST</strong> the power supply is the AC/DCPower Adapter. This is packaged inside theaccessory box. To connect the adapter, simplyconnect the output lead to the wire under the stovemarked “DC-SUPPLY”. Plug the input end into thenearest 120V st<strong>and</strong>ard outlet.Thermostat (sold separately)You can connect to <strong>and</strong> control the <strong>Tucson</strong> <strong>ST</strong> with awall thermostat. The ON/OFF/T’stat switch or wallmounted thermostat controls the <strong>Tucson</strong>. Werecommend installation of a thermostat for morecomfortable performance, however you may stilloverride the thermostat by setting the switch to “ON”.The thermostat controls the unit by “calling for heat.”The thermostat turns the unit on when the room iscold, <strong>and</strong> turns the unit off once the room is warmedsufficiently. The thermostat is controlled by a 750millivolt DC two-wire circuit.Thermostat PlacementPlace the thermostat in the same room or livingspace as the unit. Typically 5’ (1.5m) off the floor <strong>and</strong>away from any influences that may cause thetemperature in the vicinity of the thermostat to beunrepresentative of the room temperature in general.Such influences might include strong lighting, aheater vent from the central heating system, or anearby drafty window.Placement of the thermostat on an inside wall ratherthan an outside wall is preferable. Do not place thethermostat directly behind or too close to the unit,otherwise, heat from the unit will immediately satisfythe thermostat <strong>and</strong> turn the unit off.Thermostat Wiring (sold separately)Connect the thermostat to the <strong>Tucson</strong> <strong>ST</strong> using nomore than 40’ (12 m) of insulated thermostat wire.The thermostat wire can be surface mounted orrouted under the floor, through walls, etc. Ensure youleave a small coil of additional thermostat wire behindthe <strong>Tucson</strong> so that the unit is easily moved out ofposition for servicing <strong>and</strong> cleaning.Connect the thermostat wires to the wire harnesswith the provided connection kit as per theinstructions on page 26. At the thermostat, connectthe wires to the thermostat per the instructionsreceived with the thermostat. Take care not to overtightenthe connection screws <strong>and</strong> not to damage theinternal parts of the thermostat.Proflame DFC Ignition ModuleThis is the comm<strong>and</strong> center for the appliance. TheDFC Module allows the pilot to run in the IPI mode orthe CPI mode. It signals the burner to light or shutdown <strong>and</strong> provides the ignitor with the electricityneeded for sparking. The DFC Module is powered bythe DC adaptor when 120V power is available or bythe backup batteries during a power outage.SIT <strong>Manual</strong> Gas ValveThe valve has a manual flame turndown knob. Thiscontrol manually adjusts the flame height at thedesired level. All the gas flows through the valve <strong>and</strong>is regulated by the built in regulator.Pilot AssemblyThe pilot assembly consists of a pilot hood, sensorrod, <strong>and</strong> ignitor. The ignitor sends a spark to the pilothood which ignites the gas <strong>and</strong> lights the pilot. Withthe pilot lit the sensor rod is engulfed by the flame,flame rectification occurs <strong>and</strong> the appliance remainslit. If the sensor does not stay engulfed by the flamethe main burner will not light <strong>and</strong> the pilot will shutdown.Optional Remote Control (for <strong>ST</strong> model)The <strong>Tucson</strong> <strong>ST</strong> does not come equipped with aremote control. However there are two differentoptional remote controls available. Both of the remotecontrols are capable of turning the unit on <strong>and</strong> off.One of the optional remotes also allows you tocontrol the temperature of the stove, (in the sameway the thermostat controls the heater), fromanywhere in the vicinity of the unit. If “ON” & “OFF”are the only controls required, use Kit #90-56912. Ifyou would like to control the temperature via theremote control thermostat, use Kit #90-56914.Installation instructions are provided with the kits.8
<strong>Hearthstone</strong> Quality Home Heating Products, Inc. <strong>Tucson</strong> <strong>DX</strong>/<strong>ST</strong> Model <strong>8702</strong><strong>Tucson</strong> <strong>8702</strong> <strong>DX</strong> Model OverviewProflame GTMF SystemPhoto 1 – Proflame GTMF SystemThe Proflame GTMF is a modular remote controlsystem that directs the functions of <strong>Tucson</strong> <strong>DX</strong>. TheProflame GTMF System is configured to control theon/off main burner operation, its flame levels, <strong>and</strong>provides <strong>Manual</strong> <strong>and</strong> Smart thermostatic control ofthe hearth appliance. The system controls tworemotely actuated 120V/60Hz power outlets. The Fanoutlet controls the fan speed through six levels, <strong>and</strong>the Auxiliary outlet either on or off. There is also anadditional constantly powered 120V/60Hz outlet. Thesystem has battery backup power for burneroperation <strong>and</strong> control during power outages (seepage 25 for specifications).Remote TransmitterThe <strong>Tucson</strong> <strong>DX</strong> comes equipped with a thermostaticremote control transmitter. The easy to read LCDdisplay shows all functional abilities as well as achildproof lockout <strong>and</strong> low battery indicator. Itdisplays room temperature readout, set temperaturereadout <strong>and</strong> function status. The remote transmitter ispowered by three 1.5 volt AAA batteries. A Mode Keyis provided to index between the features <strong>and</strong> aThermostat Key is used to turn on/off or indexthrough thermostat functions.ReceiverThe Receiver accepts comm<strong>and</strong>s via radio frequencyfrom the Remote to operate the appliance. TheReceiver is powered (6V DC) by the Fan ControlModule <strong>and</strong> uses four 1.5 volt AA type batteries forbackup during power outages. The Receiver’s sliderswitch is set to one of three positions: ON (<strong>Manual</strong>Override), REMOTE (Remote Control) or OFF. TheON selection turns the valve on (to high) if theRemote becomes inoperative.Fan Control ModuleThe Fan Control Module (FCM) is the main powersupply for the entire system when 120v AC isavailable. The FCM is part of the blower assembly(packaged separately). The FCM provides two 120Vremotely controlled outlets, <strong>and</strong> one constantlypowered outlet. The FCM allows the remote tocontrol the fan unit through 6 speeds <strong>and</strong> turns theauxiliary outlet on <strong>and</strong> off. This module also powersthe Receiver <strong>and</strong> Ignition Module with 6v DC, makingthe batteries in the Receiver a backup power sourceexp<strong>and</strong>ing the life of the batteries. When 120V poweris not available the FCM will not operate.The FCM is equipped with a three-prong (grounding)plug for protection against shock hazard <strong>and</strong> shouldbe plugged directly into a properly grounded threeprongreceptacle. Do not cut or remove the groundingprong from the plug.Proflame DFC Ignition ModuleThis is the comm<strong>and</strong> center for the appliance. TheDFC Module allows the pilot to run in the Intermittent(IPI) mode or the Constant (CPI) mode. It signals theburner to light or shut down <strong>and</strong> provides the ignitorwith the electricity needed for sparking. The DFCModule is powered by the FCM when 120V power isavailable or by the batteries in the Receiver during apower outage.SIT Modulating Gas ValveThe remote transmitter can modulate the valve <strong>and</strong>the flame to 6 different settings between high <strong>and</strong>low. You can modulate the flame via the remoteyourself or by setting the remote control to the SmartThermostat modulation mode. Smart mode meansthat as the room temperature approaches the limit setfor shut down the valve will automatically graduallystep down the flame height. The reverse happenswhen the room cools - the valve will automaticallygradually increase the flame height.Pilot AssemblyThe pilot assembly consists of a pilot hood, sensorrod, <strong>and</strong> ignitor. The ignitor sends a spark to the pilothood which ignites the gas <strong>and</strong> lights the pilot. Withthe pilot lit the sensor rod is engulfed by the flame,flame rectification occurs <strong>and</strong> the appliance remainslit. If the sensor does not stay engulfed by the flamethe main burner will not light <strong>and</strong> the pilot will shutdown.9
<strong>Hearthstone</strong> Quality Home Heating Products, Inc. <strong>Tucson</strong> <strong>DX</strong>/<strong>ST</strong> Model <strong>8702</strong>Control FunctionsPilot ModeContinuous Pilot (CPI): Running the <strong>Tucson</strong> <strong>8702</strong> in CPI mode will keep your pilot running even when thethermostat does not call for heat <strong>and</strong> when the burner is not lit. This is an advantage in cold climates or underwindy conditions. The “st<strong>and</strong>ing pilot” helps to keep the venting warm <strong>and</strong> generate some draft within thesystem. The st<strong>and</strong>ing pilot also keeps the firebox warm – greatly minimizing, or eliminating condensationformation on the glass during startup. The ignitor will automatically spark whenever the pilot mode is switched toCPI, regardless of the position of the receiver switch.Intermittent Pilot (IPI): Using the IPI mode is a more efficient use of fuel as the pilot only ignites when thethermostat calls for heat.Photo 2 – Pilot Mode SwitchRemote Receiver (<strong>DX</strong> Only)The Receiver is normally powered by the Fan Control Module or by four 1.5V AA batteries during a poweroutage. The Receiver switch can be set to three different positions:On: <strong>Manual</strong> override allowing the valve to function <strong>and</strong> ignite the burner without the remote transmitter. Theignitor will spark automatically.Remote: Remote Transmitter controls all functions of components.Off: Turns off the stove. If CPI mode is selected, pilot will remain lit.PRG: Used to synchronize the Transmitter <strong>and</strong> Receiver initially, <strong>and</strong> after each battery change (see page 39).Photo 3 – Receiver Detail10
<strong>Hearthstone</strong> Quality Home Heating Products, Inc. <strong>Tucson</strong> <strong>DX</strong>/<strong>ST</strong> Model <strong>8702</strong>Remote Transmitter (<strong>DX</strong> Model)Photo 4 – Remote Transmitter Function Keys (remote color may differ from shown)ON/OFF Key: Controls the main burner, blower, <strong>and</strong>the modulation of both.Thermostat Key: This is the function that sets eitherthe <strong>Manual</strong> or Smart thermostatic control.UP/Down Arrow Key: Adjusts the thermostattemperature range, flame settings, <strong>and</strong> fan speed.Mode Key: Toggles through the component to becontrolled (burner, blower or auxiliary outlet)The transmitter features a user-friendly layout with aBlue LCD Screen for easier viewing.Figure 1: Remote Transmitter Display Data11
<strong>Hearthstone</strong> Quality Home Heating Products, Inc. <strong>Tucson</strong> <strong>DX</strong>/<strong>ST</strong> Model <strong>8702</strong>LI<strong>ST</strong>ED: Gas-Fired Direct-Vent Fireplace HeaterModel: <strong>Tucson</strong> Direct-Vent Gas FireplaceHeater (<strong>8702</strong>)Testing Agency: Intertek Testing ServicesNA, Inc. (ITS)Tested to: ANSI Z21.88-2005, CSA 2.33b2005, CAN/CGA2.17-M91Certified for Canada, CSA P.4.1Approved for Mobile Home Installation (seepage 7)SpecificationsCertified for use by:Board of State Examiners of Plumbers & Gasfitters100 Cambridge Street, Room 1511Boston, MA 02202www.mass.govFigure 2: Model <strong>8702</strong> DimensionsSpecification NG LPINPUT RATING (Btu/hr) 0-2000 ft 25,000 25,000INPUT RATING (Btu/hr) 2000-4500 ft 24,200 24,800ORIFICE SIZE (DMS) 0-2000 ft 41 53ORIFICE SIZE (DMS) 2000-4500 ft 42 54MANIFOLD PRESSURE - LO SETTING (in. W.c./kpa) 1.6/0.4 6.4/1.59MANIFOLD PRESSURE - HI SETTING (in. W.c./kpa) 3.5/0.87 10.0/2.48INLET PRESSURE - MINIMUM (in.w.c./kpa) 5.0/1.24 12.0/2.99INLET PRESSURE – MAXIMUM (in. w.c./kpa) 7.0/1.74 13/3.22MINIMUM INPUT RATING LO SETTING (btu/hr) 18,000 21,600MAXIMUM OUTPUT (btu/hr) 0-2000 ft 17,350 19,10012
<strong>Hearthstone</strong> Quality Home Heating Products, Inc. <strong>Tucson</strong> <strong>DX</strong>/<strong>ST</strong> Model <strong>8702</strong>CodesAdhere to all local codes or, in their absence, thelatest edition of THE NATIONAL FUEL GAS CODEANSI Z223.1 (NFPA 54) or CAN/CGA B149 (Installerl’appareil selon les codes ou règlements locaux, ou,en l’absence de tels règlements, selon les Codesd’installation CAN/CGA-B149.)Installation Codes can be obtained from:AMERICAN NATIONAL <strong>ST</strong>ANDARDSIN<strong>ST</strong>ITUTE, INC.1430 BROADWAYNEW YORK, NY 10018www.ansi.orgNATIONAL FIRE PROTECTION ASSOCIATION,INC.BATTERY MARCH PARKQUINCY, MA 02269www.nfpa.orgThe appliance when installed must be electricallyconnected <strong>and</strong> grounded in accordance with localcodes or, in the absence of local codes, with thecurrent NFPA 70-National Electrical Code or CSAC22.1-Canadian Electric Code.A manufactured home (mobile) OEM installation mustconform to the Manufactured Home Construction <strong>and</strong>Safety St<strong>and</strong>ard, Title 24 CFR, Part 3280 (U.S.) orSt<strong>and</strong>ard for Manufactured Home Installation,ANSI/NCBCS A225.1 or St<strong>and</strong>ard for Gas EquippedRecreational Vehicles <strong>and</strong> mobile Housing, CSAZ240.4.CAN/SCA Z240 MH (Canada). (Installerl’appareil selon les codes ou règlements locaux, ou,en l’absence de tels règlements, selon les Codesd’installation CAN/CGA-B149.)This appliance is equipped for use at 0 to 2000 feet(0-610 meters) altitude. (Cet appareil est equipè pourdes altitudes compries entre 0 et 2000 pieds (0-610m) seulement.)WARNING: DO NOT IN<strong>ST</strong>ALL OR USE THISAPPLIANCE IF ANY PART WAS SUBMERGEDUNDER WATER. IMMEDIATELY CALL AQUALIFIED SERVICE TECHNICIAN TO INSPECTTHE HEATER AND TO REPLACE ANY PART OFTHE CONTROL SY<strong>ST</strong>EM AND GAS CONTROLTHAT WAS UNDER WATER. (NE PAS SE SERVIRDE CET APPAREIL S’IL A ÉTÉ PLONGÉ DANSL’EAU, COMPLÈTEMENT OU EN PARTIE.APPELER UN TECHNICIEN QUALIFIÉ POURINSPECTOR L’APPAREIL ET REMPLACER TOUTEPARTIE DU SY<strong>ST</strong>ÈME DE CONTRÔLE ET TOUTECOMMANDE QUI ONT ÉTÉ PLONGÉS DANSL’LAU)Installation PreparationItems Required for InstallationAccessory stone setExternal regulator (for propane (LP) only)LP conversion kit (not included, for propaneonly))Piping which complies with local codesPipe sealant approved for use withpropane (LP) (resistant to sulfur compounds).<strong>Manual</strong> shutoff valveSediment trap (see page 27)120 volt electrical service (Required for <strong>DX</strong>model, optional for <strong>ST</strong> model)Pipe wrenchPhillips head screwdriver7/16-inch wrench3/16” hex wrenchOther parts as required by local codeSafety GlassesGlovesPacking List1- <strong>Tucson</strong> <strong>8702</strong> Gas-Fired Heater1- Owner’s Packet Envelope (manual, warranty card)1- Heat Wave Baffle (box on pallet)1- Optional Screen Kit (in box with baffle)5- Decorative Ceramic Logs (in firebox)1- Enamel Touch-up Paint (in firebox)1- Blower Assembly Box (<strong>DX</strong> Model) (on pallet)1- Accessory Box (on pallet) containing:1- Remote Control w/batteries (<strong>DX</strong> Model)1- AC/DC Adaptor (<strong>ST</strong> Model)1- 1” Valve Ctrl Extension Knob (<strong>ST</strong> Only)1- Thermostat wire kit (<strong>ST</strong> Only)1- 1 Package of four AA Batteries1- Bag of Platinum Bright Embers2- Side Stone Shields2- Top Stone Clips1- Bag of Screws6- ¼ x 20 x 3/8” Pan Head4- ¼ x 20 x 1” Leg leveling screws1- 5/16 x 1” Flat Head hex driveNote: Vent kits <strong>and</strong> components are suppliedseparately. Failure to use the ventingcomponents approved by <strong>Hearthstone</strong> for thisappliance will void your warranty.Unpacking <strong>and</strong> Inspection<strong>Hearthstone</strong> packages your <strong>Tucson</strong> to withst<strong>and</strong>normal shipment without damage. However, damagecan still occur during transit. Take care to inspect fordamage when unpacking <strong>and</strong> installing the unit.13
<strong>Hearthstone</strong> Quality Home Heating Products, Inc. <strong>Tucson</strong> <strong>DX</strong>/<strong>ST</strong> Model <strong>8702</strong>DO NOT IN<strong>ST</strong>ALL, OR PUT INTO SERVICE, ADAMAGED OR INCOMPLETE HEATER.Note: We recommend you position your <strong>Tucson</strong>,attach the venting, make the gas, electrical <strong>and</strong>thermostat (if applicable) connections, <strong>and</strong> attachany accessories before installing the stone set.Remove the shrink-wrap <strong>and</strong> other packagingmaterials taking care not to damage the stove’sfinish. Inspect the <strong>Tucson</strong> for visible or concealeddamage. The unit should be square <strong>and</strong> true. Thestone set should be complete <strong>and</strong> without damage.The sheet metal parts should be smooth <strong>and</strong> free ofbends <strong>and</strong> dents. Any enameled cast iron should befree of chips or cracks. If visible or concealeddamage is found or suspected, contact your dealerfor instructions.Always use gloves <strong>and</strong> eye protection when h<strong>and</strong>lingthe decorative ceramic fire logs, burner, <strong>and</strong> HeatWave baffle. Use care when h<strong>and</strong>ling these parts asthey are fragile <strong>and</strong> subject to damage <strong>and</strong> breakageif h<strong>and</strong>led roughly.See the firebox access instructions on page 15 <strong>and</strong>remove the log set. Unpack <strong>and</strong> inspect the logs fordamage. Inspect the ceramic burner. Open the otherboxes <strong>and</strong> inspect the components. If log, burner,baffle, or any other component damage isencountered, contact your dealer for a replacement.Otherwise, set the logs <strong>and</strong> other components asideuntil called for during the installation.Dismounting from PalletWith the accessory boxes removed <strong>and</strong> set aside,remove the three screws that fasten the unit to theshipping st<strong>and</strong>s on the pallet (see photos 5 & 6).Take care not to mar or chip the stove’s finish. Havesomeone help lift the stove forward <strong>and</strong> off the pallet,taking care to avoid damaging components mountedunder the stove.Photo 5 – Rear Shipping Clip DetailPhoto 6 – Front Shipping Clip Detail (right side shown)Installing Leg LevelersIf your hearth surface in uneven, or is not level, youcan install the four provided leveling screws. The ¼ x20 x 1” oval tip set screws are installed down throughthe threaded hole in the inner flange on the bottom ofthe stove’s feet. Adjust the screws only enough tokeep the stove from rocking, or wobbling. Onthinner hearths, or hearth pads, adjusting the screwsso the entire stove’s weight is solely supported onthem can cause damage to your hearth.14
<strong>Hearthstone</strong> Quality Home Heating Products, Inc. <strong>Tucson</strong> <strong>DX</strong>/<strong>ST</strong> Model <strong>8702</strong>Firebox Access1. First, remove the top of the stove (lift off). Setcarefully aside on a soft surface.Photo 7 – Removing Top1. Leave the top heat shield in place – no need toremove for firebox access.Photo 10 – Front Panel Retaining Slots3. If installed, remove screen by lifting off glassframe.Photo 11 – Screen Detail4. Pull forward <strong>and</strong> disengage the spring clipssecuring the top of the glass frame. See Photo12. Tilt the top of the glass frame outward <strong>and</strong> liftit out of the slots on the bottom – set carefullyaside.Photo 8 - Top Heat Shield2. Lift the front panel slightly to disengage the tangsat its top – tilt the front toward you slightly <strong>and</strong> liftit up out of the bottom slots <strong>and</strong> set aside on asoft surface.Photo 12 – Glass Spring Clip Detail5. Reinstall by reversing the previous steps. Ifdesired, you do not need to reinstall the screen.Photo 9 – Front Panel Mounting Tang Detail15
<strong>Hearthstone</strong> Quality Home Heating Products, Inc. <strong>Tucson</strong> <strong>DX</strong>/<strong>ST</strong> Model <strong>8702</strong>Clearances to CombustiblesNote: Ensure clearances are in accordancewith local installation codes <strong>and</strong> therequirements of the gas supplier.Clearance to CombustiblesDue to high surface temperatures, locate the unit outof traffic areas <strong>and</strong> away from furniture <strong>and</strong>draperies. Do not place clothing <strong>and</strong> otherflammable material on or near the heater. Whenpositioning the unit always maintain adequateclearances around air openings into the combustionchamber <strong>and</strong> allow for adequate ventilation.Minimum clearances to combustibles must bemaintained as shown in Figures 3 - 6.Note: The rear clearance to combustibles isdetermined by either the unit’s or the vent pipe’sminimum clearance, depending on whether theinstallation calls for vertical rise within the room or arear exit, through-the-wall vent pipe.Figure 3: Minimum Wall ClearancesEnsure you consider the need for access to the gascontrol valve access door on the front of the unit aswell as full access for periodic cleaning <strong>and</strong>servicing. Also consider clearance for the blowerassembly if present, or planned in the future.CAUTION: THESE CLEARANCES REPRESENTMINIMUM DI<strong>ST</strong>ANCES IN ALL CASES, WHICH,THROUGH TE<strong>ST</strong>ING IN AN INDEPENDENTLABORATORY TO ANSI AND CSA <strong>ST</strong>ANDARDS,WILL PREVENT FIRE OR SPONTANEOUSCOMBU<strong>ST</strong>ION. WE DO NOT CONTROL THECOMBU<strong>ST</strong>IBLE MATERIALS EXPOSED TO HEATBY THIS PRODUCT; THEREFORE, ANASSESSMENT MU<strong>ST</strong> BE MADE BY THEIN<strong>ST</strong>ALLER TO PREVENT CONSEQUENTIALDAMAGE OF WALLS AND FLOORING.Hearth Requirement/FloorProtectionYou can place the <strong>Tucson</strong> directly on any noncombustiblesurface or on a wood floor. Whenplacing the <strong>Tucson</strong> on any other type of combustiblesurface you must install a panel made of metal,wood, stone, or glass under the appliance. Thepanel must extending the full width <strong>and</strong> depth of theappliance. Installations must meet all local codes.Figure 4: Horizontal Vent Mantle Clearance16
<strong>Hearthstone</strong> Quality Home Heating Products, Inc. <strong>Tucson</strong> <strong>DX</strong>/<strong>ST</strong> Model <strong>8702</strong>The corner clearance for the <strong>Tucson</strong> <strong>8702</strong> is 4”,measured from the edge of the top castings, to theadjacent wall.Figure 6: Corner ClearanceFigure 5: Snorkel Termination Mantle Clearance17
<strong>Hearthstone</strong> Quality Home Heating Products, Inc. <strong>Tucson</strong> <strong>DX</strong>/<strong>ST</strong> Model <strong>8702</strong>Venting ComponentsStarter collar is installed by <strong>Hearthstone</strong>.Use the following instructions along with the pipemanufacturer’s instructions to complete theinstallation. Do not mix vent components fromdifferent manufacturers within the same ventingsystem.Approved Venting ManufacturersThe <strong>Tucson</strong> Direct Vent (<strong>8702</strong>) is approved forinstallation only with the venting componentsprovided by manufactures listed on this page.Simpson Dura-Vent, Inc.P.O. Box 1510Vacaville, CA 95696-1510 800-835-4429American Metal Products (AmeriVent)8601 Hacks Cross Rd.Olive Branch, MS 38654 800-423-4270Selkirk Corporation1301 W. President George Bush Hwy, Suite 330Richardson, TX 75080-1139 800-992-8368Security Chimneys International Ltd (Secure Vent)2125 Monterey, Laval, QuebecCanada, H7L 3T6 450-973-9999ICC, Inc.400 J-F Kennedy, St. Jerome, QuebecCanada, J7Y 4B7 450-565-6336Metal-Fab, Inc.P.O. Box 1138Wichita, Kansas 67201 316-943-2351Venting TerminationsThe <strong>Tucson</strong> cannot be vented jointly with any othersolid fuel or gas appliance. It must be vented directlyto the outside of the building using a propertermination as listed in this manual. Afterdetermining the venting configuration for your stove,select the vent system that will best accommodateyour installation.CAUTION: ENSURE ALL <strong>ST</strong>OVE ANDTERMINATION CAP CLEARANCES AREOBSERVED PER THIS OWNER’S MANUAL.CAUTION: ENSURE THERE IS NO WIRING ORPLUMBING IN THE CHOSEN LOCATION.CAUTION: DO NOT RECESS VENTINGTERMINALS INTO A WALL OR SIDING.Venting InformationApproved Venting ConfigurationsWARNING: IN HIGH WIND AREAS ANDPARTICULARLY COLD CLIMATES IT MAY BENECESSARY TO HEAT YOUR VENT SY<strong>ST</strong>EMWITH THE PILOT PRIOR TO IGNITION OF THEMAIN BURNER. IN THESE IN<strong>ST</strong>ANCES IT ISRECOMMENDED THAT YOU LEAVE THE PILOTRUNNING FOR 5 MINUTES PRIOR TO IGNITINGTHE MAIN BURNER. THIS WILL ALLOW FORPROPER <strong>ST</strong>ART UP AND IGNITION OF ALLPORTS ON THE BURNER.There are three types of venting configurationsapproved for use with this appliance:Vertical Venting/Vertical TerminationVertical Venting/Horizontal TerminationHorizontal Venting/ Snorkel TerminationPipe Clearances to combustibles:1" to vertical runs1" below <strong>and</strong> to the side of horizontal runs2" from the top of horizontal runsVertical Venting <strong>and</strong> TerminationThe <strong>Tucson</strong> <strong>8702</strong> is approved for venting verticallythrough a roof or ceiling. When installing a verticalvent <strong>and</strong>/or vertical terminations you must adhere tothe following requirements:When terminating vertically you must have atleast 10’ of vertical pipe.Always maintain a minimum of 1” clearance fromall sides of the vent system to any combustiblematerial.A listed fire stop is required at any floorpenetration. The opening must be framed inaccording to the venting manufacturer’sinstructions.Steep roofs, nearby trees, or predominantlystrong windy conditions can promote poor draftor down draft conditions. In this event, anincrease to the height of the vent may improveperformance.A maximum of two 90⁰ or four 45⁰ elbows maybe used in vertical terminations. (This includesthe one 45⁰ elbow off the stove outlet)Whenever possible use 45⁰ elbows instead of90⁰ elbows as they offer less restriction to theflue gases.Vertical terminations may require additionalrestriction in order to perform as intended.18
<strong>Hearthstone</strong> Quality Home Heating Products, Inc. <strong>Tucson</strong> <strong>DX</strong>/<strong>ST</strong> Model <strong>8702</strong>Please refer to Figure 10 <strong>and</strong> Photos 13 & 14 toadjust your vent restrictor accordinglyAll termination caps must be no less than 18”(457mm) horizontally from any roof or verticalsurface. See Figure 6.The termination must fall within the chart inFigure 10.The maximum vertical run is 35’The vent/air intake termination clearances above thehigh side of an angled roof are as follows:Roof Pitch Feet MetersFlat to 6/12 1 0.37/12 to 9/12 2 0.610/12 to 12/12 4 1.213/12 to 16/12 6 1.817/12 to 21/12 8 2.4Figure 6: Termination Cap clearancesPrefabricated & Fireplace ChimneyInstallationsThe <strong>Tucson</strong> <strong>8702</strong> is approved for use with directvent chimney conversion kits in masonry orprefabricated solid fuel listed chimneys. Thefollowing installation requirements must be followed:The termination must fall within the chart shownin Figure 10.In a masonry chimney, a fireclay liner or listedsteel liner, must be present the entire length ofthe chimney.The maximum length of vent is 35’.The liner must have an inside dimension ordiameter 6” or greater.Prefabricated chimneys must be UL103 or ULCS-629 listed <strong>and</strong> have a minimum INSIDEdiameter of 6”. Prefabricated chimneys must belisted for the specific manufacturer’s conversionkit.The use of an existing chimney as an air intake isnot listed under the ANSI Z21.88-1999-CSA 2.33-M99 test methods; this installation has been tested<strong>and</strong> approved by Intertek Testing Services with anappropriate test. The code authority havingjurisdiction must be consulted prior to proceedingwith this installation method.Horizontal TerminationThe termination must fall within the area shownin Figures 6 & 7.A minimum of 9" rise is required either directlyoff the heater or with the use of a minimum of a14” snorkel.Use a vinyl siding St<strong>and</strong>-Off when installingagainst vinyl siding. The termination cap mustnot be recessed into the wall or siding. Do not fillair spaces with any type of insulation material.A minimum 10” X10” square hole is necessaryfor proper pipe clearance through a wall,provided the vent is positioned to maintain 2”minimum clearance at the top. A 1” minimumclearance must be maintained to combustiblematerials around the other sides.All horizontal terminations must also comply withthe clearance specifications to adjacentstructures outlined in Figure 6.Horizontal sections require a 1/4" rise every 12"of horizontal run.NOTE: For each 90 0 elbow after 2, remove 5' fromthe allowable horizontal run. For Canadianinstallations: remove 4' from the allowablehorizontal run.At minimum vertical rise, maximum horizontalrun is 10’. (If a 14” snorkel termination is used amaximum horizontal run of 10’ is alsoapplicable.)WARNING: FAILURE TO USE ONLY PARTSSPECIFICALLY APPROVED FOR USE WITH THISAPPLIANCE MAY RESULT IN PROPERTYDAMAGE OR PERSONAL INJURY.19
<strong>Hearthstone</strong> Quality Home Heating Products, Inc. <strong>Tucson</strong> <strong>DX</strong>/<strong>ST</strong> Model <strong>8702</strong>Figure 7: Acceptable Direct Vent Terminal Vent Cap LocationsA = Clearance above grade, ver<strong>and</strong>a, porch, deck,or balcony: 12 inches (30cm) minimum.B = Clearance to window or door that may beopened: **Min. 9 inches U.S./*12 inches (30cm)CAN. We recommend 12 in, minimum to preventcondensation on the window.C = Clearance to permanently closed window: **Min.9 inches, U.S./*12 inches (30cm) CAN.We recommend 12 in. minimum to preventcondensation on the window.D = Vertical clearance to ventilated soffit locatedabove the termination within a horizontal distance of2 feet (60cm) from the center line of the termination:18 inches (46cm) minimum.E = Clearances to unventilated soffit: 12 inches(30cm) minimum.F = Clearance to outside corner: **Min. 9 inches,U.S./12 inches (30cm) CAN. We stronglyrecommend 12 inches, particularly where windyconditions prevail.G = Clearance to inside corner: **Min. 6 inches,U.S./12 inches (30cm) CAN. We stronglyrecommend 12 inches, particularly where strongwinds prevail.H = *Not to be installed within 15 feet (4.5m) abovea meter/regulator assembly within 3 feet (91cm)horizontally from the center line of the regulator.I = Clearance to service regulator vent: 3 feet (91cm)J = Clearance to non-mechanical air supply inlet tobuilding or the combustion air inlet to any otherappliance: 12inches (30cm) minimum.K = Clearance to a mechanical air supply inlet:**Min. 3 feet (91cm) above if within 10 feethorizontally, U.S./*6 feet (1.83m) CAN minimum.L = ¹Clearance above paved sidewalk or a paveddriveway located on public property: 7 feet (2.1m)minimum.M = ²Clearance under ver<strong>and</strong>a, porch, deck, orbalcony: 12 inches (30cm) minimum.*In accordance with CSA B149 Installation codes.**In accordance with the current ANSI Z223.1/NFPA 54,National Fuel Gas Code. Note: Local Codes <strong>and</strong>Regulations may require different clearances.¹A vent shall not terminate directly above a sidewalk ordriveway which is located between two single familydwellings <strong>and</strong> serves both dwellings²Only permitted if ver<strong>and</strong>a, porch, deck or balcony, is fullyopen on a minimum of two sides beneath the floor.*20
<strong>Hearthstone</strong> Quality Home Heating Products, Inc. <strong>Tucson</strong> <strong>DX</strong>/<strong>ST</strong> Model <strong>8702</strong>Minimum Venting InstallationInstructions1. Install the 45º elbow over the outer collar. Placethe elbow so that the twist lock end is pointingup.2. Install one of the 9” pipe sections into the elbowby fully inserting it <strong>and</strong> turning approximately ¼turn clockwise, until the 2 sections are fullylocked. Install the 90º elbow in similar fashion.3. Move the stove <strong>and</strong> pipe assembly back until the90º elbow is flush to the wall. The 9” vertical pipeshould be parallel to the wall. Draw a circlearound the pipe. Use the center of this circle asthe center point of the 10” x 10” square wallpass through. Cut <strong>and</strong> frame the wall passthrough.4. Place the interior wall thimble into the 10” x 10”wall pass through. Secure it with 4 screws (notprovided). Install the exterior portion of thethimble in similar fashion, overlapping the 2sections.Figure 8: Components for a Typical SnorkelInstallationCAUTION: FOR BUILDINGS WITH VINYL SIDING,IN<strong>ST</strong>ALL A VINYL SIDING <strong>ST</strong>ANDOFF BETWEENTHE VENT CAP AND THE EXTERIOR WALL.5. Install the horizontal vent termination on theoutside of the wall. Ensure both of the retainingstraps extend through interior wall thimble.Before attaching the vent termination to theoutside of the house, run a bead of nonhardeningmastic around its’ outside edges, soas to make a seal between it <strong>and</strong> the wall. Thearrow on the end cap should point up. Securethe cap to the wall with the appropriate screws.6. Place the thimble cover onto the 90º elbow. Putthe 9” pipe into the horizontal vent cap, (the ventpipe must extend into the horizontal vent cap aminimum of 1-1/4”). Move the stove <strong>and</strong> ventpipe into position, insert the 9” pipe into the 90ºelbow <strong>and</strong> twist to lock it. Secure the straps fromthe horizontal vent termination to the interiorpipe with 2 sheet metal screws, keeping thescrews as close to wall thimble as possible.Bend or cut the excess strapping so that thethimble cover will fit properly. Screw the thimblecover to the wall.Figure 9: Components for a Typical MinimumHorizontal Venting InstallationCenterlines shown are approximate. Ensure you dryfit your venting <strong>and</strong> take a measurement. Pipedimensions will vary by manufacturer <strong>and</strong> supplier.These dimensions are using typical Simpson Dura-Vent GS components. See installation instructionson this page (21).21
<strong>Hearthstone</strong> Quality Home Heating Products, Inc. <strong>Tucson</strong> <strong>DX</strong>/<strong>ST</strong> Model <strong>8702</strong>Restrictor PlateThe restrictor plate is used to control excess draft ifnecessary. Controlling the draft also changes theaesthetics of the flame. The restrictor plate has asmall range of unlimited settings (see Photos 13 &14). The adjustment point is on the left side of thefirebox, accessible with the stones removed.Restrictor Plate PositionThe restrictor plate is factory set in the fully closedposition for shipping. Leave in the closed positionuntil you install the Heat Wave baffle – then set tothe fully opened position. This ensures properflames for a wide variety of vent configurations <strong>and</strong>efficiency. The restrictor plate consists of a rotatingflap in front of the firebox exhaust port behind theceramic Heat Wave baffle plate. Depending on yourvent configuration, you may need to adjust therestrictor plate position to reduce draft.Restrictor Plate AdjustmentLoosen the screw <strong>and</strong> position the restrictor plate inthe desired location. Tighten the screw to lock inplace.Photo 13: Restrictor Fully ClosedPhoto 14: Restrictor Fully Opened (no restriction)22
<strong>Hearthstone</strong> Quality Home Heating Products, Inc. <strong>Tucson</strong> <strong>DX</strong>/<strong>ST</strong> Model <strong>8702</strong>Figure 10: Venting Termination Diagram23
<strong>Hearthstone</strong> Quality Home Heating Products, Inc. <strong>Tucson</strong> <strong>DX</strong>/<strong>ST</strong> Model <strong>8702</strong>Electrical System InformationCAUTION: LABEL ALL WIRES PRIOR TO DISCONNECTION WHEN SERVICING CONTROLS. WIRING ERRORSCAN CAUSE IMPROPER AND DANGEROUS OPERATION. VERIFY PROPER OPERATION AFTER SERVICING.(ATTENTION: AU MOMENT DE L’ENTRETIEN DES COMMANDES, ÉTIQUETEZ TOUS LES FILS AVANT LEDÉBRANCHEMENT. DES ERREURS DE CÂBLAGE PEUVENT ENTRAÎUN FONCTIONNEMENT INADEQUATE ETDANGEREUX.)The proper location of wire connections is shown in the following figures.<strong>ST</strong> Model:Figure 11: <strong>Tucson</strong> <strong>ST</strong> Wiring Diagram24
<strong>Hearthstone</strong> Quality Home Heating Products, Inc. <strong>Tucson</strong> <strong>DX</strong>/<strong>ST</strong> Model <strong>8702</strong><strong>DX</strong> Model:Figure 12: <strong>Tucson</strong> <strong>DX</strong> Wiring DiagramFigure 13: Proflame GTMF Component Specifications25
<strong>Hearthstone</strong> Quality Home Heating Products, Inc. <strong>Tucson</strong> <strong>DX</strong>/<strong>ST</strong> Model <strong>8702</strong><strong>ST</strong> Model Optional Thermostat Connection InstallationOptional thermostat is installed <strong>and</strong> the thermostat wires are run to the <strong>Tucson</strong> <strong>8702</strong> <strong>ST</strong> properly. Remove theModesty Panel for proper access to the wire connections.1. Remove the Modesty Panel using a Phillips screwdriver to remove the 2 screws that mount the panel tothe stove. Retain the screws for reinstallation.2. Using a 5/16” wrench, remove the nut on the IPI/CPI switch <strong>and</strong> pull the switch through the hole in thepanel.3. Follow the wires from the ON/OFF/T-<strong>ST</strong>AT switch back to their connections. Mark <strong>and</strong> disconnect thewires where they connect to the blue <strong>and</strong> white wires on the wire harness. The yellow, purple <strong>and</strong> blackwires stay connected to the switch.4. The panel is now free to pull away from the stove.Photo 15 – Modesty Panel RemovalUse the photo below for reference when making the following connections. (The thermostat wire should alreadyhave female connectors attached to the two wires.)1. Locate the black wire that shipped in the accessory box with your <strong>Tucson</strong>. Attach one Male end on theblack wire to one female connector on the thermostat wire.2. Find the yellow wire that is unconnected coming from the ON/OFF/T-stat switch. Connect the Maleterminal on the yellow wire to the Female connector on the second thermostat wire.3. Slide the T-tap terminal over the purple wire. Use a pair of pliers to crimp it in place on the purple wire.(When crimping the T-tap down ensure it cuts through the purple wire’s insulation <strong>and</strong> into the wirecreating a connection)4. Connect the Male terminal from the black wire (connected to the thermostat) wire to the end of the T-tapterminal, as shown in photo below.5. Reconnect the blue <strong>and</strong> white wires <strong>and</strong> reinstall the modesty panel.Thermostat WireT-Tap TerminalSwitchMale to Male WireConnectorPhoto 16 – Optional Thermostat Connection Detail (switch removed for clarity)26
<strong>Hearthstone</strong> Quality Home Heating Products, Inc. <strong>Tucson</strong> <strong>DX</strong>/<strong>ST</strong> Model <strong>8702</strong>Gas Supply & ConnectionsNOTE: Ensure the gas line is installed as close to the floor as possible to avoid interference or conflict witha blower assembly installation.NOTICE: A QUALIFIED TECHNICIAN MU<strong>ST</strong>CONNECT THE HEATER TO THE GAS SUPPLYAND LEAK TE<strong>ST</strong> THE UNIT BEFORE IT ISAPPROVED FOR USE. CONSULT ALL CODES.WARNING: THE UNIT MU<strong>ST</strong> BE IN<strong>ST</strong>ALLED ANDCONNECTED IN ACCORDANCE WITH LOCALCODES, OR IN THE ABSENCE OF LOCAL CODES,WITH THE MO<strong>ST</strong> CURRENT EDITION OF THENATIONAL FUEL GAS CODE ANSI Z223.1 (NFPA54) OR CAN/CGA B149 IN<strong>ST</strong>ALLATION CODE.Figure 14: Gas Control ValveNFPA Code <strong>and</strong> <strong>Hearthstone</strong> require the use ofa dedicated sediment trap just upstream of theunit. Damage to the valve, or other componentsdue to the lack of a sediment trap are notcovered by warranty (see figure 15).Figure 15: Sediment Trap (Typical)27
<strong>Hearthstone</strong> Quality Home Heating Products, Inc. <strong>Tucson</strong> <strong>DX</strong>/<strong>ST</strong> Model <strong>8702</strong>Gas ConnectionsThe gas supply connection is made to the <strong>Tucson</strong>’sgas control valve under the bottom left center of theunit using a 3/8” male NPT fitting. The supply lineshould be ½” diameter, or appropriately sized toprovide a sufficient gas supply to meet the maximumdem<strong>and</strong> of the unit without undue loss of pressure.We recommend a flexible line to avoid unduemechanical load on the valve <strong>and</strong> to ease threadalignment, but refer to local codes.CAUTION: CHECK FUEL GAS TYPE!The <strong>Tucson</strong> is factory equipped to use natural gas(NG) <strong>and</strong> requires conversion for use with propane(LP). You must purchase <strong>and</strong> install a propane (LP)fuel conversion kit if required for your installation.Use kit 97-56100 (<strong>ST</strong>) or 97-56104 (<strong>DX</strong>). Contactyour <strong>Hearthstone</strong> dealer.Gas SupplyThis appliance <strong>and</strong> its individual shutoff valve mustbe disconnected from the gas supply piping systemduring any pressure testing of that system at testpressures in excess of ½ psig. The <strong>Tucson</strong> must beisolated from the gas supply piping system byclosing its individual manual shutoff valve during anypressure testing of the gas supply piping system attest pressures equal to or greater than ½ psig.Gas Pressure AdjustmentNOTE: A QUALIFIED TECHNICIAN MU<strong>ST</strong>PERFORM THIS PROCEDURE!Once connected to the gas supply, the supply line<strong>and</strong> manifold gas pressures must be tested. Thesupply line pressure is tested to ensure it meets theminimum gas supply pressure as listed in thespecifications for the type of fuel in use (NG or LP).Test by connecting a manometer to the supply line<strong>and</strong> adjusting the incoming pressure if necessary tomeet the required supply line pressure as listed inspecifications. The manifold pressure tap on the gascontrol valve, refer to Figure 14 for location.If the installer must convert the unit to adjust forvarying altitudes, the information sticker (similar tothe one shown in Figure 16) must be filled out bythe installer <strong>and</strong> adhered to the appliance at the timeof conversion. For installations from 2000 – 4500feet (610-1370 meters) use the orifice sizes(DMS) 42 for NG <strong>and</strong> 54 for LP. See the ratinglabel for more information.This appliance is factory equipped for use at 0-2000feet (0-610 meters) altitude. (Cet appareil estequipe pour des altitudes compries entre 0 et2000pieds (0-610m) seulment).This appliance is factory set for use b etween 0-2000 ft.A conversion kit for the <strong>Tucson</strong> (<strong>8702</strong>) is availablethrough HearthStone <strong>and</strong> shall be used to convert thisappliance to the appropriate altitude. Instructions areincluded with the kit. Ask for Kit #97-56106 for altitude2000-4500 ft. The conversion should be carried out inaccordance with the requirements of the AuthorityHa ving Jurisdic tion.The normal input ratingNG LPInput rating (0-2000 ft) 25,000 25,000Input rating (2000-4500 ft) 24,200 24,800This appliance has been converted for use at ana ltitude of _______ Orifice _______Manifold pressure ______________Input (btu/hr) __________________Fuel Type ________Day_______ Month ____________ Year______________With kit number _________________________________Conversion performed by:Name: ______________________________________Compa ny:___________________________________Address: _____________________________________Figure 16: Sample Information StickerHigh Altitude InstallationsFor high altitude installations consult the local gasdistributer or the authority having jurisdiction forproper rating methods.The decreased atmospheric pressure at higheraltitudes affects the heat value of fuel gases. Gassuppliers typically derate the gas intended for use atelevations above 2000 feet (610 meters). Check withyour gas supplier before derating this appliance.28
<strong>Hearthstone</strong> Quality Home Heating Products, Inc. <strong>Tucson</strong> <strong>DX</strong>/<strong>ST</strong> Model <strong>8702</strong>Heat Wave Baffle, Log Set, & Screen PlacementCAUTION: FRAGILE! HANDLE LOG SET WITHCARE. ALWAYS WEAR GLOVES AND SAFETYGOGGLES WHILE HANDLING THE LOG SET.WARNING: Failure to position the parts inaccordance with these diagrams or failure to useonly parts specifically approved with thisappliance may result in property damage orpersonal injury.3. Lift the front edge of the baffle up to align withthe hole in the bottom of the cast iron heatexchanger.Place only the ceramic log set supplied with the unitin the firebox. Do not place any other ceramic logs,wood logs, or other materials in the firebox. If thelog set is damaged or broken contact your dealer forreplacement. The ceramic logs will last a long time;however, they will break if subjected to rough orimproper h<strong>and</strong>ling. Exact positioning of the log set isrequired in order to obtain a pleasing flame pattern<strong>and</strong> efficient combustion. Incorrect log placementmay cause carbon build-up; excess thermal stresson the log set <strong>and</strong> stove parts, reduced efficiency,<strong>and</strong> high levels of carbon monoxide. If the log setdoes not fit into the firebox exactly as outlined,contact your dealer for assistance.Installation of the Heat Wave BafflePhoto 18 – Baffle Mounting Boss4. Locate the mounting bolt <strong>and</strong> install it throughthe baffle <strong>and</strong> into the boss on the heatexchanger.To install the heat wave baffle <strong>and</strong> log set, you musthave access to the firebox (for access instructionssee page 15).1. Remove the Heat Wave baffle from thepackaging.2. Set the base of the baffle centered on the shelfin the rear of the firebox.Photo 19 – Baffle Mounting Bolt5. Do not over tighten the bolt as it may damage orbreak the baffle. When installed properly, itshould look like the baffle in the followingphotos. The bottom edge of the baffle must reston the shelf. If the baffle lifts off the shelf, themounting bolt is too tight.Photo 17 – Baffle Shelf6. You are now ready to open the restrictor plate<strong>and</strong> install the log set.29
<strong>Hearthstone</strong> Quality Home Heating Products, Inc. <strong>Tucson</strong> <strong>DX</strong>/<strong>ST</strong> Model <strong>8702</strong>Installation of the Log Set(Refer to the following images in this section for logset assembly)3. Place Log 2 into the channel in the burner infront of log 1 as shown.1. Remove the packaging material around the logset assembly. Be careful not to damage the logset when unpacking.12 345Photo 23 – Log 2 Position4. Place log 3 onto the end of log 1 as shown.Photo 20 – Log Set Numbering2. Place log 1 on support bracket as shown.Photo 24 – Log 3 Position5. Place log 4 on top of logs 1 <strong>and</strong> 2 as shown.Photo 21 – Log 1 Mounting DetailPhoto 22 – Log 1 in PositionPhoto 25 – Log 4 Position6. Gently place Log 5 in the indentation on theburner <strong>and</strong> rest it on log 3 as shown.30
<strong>Hearthstone</strong> Quality Home Heating Products, Inc. <strong>Tucson</strong> <strong>DX</strong>/<strong>ST</strong> Model <strong>8702</strong>2. Hang screen by folded lip on top of glass frameas shown in photo 28.Photo 26 – Log 5 Position7. Place small tufts of the Platinum Bright Emberson the burner <strong>and</strong> log surfaces for additionalglow as desired – do not block burner ports.Photo 28 – Mounted Screen DetailRemoval of Log SetCAUTION: THE LOG SET, BURNER, AND EMBERSRETAIN HEAT AND CAN BE VERY HOT! ALLOW2 TO 3 HOURS TO COOL AFTER PILOT LIGHT I<strong>ST</strong>URNED OFF FOR SAFE HANDLING.To remove the log set, follow the Installation of LogSet instructions in the reverse order.Photo 27 –Platinum Bright Embers (Enlarged toShow Detail)Installation of the Optional ScreenTo install the optional screen, you must have accessto the glass frame (for access instructions see page15).Completing the Installation1. Close the firebox – reverse the fireboxaccess procedure outlined on page 15.2. Install any batteries as necessary.Synchronize the Remote Transmitter <strong>and</strong>Receiver if applicable to your model (seepage 39).3. Install the Blower Assembly Kit (<strong>DX</strong> Model).See the instructions provided with the kit.4. Install the stone set (see page 32).31
<strong>Hearthstone</strong> Quality Home Heating Products, Inc. <strong>Tucson</strong> <strong>DX</strong>/<strong>ST</strong> Model <strong>8702</strong>Stone Installation1. Remove the top casting (lift off) <strong>and</strong> lay it facedown on a clean work surface.Photo 292. Loosen the two screws securing the top heatshield <strong>and</strong> slide it up <strong>and</strong> forward to remove –set carefully aside.Top Heat Shield ScrewsPhoto 315. Slide the second stone down on top of the firststone. The two beveled edges should touchevenly when the second stone is in position6. Locate the side stone retaining shields. Slideone shield down between the stone <strong>and</strong> thefirebox as shown in Photo 32.Photo 303. Installing the side stones. Locate the four sidestones. Arrange the stones so the grain runs inthe same direction.4. Slide one stone down the side of the stovebetween the cast iron <strong>and</strong> the firebox as shownin Photo 31. Ensure the beveled edges are onthe top <strong>and</strong> bottom <strong>and</strong> facing out. Slide it downuntil the stone is resting on the bottom plate.Photo 327. Repeat Steps 1 through 4 on the other side ofthe stove. Your side stones are now in place.a. HINT: The side shields should provideenough tension to hold the stones outagainst the side castings so they do notrattle, yet not so much tension that theyare difficult to install <strong>and</strong> remove. Adjustthe shield’s tension by simply bendingthe metal until it achieves the propershape to apply the correct pressure.8. Reinstall the top heat shield removed in step 2 –tighten the mounting screws (see Photo 30).32
<strong>Hearthstone</strong> Quality Home Heating Products, Inc. <strong>Tucson</strong> <strong>DX</strong>/<strong>ST</strong> Model <strong>8702</strong>9. Installing the top stones. Refer to Photos 33 -35 when installing the top stones <strong>and</strong> stonebrackets.Rear Retaining BracketScrewsBossesFront Retaining BracketPhoto 3310. With the top outer surface facing down, locate<strong>and</strong> place the center top stone in positionbetween the bosses <strong>and</strong> in the center of the topwith the beveled edges <strong>and</strong> polished surfacefacing down.11. Locate <strong>and</strong> place the 2 outer top stones facedown between the side bosses. Place the sidestones tightly against the center stone tominimize spaces at the seams.12. Using 2 retaining screws, mount the Front StoneRetaining Bracket.13. Using 4 retaining screws, mount the Rear StoneRetaining Bracket.Photo 3414. The brackets should hold the stones securely<strong>and</strong> prevent any shifting. Lift the completedassembly <strong>and</strong> carefully set it back on the <strong>Tucson</strong>body.Photo 3533
<strong>Hearthstone</strong> Quality Home Heating Products, Inc. <strong>Tucson</strong> <strong>DX</strong>/<strong>ST</strong> Model <strong>8702</strong>WARNING: IF YOU DO NOT FOLLOW THESEIN<strong>ST</strong>RUCTIONS EXACTLY, A FIRE OREXPLOSION MAY RESULT CAUSING PROPERTYDAMAGE, PERSONAL INJURY OR LOSS OF LIFE.CAUTION: LIGHTING THE TUCSON FOR THEFIR<strong>ST</strong> TIME AND ADJU<strong>ST</strong>MENTS TO THE UNITSHOULD BE PERFORMED BY QUALIFIEDSERVICE PERSONNEL.Lighting InstructionsUse a gas sniffer device or smell all around theappliance area for gas. Be sure to check next to thefloor because some gases are heavier than air(propane). If you do not detect or smell gas, proceedwith the lighting procedure. If you do detect or smellgas, DO NOT proceed with the lighting procedure.Instead, immediately refer to the What To Do IfYou Smell Gas Warning, on the cover of thismanual.Pilot Light WarningDo not attempt to light the unit with a match or byany means other than the ignition system suppliedwith the unit.To Light the Stove:For the <strong>Tucson</strong> <strong>ST</strong>: plug the AC/DC powertransformer into the nearest 120V electrical outlet<strong>and</strong>/or install batteries in the battery holder.1. Open the gas supply to the valve.2. On the control panel, switch theON/OFF/T’’<strong>ST</strong>AT switch to the ON position.3. Switch the pilot to CPI mode <strong>and</strong> turn up theregulator on the valve.The control system will beep several times whenlighting the unit for the first time until all air in the gasline is purged. The pilot will ignite automaticallywhen the air is purged. The main burner shouldignite seconds later.For the <strong>Tucson</strong> <strong>DX</strong>: connect the power cord fromthe Fan Control Module to the nearest 120Velectrical outlet.1. Open the gas supply to the valve.2. Slide the ON/ REMOTE/OFF switch to theON position.3. Switch the pilot to CPI modeThe control system will beep several times whenlighting the unit for the first time until all air in the gasline is purged. The pilot will ignite automaticallywhen the air is purged. The main burner shouldignite seconds later.Lighting & OperationUsing the Remote:The Remote <strong>and</strong> Receiver must be synchronizedbefore initial use, <strong>and</strong> after every battery change (forinstructions, see page 39).Smoke <strong>and</strong> Fumes WarningWhen lit for the first time, the <strong>Tucson</strong> will emit somesmoke <strong>and</strong> fumes. This is normal “off-gassing” ofthe paints <strong>and</strong> oils used in the manufacturing <strong>and</strong>assembly of the unit. Open windows to vent theroom if necessary. The off gassing <strong>and</strong> fumes willsubside after the first 10 to 20 minutes of operation.Odors <strong>and</strong> ImpuritiesA heater of this type may produce odors duringheater operation at any time due to impurities thatmay exist in the immediate area around the unit.Sources of impurities can be cleaning solvents, paintsolvents, cigarettes, c<strong>and</strong>les, smoke, pet hair, dust,adhesives, new carpet, <strong>and</strong>/or textiles. Such odorswill eventually dissipate. However, opening awindow or otherwise providing additional ventilationto the area can alleviate the condition sooner. If anyodor persists, find <strong>and</strong> remove the cause, or contactyour dealer or an authorized service technician.Initial AdjustmentsOnce the <strong>Tucson</strong> is set in place, connected <strong>and</strong>assembled as described in the Clearances ToCombustibles, Venting Components &Configurations, Electrical Connections, <strong>and</strong> GasSupply <strong>and</strong> Connections sections of this manual, theunit is ready to be lit <strong>and</strong> adjusted to its particularinstallation. <strong>Hearthstone</strong> tests each unit prior toshipment, so ignition should take place withoutfailure. However, a number of small adjustmentsmay be necessary to compensate for variations ingas pressure, altitude, <strong>and</strong> other factors particular toeach installation.Pilot AdjustmentThe pilot light is preset by the manufacturer <strong>and</strong>should not need adjustment. The pilot light flameshould be large enough to engulf the sensor (refer toFigure 17) <strong>and</strong> to reach the light off ports on theburner but not so large as to create excessive noiseor consume excessive gas. However, it can beadjusted by means of the pilot light adjustmentscrew located on the gas control valve. Controllingthe <strong>Tucson</strong> by a remote or wall-mounted thermostatmay become erratic, nonexistent, or the unit may go34
<strong>Hearthstone</strong> Quality Home Heating Products, Inc. <strong>Tucson</strong> <strong>DX</strong>/<strong>ST</strong> Model <strong>8702</strong>out, if the pilot flame is too small or misdirected awayfrom the thermopile.Figure 17: Pilot Flame PatternWARNING: THE CONTROL HAS AN INTERLOCKDEVICE. IF THE <strong>ST</strong>OVE HAS BEEN LIT, IT WILLNOT RELIGHT AGAIN IMMEDIATELY. AFTERSHUTTING OFF ALL GAS FLOW, THE PILOTBURNER CANNOT BE RELIT UNTIL THE FLAMESENSOR HAS COOLED, ALLOWING THEELECTROMAGNET TO BE RELEASED (APPROX.60 SEC.).Air ShutterThe air shutter is used to regulate the air-to-gascombustion mixture, which in turn influences the size<strong>and</strong> color of the flames. The air shutter is factorypositioned in the general location needed for testingthe unit with natural gas (NG) <strong>and</strong> minimum venting.However, if the unit is not burning as well as itshould in your installation, then the air shutter mayneed adjusting.To determine if the air shutter needs adjustment, it isnecessary to view the flame pattern with the burneroutput set at its highest setting. Allow the unit tooperate for at least 10 minutes to allow the entireunit to reach temperature, <strong>and</strong> for the flame patternto stabilize. Generally, the more air (open shutter) inthe mixture, the bluer the flame. Less air (closedshutter) results in a more yellow flame, but too littleair will result in incomplete combustion, lowefficiency <strong>and</strong> a dirty burn. There are two simpleguidelines to aid in determining the correct flamepattern:1. If the flame just above the surface of theburner or at the base of the logs iscompletely blue, the air shutter may be opentoo far;2. If the flame is dirty, sooty or licks the top ofthe baffle, the air shutter may be closed toofar.Some conditions cannot be corrected through airshutter adjustment; an adjustment must be made tothe gas supply pressure or by changing therestriction plate setting. Qualified service personnelmust perform supply line/manifold gas line pressureadjustments <strong>and</strong> restrictor plate adjustments. Do notattempt to complete any part of the installation oradjustment of this unit unless technically qualified.Air Shutter AdjustmentsWARNING: THE ADJU<strong>ST</strong>ING ROD IS HOT!WARNING: THE AIR SHUTTER IS FACTORY SETAND ONLY A QUALIFIED GAS TECHNICIANSHOULD MAKE ADJU<strong>ST</strong>MENTS.The air shutter is adjustable while the stove isburning. Loosen the set screw on the adjusting rodlocated in the lower rear center of the stove. Movethe rod in or out to adjust the flame pattern. SeePhotos 36 <strong>and</strong> 37. Push the rod in to open the airshutter, <strong>and</strong> pull it out to close the shutter. Whenthe flame pattern is correct, tighten the set screwwithout letting the rod move.Photo 36 – Air Shutter ClosedPhoto 37 – Air Shutter Opened35
<strong>Hearthstone</strong> Quality Home Heating Products, Inc. <strong>Tucson</strong> <strong>DX</strong>/<strong>ST</strong> Model <strong>8702</strong>Note: Very little movement is needed to substantiallychange the burn <strong>and</strong> flame patterns. Someconditions cannot be corrected through air shutteradjustment; an adjustment must be made to the gassupply pressure. Supply line/manifold gas linepressure adjustments must be performed byqualified service personnel. Do not attempt tocomplete any part of the installation or adjustment ofthis unit unless technically qualified to do so.Burner Flame AppearanceOnce the unit is lit, observe the flame pattern <strong>and</strong>adjust as necessary. Also, a periodic visual check ofthe burner flame should be performed. The burnerflames can be adjusted by means of the air shutter.To determine if the burner flame needs adjustment,it is necessary to view the flame pattern with thevalve output at its highest setting. Allow the unit tooperate for 10 minutes enabling the entire unit toreach temperature <strong>and</strong> for the flame pattern tostabilize. The flame pattern should be similar to theone shown in Photo 38. There are several guidelinesto aid in determining if the flame pattern is correct:1. The flame should not be dirty, smoky, sooty, orlick the top of the stove.2. The flame should not rise off the pan burner; thisis called “lifting”.3. Flames should not impinge heavily on the logset. They should “fit” through the pre-formedspaces designed in the log set.ON/OFF/T’<strong>ST</strong>AT switch (<strong>ST</strong> model),ON/REMOTE/OFF switch on the Receiver (<strong>DX</strong>Model) or by the Remote Control (<strong>DX</strong> model).For the <strong>ST</strong> model: simply slide the switch to the ONposition to automatically light the burner <strong>and</strong> enjoythe heat from the unit. Slide the switch to ‘T’Stat’ tocontrol your stove with an optional wall thermostat,or remote thermostat.<strong>Manual</strong>ly adjust the flame height on the variableoutput control located on the gas control valve; youcan vary the rate of heat output to meet the heatingrequirements of the season.Photo 39 – <strong>ST</strong> Valve Output ControlFor the <strong>DX</strong> model: with the Receiver switch set to‘REMOTE’ you have the option of setting thethermostat on the remote control to the desired roomtemperature <strong>and</strong> the unit will cycle on <strong>and</strong> off asrequired. Or you can set the switch on the Receiverto ‘ON’ <strong>and</strong> the burner will light <strong>and</strong> remain on Highuntil you turn it off.Photo 38 – Typical Burner Flame AppearanceDaily OperationYour <strong>Tucson</strong> gas-fired heater is easily operatedonce installed <strong>and</strong> adjusted by qualified servicepersonnel. The unit is controlled via thePhoto 40 – <strong>DX</strong> Receiver SwitchYou can adjust the flame height on the <strong>DX</strong> via theremote control, or use the ‘Smart’ mode to let thesystem automatically adjust it for you. See theProflame GTMF use <strong>and</strong> installation instructionsincluded with the Remote transmitter for detailedsystem operation instructions.36
<strong>Hearthstone</strong> Quality Home Heating Products, Inc. <strong>Tucson</strong> <strong>DX</strong>/<strong>ST</strong> Model <strong>8702</strong>For both models: During the summer non-heatingseason, switch the unit “OFF”, <strong>and</strong> flip the pilotswitch to Intermittent (IPI). This will improve theoverall efficiency of the unit as the heat from the pilotis not wasted. When putting the unit back intoservice, replace any batteries with fresh ones, <strong>and</strong>refer to the lighting instructions on page 34.Note: the unit will produce odors for a shorttime when lit after a long period of non-use.A thorough cleaning of the unit to removedust will minimize this effect. Open a windowbriefly to help quickly dissipate the odors.When the unit is first lit, especially when cool, it isnormal to experience some condensation on theinside of the window glass. This condensation willburn off within the first few minutes of operation. Ifcontinuous condensation on the window glass ordripping water from any part of the unit or ventingsystem (chimney) is noted, immediately discontinueoperation of the unit <strong>and</strong> contact qualified servicepersonnel.To Turn off Gas <strong>and</strong> Shut Down theAppliance:1. Close the shut-off in the gas supply tothe valve.2. Set the thermostat to the “OFF” positionor turn the ON/OFF/T-<strong>ST</strong>AT orON/REMOTE/OFF switch to the “OFF”position.3. Switch the Pilot mode switch to IPImode.37
<strong>Hearthstone</strong> Quality Home Heating Products, Inc. <strong>Tucson</strong> <strong>DX</strong>/<strong>ST</strong> Model <strong>8702</strong>Routine Maintenance <strong>and</strong> CareYour <strong>Tucson</strong> requires minimal routine maintenance<strong>and</strong> care. Ensure the unit is cool <strong>and</strong> off whencleaning, or servicing.WARNING: DO NOT SUB<strong>ST</strong>ITUTE MATERIALS.For replacement parts, or for information about partsor service, contact your local <strong>Hearthstone</strong> dealer.CleaningWARNING: DO NOT CLEAN THE UNIT WHEN HOT.The unit should receive regular cleaning on, under,<strong>and</strong> around the stove to prevent the buildup of dust<strong>and</strong> lint. The exterior surfaces of the unit can becleaned using soap, water, <strong>and</strong> a soft cloth. Do notuse abrasive or chemical cleaners <strong>and</strong> take care notto scratch the glass or enamel finish (if so equipped)when cleaning the unit. The use of chemical waxbased cleaners or polishes are not recommendeddue to the potential for discoloration of the castings,stones or enamel when the residue of the cleanersor polishes is exposed to heat. Excessive buildup ofdust, spider webs, or room air contamination maycause odors when the stove is hot.Monthly:Glass CleaningAs fuel gas may contain some impurities; it will benecessary to clean the inside of the glassoccasionally. Do not use abrasive cleaners.Scratching the glass will weaken the integrity of theglass. Do not clean the glass when hot! Allow theglass to cool <strong>and</strong> apply a mild window cleaning fluid.Special gas appliance window cleaner is availablefrom your local <strong>Hearthstone</strong> dealer.WARNING: DO NOT OPERATE THIS APPLIANCEWITH THE GLASS PANEL REMOVED, CRACKED,OR BROKEN. DO NOT SUBJECT THE GLASS ORITS FRAME TO ABUSE, SUCH AS <strong>ST</strong>RIKING ORBENDING. REPLACEMENT OF THE GLASSPANEL SHOULD BE DONE BY A LICENSED ORQUALIFIED SERVICE PERSON.NOTE: If the venting system is disassembled for anyreason, re-install per the instructions provided in theventing section of this manual.Annually:Clean Firebox, Pilot, & Burner AssemblyThe firebox requires periodic cleaning to prevent theaccumulation of dust, lint, <strong>and</strong> other debris. To cleanthe firebox, set the switch to the “OFF” position, <strong>and</strong>turn off the gas supply to the valve. When the unit iscool, remove the front panel <strong>and</strong> glass (see page 15for Firebox Access instructions) <strong>and</strong> carefullyremove the decorative ceramic log set, taking carenot to damage the logs or chip the enamel cast iron.Remove all ember material. Clean the firebox baffle,ceramic burner, <strong>and</strong> carefully vacuum the entiresurface of the log set with a soft brush attachment.Thoroughly vacuum the ports (holes) along the topof the burner, <strong>and</strong> the pilot assembly.With the decorative ceramic logs out of the firebox,reseal the firebox <strong>and</strong> briefly light the unit accordingto the lighting instructions described on page 34.Check to ensure a proper flame is burning from eachburner port. The pilot flame should be burningproperly as shown in Figure 17.NOTE: Do not operate the unit for more than1-2 minutes without the log set in place. Turnthe unit off by setting the switch to “OFF”,<strong>and</strong> turning off the gas supply to the valve.Allow the unit to cool.Check <strong>and</strong> clean any burner ports that are notburning, or not burning properly. Clean burner portsusing a soft brush or vacuum cleaner. If the pilotflame height needs adjustment, it should be adjustedby qualified service personnel as described on page34.Complete the cleaning procedure by carefullyplacing the log set within the firebox as described onpage 28. Reattach the glass <strong>and</strong> front panel to sealthe firebox. Turn on the gas, light the unit <strong>and</strong> checkfor proper operation. Flame patterns should looksimilar to the flames in Photo 38. Regularly check toensure the area around the <strong>Tucson</strong> is kept free fromcombustible materials, gasoline, <strong>and</strong> otherflammable vapors <strong>and</strong> liquids. Check that the flow ofcombustion <strong>and</strong> ventilation air is not obstructed.38
<strong>Hearthstone</strong> Quality Home Heating Products, Inc. <strong>Tucson</strong> <strong>DX</strong>/<strong>ST</strong> Model <strong>8702</strong>Battery ReplacementWARNING: DISCONNECT POWER TO THE UNITAND SHUT OFF THE GAS SUPPLY TO THEVALVE BEFORE REPLACING ANY BATTERIES.<strong>Hearthstone</strong> recommends replacing all batteries atleast every season. Keep a supply of good qualityrechargeable batteries on h<strong>and</strong> to ensurefunctionality during power outages, <strong>and</strong> to give theenvironment a break.Remote Transmitter Battery ReplacementYou can easily change the Remote Transmitterbatteries by accessing the rear cover plate. Ensureyou orient the batteries correctly as indicated in thebattery compartment.Receiver Battery Replacement1. Move the switch to the OFF position. Removethe cover plate screws <strong>and</strong> pry the entire platewith the switch off the receiver’s batterycompartment.2. Install four new AA batteries. Ensure you orientthe batteries correctly as indicated on the batterycompartment cover.3. Ensure the switch is still in the OFF position,align the slider with switch stem <strong>and</strong> snap thecover plate back onto the battery compartment.4. Replace the cover plate screws.Initializing the Remote ControlWhenever you replace the batteries, you mustsynchronize communication between the Receiver<strong>and</strong> the Remote Control transmitter.1. Place the slider switch in the REMOTE position.2. Insert the end of a paper clip into the holemarked PRG on the Receiver cover. TheReceiver will beep three times to indicate it isready to synchronize with the Remote Control.3. Install three AAA batteries in the RemoteControl, <strong>and</strong> push the ON button. The Receiverwill beep four times to indicate the Remote’scomm<strong>and</strong> is accepted <strong>and</strong> is set to the particularcode of that Remote. The system is nowinitialized.Professional InspectionOnce a year, have the unit, <strong>and</strong> venting systeminspected by qualified service personnel to ensurethat they are clean, free of obstruction, safe, <strong>and</strong> ingood working order. If service or maintenance isrequired, have qualified service personnel perform it.As Needed:Glass <strong>and</strong> Gasket ReplacementIn the event that you need to repair or replace acracked or broken glass or gasketing use thefollowing instructions to replace the components. Fora broken glass ask for kit #97-58710 from yourAuthorized <strong>Hearthstone</strong> Dealer. Your <strong>Tucson</strong> uses afolded flat fiberglass gasket to make a tight sealbetween the glass frame <strong>and</strong> the firebox. In time, thegasket can become brittle <strong>and</strong> compressed <strong>and</strong>should be replaced. New gasket material is alsoavailable from your Authorized <strong>Hearthstone</strong> Dealer.Protect your h<strong>and</strong>s with work gloves, <strong>and</strong> wash uplater.1. Allow the <strong>Tucson</strong> to cool completely. Removethe glass from the glass frame by drilling out thefour 1/8” rivets that lock the glass in place. Pullthe glass away from the frame <strong>and</strong> set it aside.2. Remove the existing gasket from the glass bygrasping one end <strong>and</strong> pulling firmly. Clean off asmuch of the hanging fiber “hairs” as possible3. Locate the 1” x1/8” flat tape gasket. Peel theadhesive protecting paper away from one end.Starting at the center of the long end of the glassapply the gasket centered on the edge of theglass. Continue to wrap the gasket around theedge until you meet at the starting point. Do notoverlap the gasket ends or leave ends withragged edges.4. Firmly <strong>and</strong> evenly, fold the gasket around theedges of the glass so it lies flat on the surface.5. Place the gasket back in the glass frame. Withfour new 1/8” rivets replace the 2 glass clips.The glass <strong>and</strong> frame are now ready to be placedback on the unit.39
<strong>Hearthstone</strong> Quality Home Heating Products, Inc. <strong>Tucson</strong> <strong>DX</strong>/<strong>ST</strong> Model <strong>8702</strong>Parts ListPart # Description Part # Description17YY-355 Side Stone 5710-224 Control Door Hinge, Left17YY-360 Top Center Stone 7000-104 Battery Holder (<strong>ST</strong>)17YY-362 Top Outside Stone 7000-394 Remote Control Receiver (<strong>DX</strong>)27XX-100 Foot 7000-393 Remote Control Transmitter (<strong>DX</strong>)27XX-200 Control Door 7200-241 NG Burner Orifice #4127XX-300 Left Side 7200-253 LP Burner Orifice #5327XX-350 Right Side 7211-588 Ember Burner27XX-400 Front 7211-590 Log 1, Rear27XX-500 Top 7211-591 Log 2, Center Base27XX-486 Heat Exchanger 7211-592 Log 3, Right Lower3120-150 Heat Wave Baffle 7211-593 Log 4, Right Top3160-150 Heat Exchanger Gasket 7211-594 Log 5, Left Top3160-105 Delayed Ignition Relief Gasket 7211-395 IPI (NG)Pilot Burner Assembly3160-152 Pilot Gasket 7211-163 NG Pilot Orifice .62mm3160-106 Venturi Tube Gasket 7211-136 LP Pilot Orifice .35mm3160-107 Rear Orifice Plate Gasket 7211-340 LP Regulator <strong>Manual</strong> (<strong>ST</strong>)3160-081 ¾”x 1/8” Gasket Tape 7211-344 LP Regulator Stepper (<strong>DX</strong>)3160-155 Gasket 4”, Inlet 7211-100 NG Valve, <strong>Manual</strong> (<strong>ST</strong>)3160-157 Gasket 6”, Exhaust 7211-110 NG Valve, Stepper (<strong>DX</strong>)3170-150 Platinum Bright Embers 7211-101 DFC Board5710-200 Firebox 7211-104 Power Adapter (<strong>ST</strong>)5710-015 Venturi Tube 7211-102 DFC Wire Harness5710-220 Base Plate 7211-103 GTMF Wire Harness (<strong>DX</strong>)5710-230 Glass Frame 7211-105 Fan Control Module (<strong>DX</strong>)5710-240 Stone Support Panel 7211-404 Knob extension, 1” (<strong>ST</strong>)5710-279 Glass H<strong>and</strong>le, Spring Hook 7211-517 Charcoal embers 4oz5710-211 DFC Board Mounting Plate 97-58710 Glass Assembly5710-226 Modesty Panel (<strong>ST</strong>) 97-57100 Replacement Blower Kit5710-227 Modesty Panel (<strong>DX</strong>) 97-56100 LP Conversion Kit <strong>Manual</strong> (<strong>ST</strong>)5710-277 Pilot Shield 97-56104 LP Conversion Kit Stepper (<strong>DX</strong>)5710-222 Control Door Hinge, Right 97-56102 NG Conversion Kit <strong>Manual</strong> (<strong>ST</strong>)97-56105 NG Conversion Kit Stepper (<strong>DX</strong>)Key:XX = Finish (e.g. 10 = Matte Black Paint) – Specify finish required when ordering partsYY = Stone Type (e.g. 41 = Polished Grey Soapstone)WARNING: DO NOT SUB<strong>ST</strong>ITUTE MATERIALS. FOR REPLACEMENT PARTS, OR FOR INFORMATION ABOUTPARTS OR SERVICE, CONTACT YOUR AUTHORIZED HEARTH<strong>ST</strong>ONE RETAILER.For the name of the authorized retailer nearest to you, visit our website www.hearthstonestoves.com or write:<strong>Hearthstone</strong> Quality Home Heating Products, Inc.317 Stafford Ave.Morrisville, Vermont 05661-869540
<strong>Hearthstone</strong> Quality Home Heating Products, Inc. <strong>Tucson</strong> <strong>DX</strong>/<strong>ST</strong> Model <strong>8702</strong>TroubleshootingSymptom Possible Cause Corrective Action1. Pilot will not light. A. Power supply not plugged in<strong>and</strong>/or batteries are dead.B. Insufficient gas pressure, air inthe pilot line, or dirty or kinked gasline.C. Pilot orifice plugged.D. Defective or misalignedelectrode in pilot assembly.E. Defective ignitor.F. After sitting for "off" season(summer), pilot assembly may bedirty.A. Ensure power supply is plugged in <strong>and</strong> receiving 120VAC. Ensure power supply output is 6V DC. Replace allbatteries with known good batteries.B. Allow time for system to purge air in line. Check the inletgas pressure. Make sure it is within the Min/Max. allowablepressures.C. Clean or replace the pilot assembly.D. If a flame lights the pilot, check the electrode gap <strong>and</strong>location. The gap should be 1/8" in the flame area.E. Check for a good connection between ignitor <strong>and</strong>electrode. Check wire insulation. If everything is properlyconnected <strong>and</strong> still no spark, replace the DFC IgnitionModule.F. Clean or replace the pilot assembly.2. Pilot in CPI mode butwill not stay lit aftercarefully following lightinginstructions.A. Low or too high gas pressureB. Faulty connections.C. Pilot dirty or plugged.A. Check for proper inlet pressure for the fuel gas in use.B. Check connections on the valve.C. Clean or replace the pilot assembly.3. Pilot burning, no gas tomain burner,ON/OFF/T'<strong>ST</strong>AT orON/REMOTE/OFF switchin the "ON" position.A. Switch, Thermostat, Receiver,DFC Ignition Module, or wiresdefective.B. No power <strong>and</strong> batteries may bedead.C. Plugged burner orifice.A. Check wiring for proper connections. Check componentsfor proper operation. Place jumper wire across terminals atthermostat if present. If burner comes on, replace defectivethermostat. If not OK, place jumper across thermostat wiresat gas valve. If burner comes on, tighten connections, orreplace faulty wires.B. Restore 120V service. Check for proper output of FCM, orAC adaptor – replace unit if defective. Replace batteries toignition system <strong>and</strong>/or remote receiver.4. Pilot <strong>and</strong> burner comeon, but go out after somewarm-up.A. Inconsistent or insufficientflame on flame rectificationsensor.B. Insufficient gas pressure.C. Excessive draft.C. Remove <strong>and</strong> check burner orifice - clean or replace. Note:do not use any metal cleaning device, as this may damagethe orifice.A. Adjust pilot flame size <strong>and</strong> assure that the flame is aimeddirectly at the rectification sensor.B. Check line pressure to ensure that the correct inletpressure is present for the type of gas being used. If propanepressure is inconsistent, check for water condensation at theregulator.C. Check Restriction settings per this manual.41
<strong>Hearthstone</strong> Quality Home Heating Products, Inc. <strong>Tucson</strong> <strong>DX</strong>/<strong>ST</strong> Model <strong>8702</strong>Symptom Possible Cause Corrective Action5. Frequent pilot outageproblem in CPI mode.A. Pilot flame may be too low orblowing, (high), causing the pilotsafety to drop out.B. Excessive draft6. Glass fogs A. A normal result of gascombustion in a cold stove.A. Clean <strong>and</strong>/or adjust the pilot flame for maximumimpingement on the rectification sensor.B. Check Restriction settings per this manual.A1. After the heater has warmed up, the glass should clear.A2. Leave pilot in CPI mode to keep stove warmer.7. Blue Flames A. A normal result during the first20 minutes.A. Flames should begin to turn more yellowish after 20minutes of burning.8. Floating flames, lazy illdefined,quiet flames,which roll around,sometimes completely offof the port, sometimeswith overly, yellow tips.Possible sooting. Usuallyaccompanied by the odorof aldehydes.A. Potentially dangerousincomplete combustion due toincorrect air to fuel ratio (lack ofcombustion air or excessive fueldelivery I.e. excessive gaspressure, overrating of appliance).B. Incorrect air intake/exhaust flowsystem. Causes may be:B1. Blocked burner.B2. Blocked primary airB3. Blocked secondary air inletsC. Incorrect air shutter position.B. If the blue color stays; adjust the air shutter for a properburn.A. Check the appliance input rate <strong>and</strong> reduce if necessary.The air intake/exhaust flow system may be too restrictive orblocked (the rate at which the exhaust leaves [draft]determines the rate at which the combustion air is delivered).Poor draft results in insufficient air delivery or a restrictedexhaust. Correct air intake/exhaust flow system.B1. Clear ports.B2. Clear obstructions.B3. Clear obstructions.C. If gas pressures are correct <strong>and</strong> the flames stay the same,adjust the air shutter for a proper burn.9. Burner flashback. Airgasmixture ignites insideA. Excessive primary air.the burner near the orifice, B. Burner input underrated.usually creating a roaringnoise like a blowtorch. The C. Valve leak if flashback occursproblem is an imbalance with burner valve in off position.of gas flow velocity <strong>and</strong>burning speed pattern. D. Improper gas pipe size.A. Adjust the air shutter for a proper burn.B. Check input rate. Check input pressure using amanometer. Confirm correct gas pressure at house meter ortank (call gas company). Confirm burner orifice size.C. Replace valve. If above corrections do not eliminateflashback, replace burner.10. Delayed ignition(makes a sudden"whoosh" noise as theburner lights). This is abuildup of gas prior toignition. This is moreprevalent with propane(LP) fuel.A. Incorrect air-to-fuel ratio.A1. Primary air incorrect.A2. Burner ports plugged.B. Improper log placement.C. Pilot shield not installedproperly.D. Correct plumbing.A1. Adjust the air shutter for a proper burn.A2. Open ports to allow for proper travel of flames.B. Reposition logs to eliminate interference with flame travel.C. Ensure the pilot shield is installed in the proper position.42
<strong>Hearthstone</strong> Quality Home Heating Products, Inc. <strong>Tucson</strong> <strong>DX</strong>/<strong>ST</strong> Model <strong>8702</strong>Rating LabelMOD EL # <strong>8702</strong>-SERIAL #MODEL NAME: TUCSON DIRECT VENT GAS FIRED HEATERLI<strong>ST</strong>ED: GAS FIRED DIRECT VENT HEATERTE<strong>ST</strong>ED TO: ANSI Z21.88b -2005/CSA 2.33b-2005CGA-2.1 7-M9 1 CSA P.4.1-02CAUTION: DO NOT OPERATE WITH GLASS REMOVED, CRACKED, OR BROKEN.Replacemen t on the panel sho uld be done by a l icensed or q ualifie d serv ice pe rson.C AUTIO NNE R: N’o p re l’appareil avec le verra enl ve, craque ou casse. Leremplacement du panne au devrait tre fait par une personne de service qualifi é ou autoris é.èèêFUEL TYPE:INPUT RATING (Btu/hr) 0-2000 ftINPUT RATING (Btu/hr) 2000-4000FTORIFICE SIZE (DMS) 0-2000 ftORIFICE SIZE (DMS) 2000-4000 ftMANIFOLD PRESSURE - LO (in. w.c./kpa)MANIFOLD PRESSURE - HI (in. W.c./kpa)MINIMUM INLET P RESSURE (in. W.c./kpa)MINIMUM INPUT (btu/hr) 0/2000 ftMAXIMUM OUTPUT (btu/hr) 0-2000 ftNG25,00024,20041421.6/0.403.5/0.875. 0/1.2 518,00017,350LP25,00024,20053546.4/1.591 0.0/2 .4812/2 .9921,60019,100CER TIFIED FOR AND US CANADAHOMOLOGU E POUR LE CANADAALS O FOR M OBILE HOME IN<strong>ST</strong>ALLATIONThis appliance m ust be installed in accordance with the local codes, ifany, if not; follow the N ational Fuel Gas Code, ANSI Z 223.1 orCanadian Installa tion C odes, CSA B149.1. (Installer l'appareil selon lescode s ou r églements locaux , ou, en l'abs ence de tels réglements , selon les C odesd'installation CSA-B149.1)WARNING: Improper installation, adjustment, alteration, s ervice ormaintenance can cause injury or property damage. Refer t o theowne r's information manual provided with this appliance. Forassis tance or ad ditional infor mation consult a qualifie d inst aller, s erviceagency or the gas supplier. (L'AVERTISSEMENT: L'installationinconvenante, aj ustement, modification, s ervice ou entretien peutcaus er le d ommage s de propr iété ou ble ssu re. Référe r au man ue ld'information de propriétaire fourni cet ap pareil. Pour l'assistance ouinfor mation supp lémentaire consulte un qualifié e installeur, agence deservi ce ou le fournisseur de gaz.)MINIMUM CLEARANCES TO COMBU<strong>ST</strong>IBLESUNIT TO REAR WALLUNIT TO SIDE WALLSCORNER2” / 51 mm6” / 153 mm4” / 102 mmThis appliance is only for use wi th the typ e of gas in dicated o n this rating plate <strong>and</strong> may b e installe d in a n aftermarket,permanently located, m anu factured (mobile) home where no t pro hibited by loca l codes. See o wner’s m anual for details. Thisappliance is not convertible for use with other gase s, un less a certified kit is used. If the ve nt air intake system isdisassemble d for any reason, re install per the instructions pr ovided with the initi al instruct ions. This vent ed ga s fireplac eheater is not for use with air filte rs. Th is appliance m ust be properly co nnected to a venting system in ac cordance with thema nufa cturer’s in stallation instructions.VENTED GAS FIREPLACE HEATER - NOT FOR USE WITH SOLID FUEL.MANUFACTURED BY: HearthStone, MORRISVILLE, VERMONT 05661Date of Manufacture2009 2010 2011 Jan Feb Mar Ap r May Jun Jul Aug Sep Oct Nov DecDO NOT REMOVE OR COV ER THIS LABEL MAD E IN USA 3 3 00- 54043
<strong>Hearthstone</strong> Quality Home Heating Products, Inc. <strong>Tucson</strong> <strong>DX</strong>/<strong>ST</strong> Model <strong>8702</strong>WARRANTY REGI<strong>ST</strong>RATIONThe Original Purchaser can complete their warranty registration on our website at www.hearthstonestoves.com,or send a completed <strong>and</strong> signed Warranty Registration Form, which is enclosed in the Gas Stove warrantypacket, to the following address:<strong>Hearthstone</strong> Quality Home Heating Products, Inc.Warranty Department317 Stafford AvenueMorrisville, VT 05661NOTE: SENDING IN THE SIGNED WARRANTY REGI<strong>ST</strong>RATION FORM IS NOT REQUIRED AS ACONDITION OF WARRANTY COVERAGE OR HEARTH<strong>ST</strong>ONE’S PERFORMANCE.44