User Manual - ALLSEASONS Heating And Cooling
User Manual - ALLSEASONS Heating And Cooling
User Manual - ALLSEASONS Heating And Cooling

You also want an ePaper? Increase the reach of your titles
YUMPU automatically turns print PDFs into web optimized ePapers that Google loves.
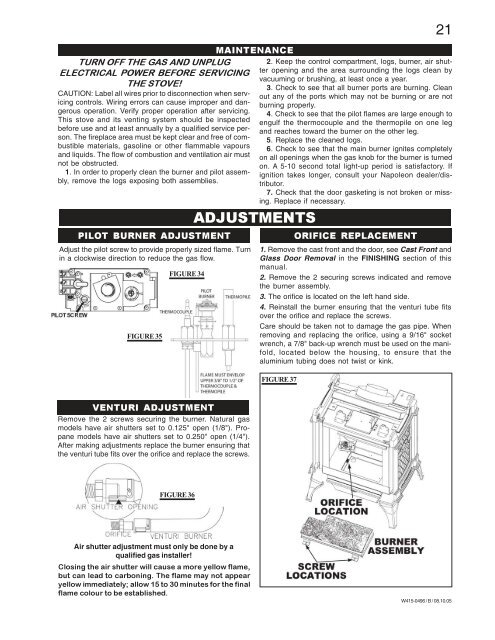
TURN OFF THE GAS AND UNPLUGELECTRICAL POWER BEFORE SERVICINGTHE STOVE!CAUTION: Label all wires prior to disconnection when servicingcontrols. Wiring errors can cause improper and dangerousoperation. Verify proper operation after servicing.This stove and its venting system should be inspectedbefore use and at least annually by a qualified service person.The fireplace area must be kept clear and free of combustiblematerials, gasoline or other flammable vapoursand liquids. The flow of combustion and ventilation air mustnot be obstructed.1. In order to properly clean the burner and pilot assembly,remove the logs exposing both assemblies.PILOT BURNER ADJUSTMENTAdjust the pilot screw to provide properly sized flame. Turnin a clockwise direction to reduce the gas flow.FIGURE 35FIGURE 34MAINTENANCEADJUSTMENTS212. Keep the control compartment, logs, burner, air shutteropening and the area surrounding the logs clean byvacuuming or brushing, at least once a year.3. Check to see that all burner ports are burning. Cleanout any of the ports which may not be burning or are notburning properly.4. Check to see that the pilot flames are large enough toengulf the thermocouple and the thermopile on one legand reaches toward the burner on the other leg.5. Replace the cleaned logs.6. Check to see that the main burner ignites completelyon all openings when the gas knob for the burner is turnedon. A 5-10 second total light-up period is satisfactory. Ifignition takes longer, consult your Napoleon dealer/distributor.7. Check that the door gasketing is not broken or missing.Replace if necessary.ORIFICE REPLACEMENT1. Remove the cast front and the door, see Cast Front andGlass Door Removal in the FINISHING section of thismanual.2. Remove the 2 securing screws indicated and removethe burner assembly.3. The orifice is located on the left hand side.4. Reinstall the burner ensuring that the venturi tube fitsover the orifice and replace the screws.Care should be taken not to damage the gas pipe. Whenremoving and replacing the orifice, using a 9/16" socketwrench, a 7/8" back-up wrench must be used on the manifold,located below the housing, to ensure that thealuminium tubing does not twist or kink.FIGURE 37VENTURI ADJUSTMENTRemove the 2 screws securing the burner. Natural gasmodels have air shutters set to 0.125" open (1/8"). Propanemodels have air shutters set to 0.250" open (1/4").After making adjustments replace the burner ensuring thatthe venturi tube fits over the orifice and replace the screws.FIGURE 36Air shutter adjustment must only be done by aqualified gas installer!Closing the air shutter will cause a more yellow flame,but can lead to carboning. The flame may not appearyellow immediately; allow 15 to 30 minutes for the finalflame colour to be established.W415-0496 / B / 08.10.05