User Manual - ALLSEASONS Heating And Cooling
User Manual - ALLSEASONS Heating And Cooling
User Manual - ALLSEASONS Heating And Cooling

Create successful ePaper yourself
Turn your PDF publications into a flip-book with our unique Google optimized e-Paper software.
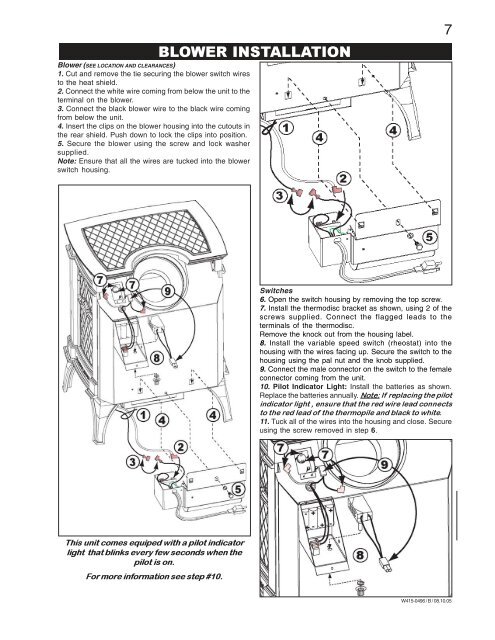
BLOWER INSTALLATIONBlower (SEE LOCATION AND CLEARANCES)1. Cut and remove the tie securing the blower switch wiresto the heat shield.2. Connect the white wire coming from below the unit to theterminal on the blower.3. Connect the black blower wire to the black wire comingfrom below the unit.4. Insert the clips on the blower housing into the cutouts inthe rear shield. Push down to lock the clips into position.5. Secure the blower using the screw and lock washersupplied.Note: Ensure that all the wires are tucked into the blowerswitch housing.7Switches6. Open the switch housing by removing the top screw.7. Install the thermodisc bracket as shown, using 2 of thescrews supplied. Connect the flagged leads to theterminals of the thermodisc.Remove the knock out from the housing label.8. Install the variable speed switch (rheostat) into thehousing with the wires facing up. Secure the switch to thehousing using the pal nut and the knob supplied.9. Connect the male connector on the switch to the femaleconnector coming from the unit.10. Pilot Indicator Light: Install the batteries as shown.Replace the batteries annually. Note: If replacing the pilotindicator light , ensure that the red wire lead connectsto the red lead of the thermopile and black to white.11. Tuck all of the wires into the housing and close. Secureusing the screw removed in step 6.This unit comes equiped with a pilot indicatorlight that blinks every few seconds when thepilot is on.For more information see step #10.W415-0496 / B / 08.10.05