JRV212T Owners Manual - Jensen Heavy Duty
JRV212T Owners Manual - Jensen Heavy Duty
JRV212T Owners Manual - Jensen Heavy Duty

You also want an ePaper? Increase the reach of your titles
YUMPU automatically turns print PDFs into web optimized ePapers that Google loves.
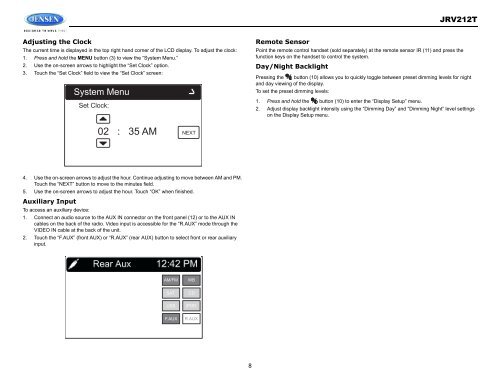
<strong>JRV212T</strong>Adjusting the ClockThe current time is displayed in the top right hand corner of the LCD display. To adjust the clock:1. Press and hold the MENU button (3) to view the “System Menu.”2. Use the on-screen arrows to highlight the “Set Clock” option.3. Touch the “Set Clock” field to view the “Set Clock” screen:System MenuSet Clock:Remote SensorPoint the remote control handset (sold separately) at the remote sensor IR (11) and press thefunction keys on the handset to control the system.Day/Night BacklightPressing the button (10) allows you to quickly toggle between preset dimming levels for nightand day viewing of the display.To set the preset dimming levels:1. Press and hold the button (10) to enter the “Display Setup” menu.2. Adjust display backlight intensity using the “Dimming Day” and “Dimming Night” level settingson the Display Setup menu.02 : 35AM NEXT4. Use the on-screen arrows to adjust the hour. Continue adjusting to move between AM and PM.Touch the “NEXT” button to move to the minutes field.5. Use the on-screen arrows to adjust the hour. Touch “OK” when finished.Auxiliary InputTo access an auxiliary device:1. Connect an audio source to the AUX IN connector on the front panel (12) or to the AUX INcables on the back of the radio. Video input is accessible for the “R.AUX” mode through theVIDEO IN cable at the back of the unit.2. Touch the “F.AUX” (front AUX) or “R.AUX” (rear AUX) button to select front or rear auxiliaryinput.AM/FMWBSATUSBCDiPODF.AUXR.AUX8