REAL TIME DVR
REAL TIME DVR
REAL TIME DVR
- No tags were found...

You also want an ePaper? Increase the reach of your titles
YUMPU automatically turns print PDFs into web optimized ePapers that Google loves.
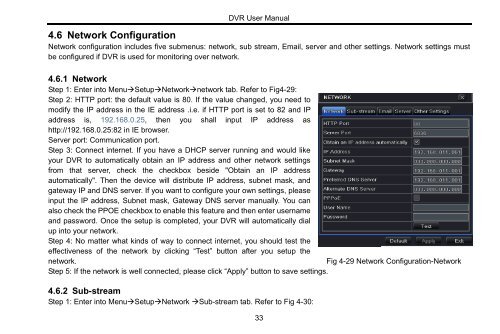
<strong>DVR</strong> User Manual4.6 Network ConfigurationNetwork configuration includes five submenus: network, sub stream, Email, server and other settings. Network settings mustbe configured if <strong>DVR</strong> is used for monitoring over network.4.6.1 NetworkStep 1: Enter into MenuSetupNetworknetwork tab. Refer to Fig4-29:Step 2: HTTP port: the default value is 80. If the value changed, you need tomodify the IP address in the IE address .i.e. if HTTP port is set to 82 and IPaddress is, 192.168.0.25, then you shall input IP address ashttp://192.168.0.25:82 in IE browser.Server port: Communication port.Step 3: Connect internet. If you have a DHCP server running and would likeyour <strong>DVR</strong> to automatically obtain an IP address and other network settingsfrom that server, check the checkbox beside "Obtain an IP addressautomatically". Then the device will distribute IP address, subnet mask, andgateway IP and DNS server. If you want to configure your own settings, pleaseinput the IP address, Subnet mask, Gateway DNS server manually. You canalso check the PPOE checkbox to enable this feature and then enter usernameand password. Once the setup is completed, your <strong>DVR</strong> will automatically dialup into your network.Step 4: No matter what kinds of way to connect internet, you should test theeffectiveness of the network by clicking “Test” button after you setup thenetwork.Fig 4-29 Network Configuration-NetworkStep 5: If the network is well connected, please click “Apply” button to save settings.4.6.2 Sub-streamStep 1: Enter into MenuSetupNetwork Sub-stream tab. Refer to Fig 4-30:33