Uncontrolled
Uncontrolled Copy - DTL Connectors
Uncontrolled Copy - DTL Connectors
- No tags were found...

Create successful ePaper yourself
Turn your PDF publications into a flip-book with our unique Google optimized e-Paper software.
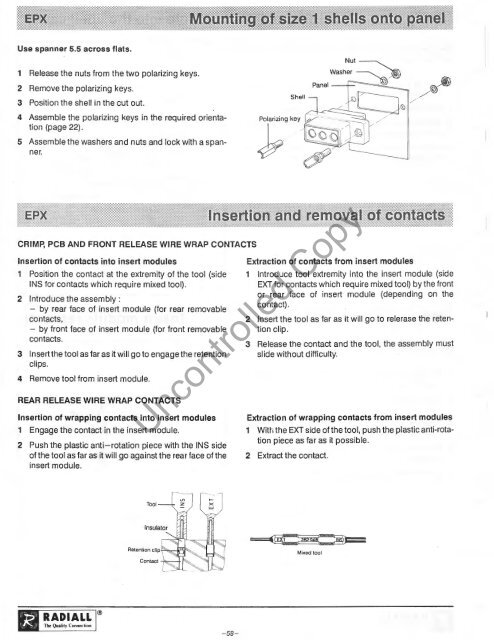
Use spanner 5.5 across flats.<br />
1 Release the nuts from the two polarizing keys.<br />
2 Remove the polarizing keys.<br />
3 Position the shell in the cut out.<br />
4 Assemble the polarizing keys in the required orientation<br />
(page 22).<br />
Polarizing key<br />
Jy<br />
CRIMP, PCB AND FRONT RELEASE WIRE WRAP CONTACTS<br />
Insertion of contacts into insert modules<br />
1 Position the contact at the extremity of the tool (side<br />
INS for contacts which require mixed tool).<br />
2 Introduce the assembly:<br />
- by rear face of insert module (for rear removable<br />
contacts,<br />
- by front face of insert module (for front removable<br />
contacts.<br />
3 Insert the tool as far as it will go to engage the retention<br />
clips.<br />
4 Remove tool from insert module.<br />
REAR RELEASE WIRE WRAP CONTACTS<br />
Insertion of wrapping contacts into insert modules<br />
1 Engage the contact in the insert module.<br />
2 Push the plastic anti-rotation piece with the INS side<br />
of the tool as far as it will go against the rear face of the<br />
insert module.<br />
Extraction of contacts from insert modules<br />
1 Introduce tool extremity into the insert module (side<br />
EXT for contacts which require mixed tool) by the front<br />
or rear face of insert module (depending on the<br />
contact).<br />
2 Insert the tool as far as it will go to relerase the retention<br />
clip.<br />
3 Release the contact and the tool, the assembly must<br />
slide without difficulty.<br />
Extraction of wrapping contacts from insert modules<br />
<strong>Uncontrolled</strong> Copy<br />
1 With the EXT side of the tool, push the plastic anti-rotation<br />
piece as far as it possible.<br />
2 Extract the contact.<br />
Mixed tool<br />
RADIALL ®<br />
The Quality Connec tion<br />
5 Assemble the washers and nuts and lock with a spanner.<br />
-58-