Uncontrolled
Uncontrolled Copy - DTL Connectors
Uncontrolled Copy - DTL Connectors
- No tags were found...

You also want an ePaper? Increase the reach of your titles
YUMPU automatically turns print PDFs into web optimized ePapers that Google loves.
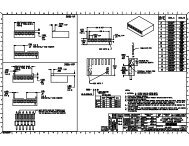
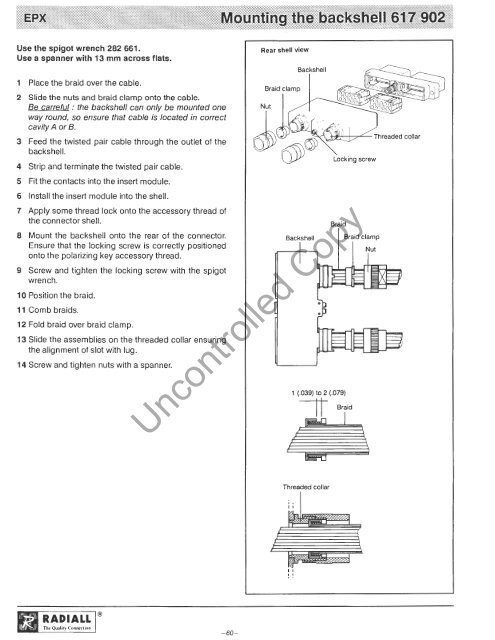
Use the spigot wrench 282 661.<br />
Use a spanner with 13 mm across flats.<br />
Rear shell view<br />
1 Place the braid over the cable.<br />
2 Slide the nuts and braid clamp onto the cable.<br />
Be carreful : the backshe/1 can only be mounted one<br />
way round, so ensure that cable is located in correct<br />
cavity A or B.<br />
3 Feed the twisted pair cable through the outlet of the<br />
backs hell.<br />
4 Strip and terminate the twisted pair cable.<br />
5 Fit the contacts into the insert module.<br />
6 Install the insert module into the shell.<br />
7 Apply some thread lock onto the accessory thread of<br />
the connector shell.<br />
8 Mount the backshell onto the rear of the connector.<br />
Ensure that the locking screw is correctly positioned<br />
onto the p()larizing key accessory thread.<br />
9 Screw-and tighten the locking screw with the spigot<br />
wrench.<br />
10 Position the braid.<br />
11 Comb braids.<br />
12 Fold braid over braid clamp.<br />
13 Slide the assemblies on the threaded collar ensuring<br />
the alignment of slot with lug.<br />
14 Screw and tighten nuts with a spanner.<br />
Backs hell<br />
----rt Braid<br />
Locking screw<br />
Braid<br />
1 (.039) to 2 (.079)<br />
Braid clamp<br />
<strong>Uncontrolled</strong> Copy<br />
Threaded collar<br />
'0<br />
II<br />
I I<br />
' '<br />
RADIALL ®<br />
Tht- Quality Connect io n<br />
-60 -