EMPIRE
Flint Hill & Burner VFD(M,R,T) - White Mountain Hearth
Flint Hill & Burner VFD(M,R,T) - White Mountain Hearth
You also want an ePaper? Increase the reach of your titles
YUMPU automatically turns print PDFs into web optimized ePapers that Google loves.
VFD(R,T,M)(18,24) & VFDR18LB10 LOG PLACEMENT (5 LOG SET)<br />
Before you begin: if you are installing logs onto the VFD(R,T,M)18 or<br />
VFD(R,T,M)24 models, this burner assembly is supplied with a set<br />
of five ceramic fiber logs. Do not handle these logs with your bare<br />
hands! Always wear gloves to prevent skin irritation from ceramic<br />
fibers. After handling logs, wash your hands gently with soap and<br />
water to remove any traces of fibers.<br />
The positioning of the logs is critical to the safe and clean operation<br />
of this burner assembly. Sooting and other problems may result<br />
if the logs are not properly and firmly positioned on the burner<br />
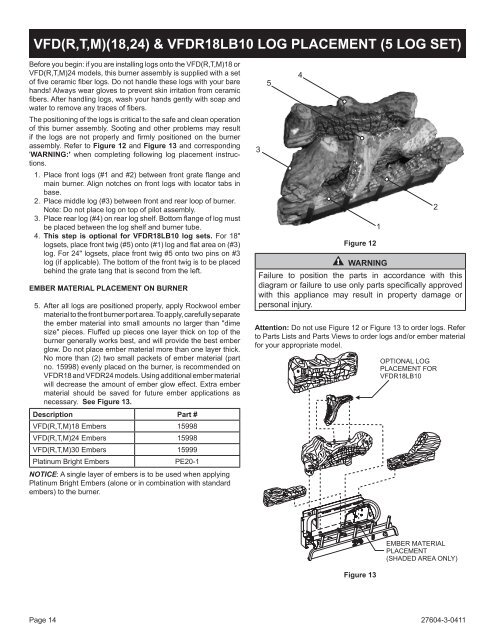
assembly. Refer to Figure 12 and Figure 13 and corresponding<br />
'WARNING:' when completing following log placement instructions.<br />
1. Place front logs (#1 and #2) between front grate flange and<br />
main burner. Align notches on front logs with locator tabs in<br />
base.<br />
2. Place middle log (#3) between front and rear loop of burner.<br />
Note: Do not place log on top of pilot assembly.<br />
3. Place rear log (#4) on rear log shelf. Bottom flange of log must<br />
be placed between the log shelf and burner tube.<br />
4. This step is optional for VFDR18LB10 log sets. For 18"<br />
logsets, place front twig (#5) onto (#1) log and flat area on (#3)<br />
log. For 24" logsets, place front twig #5 onto two pins on #3<br />
log (if applicable). The bottom of the front twig is to be placed<br />
behind the grate tang that is second from the left.<br />
EMBER MATERIAL PLACEMENT ON BURNER<br />
5. After all logs are positioned properly, apply Rockwool ember<br />
material to the front burner port area. To apply, carefully separate<br />
the ember material into small amounts no larger than "dime<br />
size" pieces. Fluffed up pieces one layer thick on top of the<br />
burner generally works best, and will provide the best ember<br />
glow. Do not place ember material more than one layer thick.<br />
No more than (2) two small packets of ember material (part<br />
no. 15998) evenly placed on the burner, is recommended on<br />
VFDR18 and VFDR24 models. Using additional ember material<br />
will decrease the amount of ember glow effect. Extra ember<br />
material should be saved for future ember applications as<br />
necessary. See Figure 13.<br />
Description Part #<br />
VFD(R,T,M)18 Embers 15998<br />
VFD(R,T,M)24 Embers 15998<br />
VFD(R,T,M)30 Embers 15999<br />
Platinum Bright Embers<br />
PE20-1<br />
NOTICE: A single layer of embers is to be used when applying<br />
Platinum Bright Embers (alone or in combination with standard<br />
embers) to the burner.<br />
3<br />
5<br />
4<br />
Figure 12<br />
WARNING<br />
Failure to position the parts in accordance with this<br />
diagram or failure to use only parts specifically approved<br />
with this appliance may result in property damage or<br />
personal injury.<br />
Attention: Do not use Figure 12 or Figure 13 to order logs. Refer<br />
to Parts Lists and Parts Views to order logs and/or ember material<br />
for your appropriate model.<br />
1<br />
2<br />
OPTIONAL LOG<br />
PLACEMENT FOR<br />
VFDR18LB10<br />
EMBER MATERIAL<br />
PLACEMENT<br />
(SHADED AREA ONLY)<br />
Figure 13<br />
Page 14<br />
27604-3-0411


