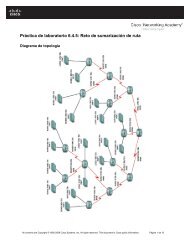
Práctica de laboratorio 9.6.1: Práctica de laboratorio de ...
Práctica de laboratorio 9.6.1: Práctica de laboratorio de ...
Práctica de laboratorio 9.6.1: Práctica de laboratorio de ...
- No tags were found...

You also want an ePaper? Increase the reach of your titles
YUMPU automatically turns print PDFs into web optimized ePapers that Google loves.
CCNA Exploration<br />
Conceptos y protocolos <strong>de</strong> enrutamiento: EIGRP<br />
Práctica <strong>de</strong> <strong>laboratorio</strong> <strong>9.6.1</strong>: Práctica <strong>de</strong> <strong>laboratorio</strong> <strong>de</strong> configuración básica <strong>de</strong> EIGRP<br />
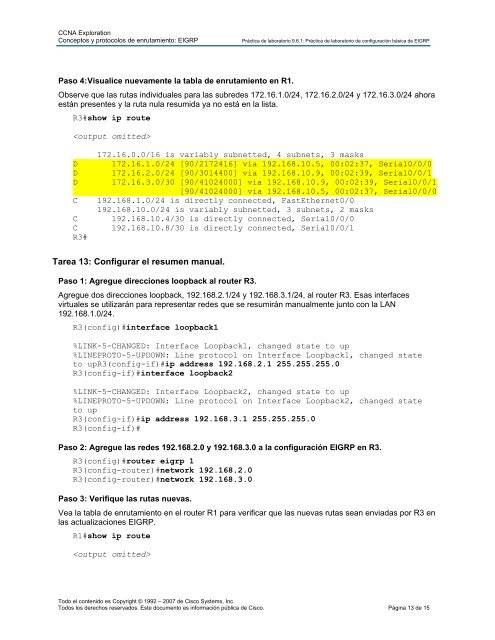
Paso 4: Visualice nuevamente la tabla <strong>de</strong> enrutamiento en R1.<br />
Observe que las rutas individuales para las subre<strong>de</strong>s 172.16.1.0/24, 172.16.2.0/24 y 172.16.3.0/24 ahora<br />
están presentes y la ruta nula resumida ya no está en la lista.<br />
R3#show ip route<br />
<br />
D<br />
D<br />
D<br />
C<br />
C<br />
C<br />
R3#<br />
172.16.0.0/16 is variably subnetted, 4 subnets, 3 masks<br />
172.16.1.0/24 [90/2172416] via 192.168.10.5, 00:02:37, Serial0/0/0<br />
172.16.2.0/24 [90/3014400] via 192.168.10.9, 00:02:39, Serial0/0/1<br />
172.16.3.0/30 [90/41024000] via 192.168.10.9, 00:02:39, Serial0/0/1<br />
[90/41024000] via 192.168.10.5, 00:02:37, Serial0/0/0<br />
192.168.1.0/24 is directly connected, FastEthernet0/0<br />
192.168.10.0/24 is variably subnetted, 3 subnets, 2 masks<br />
192.168.10.4/30 is directly connected, Serial0/0/0<br />
192.168.10.8/30 is directly connected, Serial0/0/1<br />
Tarea 13: Configurar el resumen manual.<br />
Paso 1: Agregue direcciones loopback al router R3.<br />
Agregue dos direcciones loopback, 192.168.2.1/24 y 192.168.3.1/24, al router R3. Esas interfaces<br />
virtuales se utilizarán para representar re<strong>de</strong>s que se resumirán manualmente junto con la LAN<br />
192.168.1.0/24.<br />
R3(config)#interface loopback1<br />
%LINK-5-CHANGED: Interface Loopback1, changed state to up<br />
%LINEPROTO-5-UPDOWN: Line protocol on Interface Loopback1, changed state<br />
to upR3(config-if)#ip address 192.168.2.1 255.255.255.0<br />
R3(config-if)#interface loopback2<br />
%LINK-5-CHANGED: Interface Loopback2, changed state to up<br />
%LINEPROTO-5-UPDOWN: Line protocol on Interface Loopback2, changed state<br />
to up<br />
R3(config-if)#ip address 192.168.3.1 255.255.255.0<br />
R3(config-if)#<br />
Paso 2: Agregue las re<strong>de</strong>s 192.168.2.0 y 192.168.3.0 a la configuración EIGRP en R3.<br />
R3(config)#router eigrp 1<br />
R3(config-router)#network 192.168.2.0<br />
R3(config-router)#network 192.168.3.0<br />
Paso 3: Verifique las rutas nuevas.<br />
Vea la tabla <strong>de</strong> enrutamiento en el router R1 para verificar que las nuevas rutas sean enviadas por R3 en<br />
las actualizaciones EIGRP.<br />
R1#show ip route<br />
<br />
Todo el contenido es Copyright © 1992 – 2007 <strong>de</strong> Cisco Systems, Inc.<br />
Todos los <strong>de</strong>rechos reservados. Este documento es información pública <strong>de</strong> Cisco. Página 13 <strong>de</strong> 15