Práctica de laboratorio 11.6.1: Práctica de laboratorio sobre ...
Práctica de laboratorio 11.6.1: Práctica de laboratorio sobre ...
Práctica de laboratorio 11.6.1: Práctica de laboratorio sobre ...

You also want an ePaper? Increase the reach of your titles
YUMPU automatically turns print PDFs into web optimized ePapers that Google loves.
CCNA Exploration<br />
Conceptos y protocolos <strong>de</strong> enrutamiento:<br />
OSPF<br />
Práctica <strong>de</strong> <strong>laboratorio</strong> <strong>11.6.1</strong>: Práctica <strong>de</strong> <strong>laboratorio</strong> <strong>sobre</strong> configuración OSPF básica<br />
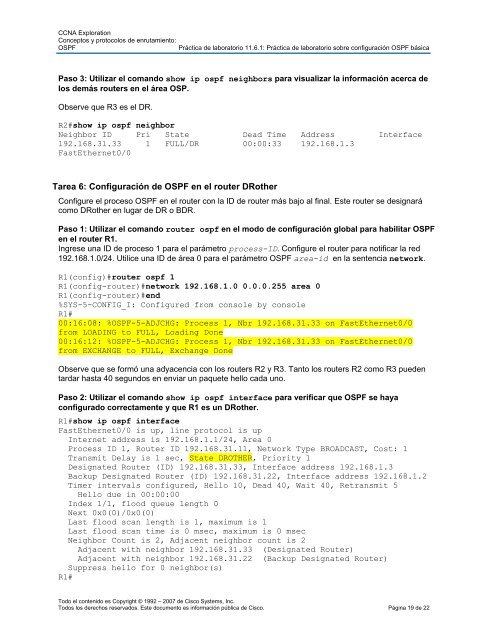
Paso 3: Utilizar el comando show ip ospf neighbors para visualizar la información acerca <strong>de</strong><br />
los <strong>de</strong>más routers en el área OSP.<br />
Observe que R3 es el DR.<br />
R2#show ip ospf neighbor<br />
Neighbor ID Pri State Dead Time Address Interface<br />
192.168.31.33 1 FULL/DR 00:00:33 192.168.1.3<br />
FastEthernet0/0<br />
Tarea 6: Configuración <strong>de</strong> OSPF en el router DRother<br />
Configure el proceso OSPF en el router con la ID <strong>de</strong> router más bajo al final. Este router se <strong>de</strong>signará<br />
como DRother en lugar <strong>de</strong> DR o BDR.<br />
Paso 1: Utilizar el comando router ospf en el modo <strong>de</strong> configuración global para habilitar OSPF<br />
en el router R1.<br />
Ingrese una ID <strong>de</strong> proceso 1 para el parámetro process-ID. Configure el router para notificar la red<br />
192.168.1.0/24. Utilice una ID <strong>de</strong> área 0 para el parámetro OSPF area-id en la sentencia network.<br />
R1(config)#router ospf 1<br />
R1(config-router)#network 192.168.1.0 0.0.0.255 area 0<br />
R1(config-router)#end<br />
%SYS-5-CONFIG_I: Configured from console by console<br />
R1#<br />
00:16:08: %OSPF-5-ADJCHG: Process 1, Nbr 192.168.31.33 on FastEthernet0/0<br />
from LOADING to FULL, Loading Done<br />
00:16:12: %OSPF-5-ADJCHG: Process 1, Nbr 192.168.31.33 on FastEthernet0/0<br />
from EXCHANGE to FULL, Exchange Done<br />
Observe que se formó una adyacencia con los routers R2 y R3. Tanto los routers R2 como R3 pue<strong>de</strong>n<br />
tardar hasta 40 segundos en enviar un paquete hello cada uno.<br />
Paso 2: Utilizar el comando show ip ospf interface para verificar que OSPF se haya<br />
configurado correctamente y que R1 es un DRother.<br />
R1#show ip ospf interface<br />
FastEthernet0/0 is up, line protocol is up<br />
Internet address is 192.168.1.1/24, Area 0<br />
Process ID 1, Router ID 192.168.31.11, Network Type BROADCAST, Cost: 1<br />
Transmit Delay is 1 sec, State DROTHER, Priority 1<br />
Designated Router (ID) 192.168.31.33, Interface address 192.168.1.3<br />
Backup Designated Router (ID) 192.168.31.22, Interface address 192.168.1.2<br />
Timer intervals configured, Hello 10, Dead 40, Wait 40, Retransmit 5<br />
Hello due in 00:00:00<br />
In<strong>de</strong>x 1/1, flood queue length 0<br />
Next 0x0(0)/0x0(0)<br />
Last flood scan length is 1, maximum is 1<br />
Last flood scan time is 0 msec, maximum is 0 msec<br />
Neighbor Count is 2, Adjacent neighbor count is 2<br />
Adjacent with neighbor 192.168.31.33 (Designated Router)<br />
Adjacent with neighbor 192.168.31.22 (Backup Designated Router)<br />
Suppress hello for 0 neighbor(s)<br />
R1#<br />
Todo el contenido es Copyright © 1992 – 2007 <strong>de</strong> Cisco Systems, Inc.<br />
Todos los <strong>de</strong>rechos reservados. Este documento es información pública <strong>de</strong> Cisco. Página 19 <strong>de</strong> 22