

INSTRUCTION GUIDE SHIV
0000051673_R1
0000051673_R1

You also want an ePaper? Increase the reach of your titles
YUMPU automatically turns print PDFs into web optimized ePapers that Google loves.
CHAPTER 2: HANDLEBAR EXTENSION / RISER INSTALLATION<br />
WARNING! Aerobars are attached to the front of your bicycle, and as a result, proper and secure installation is critical. Improper<br />
installation or adjustment may result in damage to the bicycle or its components or in an accident which can cause serious injury or<br />
death.<br />
WARNING! Aerobars can require riding positions that are new or different to many riders, which may cause you to lose control and fall.<br />
Continue to look forward while riding and not down towards the ground. We advise that you practice using these aerobars in a low traffic<br />
area to become accustomed to any changes in the steering or handling of your bicycle.<br />
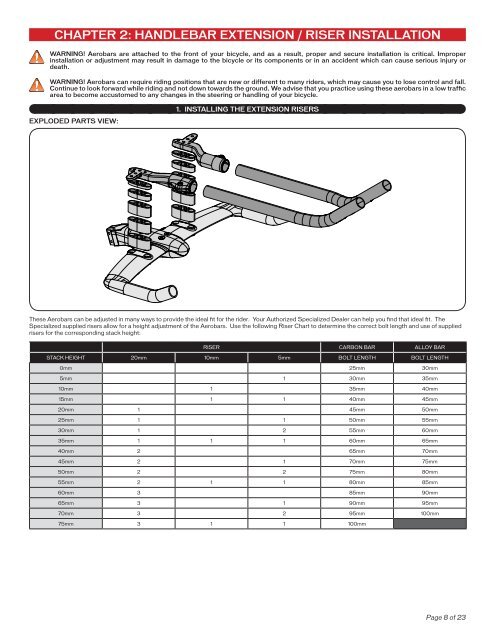
EXPLODED PARTS VIEW:<br />
1. INSTALLING THE EXTENSION RISERS<br />
These Aerobars can be adjusted in many ways to provide the ideal fit for the rider. Your Authorized Specialized Dealer can help you find that ideal fit. The<br />
Specialized supplied risers allow for a height adjustment of the Aerobars. Use the following Riser Chart to determine the correct bolt length and use of supplied<br />
risers for the corresponding stack height:<br />
RISER CARBON BAR ALLOY BAR<br />
STACK HEIGHT 20mm 10mm 5mm BOLT LENGTH BOLT LENGTH<br />
0mm 25mm 30mm<br />
5mm 1 30mm 35mm<br />
10mm 1 35mm 40mm<br />
15mm 1 1 40mm 45mm<br />
20mm 1 45mm 50mm<br />
25mm 1 1 50mm 55mm<br />
30mm 1 2 55mm 60mm<br />
35mm 1 1 1 60mm 65mm<br />
40mm 2 65mm 70mm<br />
45mm 2 1 70mm 75mm<br />
50mm 2 2 75mm 80mm<br />
55mm 2 1 1 80mm 85mm<br />
60mm 3 85mm 90mm<br />
65mm 3 1 90mm 95mm<br />
70mm 3 2 95mm 100mm<br />
75mm 3 1 1 100mm<br />
Page 8 of 23