

INSTRUCTION GUIDE SHIV
0000051673_R1
0000051673_R1

Create successful ePaper yourself
Turn your PDF publications into a flip-book with our unique Google optimized e-Paper software.
CHAPTER 6: FUELSELAGE INSTALLATION<br />
1. INSTALLING THE FUELSELAGE<br />
The Specialized Fuelselage Integrated Hydration System reservoir is designed to fit exclusively with Specialized Shiv carbon frames, through the top tube port<br />
and into the down tube. The Fuelselage hose can be trimmed to the desired length, and combined with the mouth port magnet and matching magnet loop, the<br />
valve location can be customized to the rider’s ideal location.<br />
1 2 3<br />
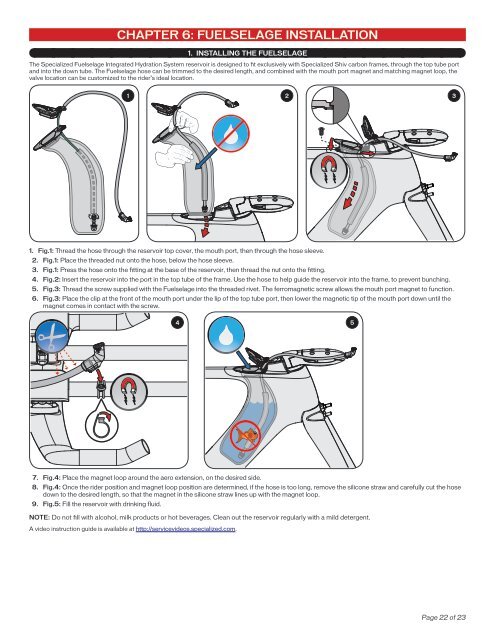
1. Fig.1: Thread the hose through the reservoir top cover, the mouth port, then through the hose sleeve.<br />
2. Fig.1: Place the threaded nut onto the hose, below the hose sleeve.<br />
3. Fig.1: Press the hose onto the fitting at the base of the reservoir, then thread the nut onto the fitting.<br />
4. Fig.2: Insert the reservoir into the port in the top tube of the frame. Use the hose to help guide the reservoir into the frame, to prevent bunching.<br />
5. Fig.3: Thread the screw supplied with the Fuelselage into the threaded rivet. The ferromagnetic screw allows the mouth port magnet to function.<br />
6. Fig.3: Place the clip at the front of the mouth port under the lip of the top tube port, then lower the magnetic tip of the mouth port down until the<br />
magnet comes in contact with the screw.<br />
4 5<br />
7. Fig.4: Place the magnet loop around the aero extension, on the desired side.<br />
8. Fig.4: Once the rider position and magnet loop position are determined, if the hose is too long, remove the silicone straw and carefully cut the hose<br />
down to the desired length, so that the magnet in the silicone straw lines up with the magnet loop.<br />
9. Fig.5: Fill the reservoir with drinking fluid.<br />
NOTE: Do not fill with alcohol, milk products or hot beverages. Clean out the reservoir regularly with a mild detergent.<br />
A video instruction guide is available at http://servicevideos.specialized.com.<br />
Page 22 of 23