

Getting Started Guide
fc7-getting-started-guide
fc7-getting-started-guide

You also want an ePaper? Increase the reach of your titles
YUMPU automatically turns print PDFs into web optimized ePapers that Google loves.
<strong>Getting</strong> <strong>Started</strong><br />
<strong>Guide</strong><br />
With the value now stored in the<br />
variable ‘SwitchPressed’ we must<br />
do something with it. We could just<br />
add a single output icon to turn<br />
on the LED whenever we press the<br />
switch, but that’s a bit too simple.<br />
Instead we will make a latch, so<br />
when the switch is pressed it turns<br />
on the LED and holds it on until the<br />
switch is pressed again.<br />
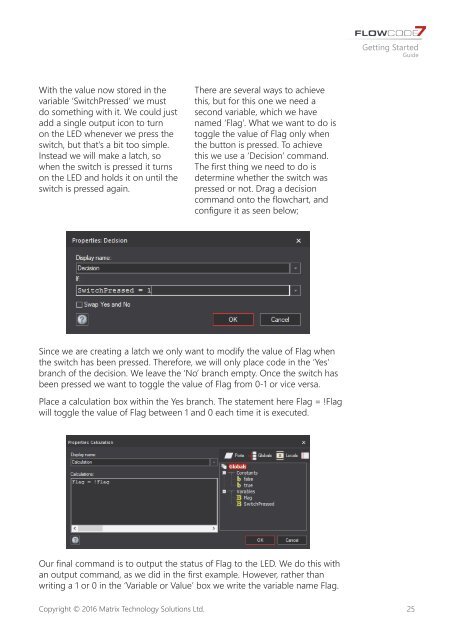
There are several ways to achieve<br />
this, but for this one we need a<br />
second variable, which we have<br />
named ‘Flag’. What we want to do is<br />
toggle the value of Flag only when<br />
the button is pressed. To achieve<br />
this we use a ‘Decision’ command.<br />
The first thing we need to do is<br />
determine whether the switch was<br />
pressed or not. Drag a decision<br />
command onto the flowchart, and<br />
configure it as seen below;<br />
Since we are creating a latch we only want to modify the value of Flag when<br />
the switch has been pressed. Therefore, we will only place code in the ‘Yes’<br />
branch of the decision. We leave the ‘No’ branch empty. Once the switch has<br />
been pressed we want to toggle the value of Flag from 0-1 or vice versa.<br />
Place a calculation box within the Yes branch. The statement here Flag = !Flag<br />
will toggle the value of Flag between 1 and 0 each time it is executed.<br />
Our final command is to output the status of Flag to the LED. We do this with<br />
an output command, as we did in the first example. However, rather than<br />
writing a 1 or 0 in the ‘Variable or Value’ box we write the variable name Flag.<br />
Copyright © 2016 Matrix Technology Solutions Ltd.<br />
25