


You also want an ePaper? Increase the reach of your titles
YUMPU automatically turns print PDFs into web optimized ePapers that Google loves.
THE PI DERBY<br />
Tutorial<br />
Above Move the ball bearing as shown to advance your horse<br />
the finishing line, the winning margin is calculated<br />
and printed using the correct horse racing terms: a<br />
head, short head, length, and so on. Then the horses<br />
are wound back to the start with an accompanying<br />
ratchet sound just like the original, and the race can<br />
start again. At any time, pressing the RETURN key<br />
will restart the race. We found occasionally that a<br />
ball would sit on the contacts but still not make an<br />
electrical connection. In that case, a small vibration<br />
of the box soon made a good connection.<br />
The software<br />
The derby.py code listing is shown overleaf; this and<br />
the accompanying graphics are on our GitHub page<br />
(magpi.cc/1NqJjmV). Like a lot of our projects, it’s<br />
written with the Pygame framework, and follows a<br />
pattern familiar to regular readers. The showPicture<br />
function first draws the track, then the two horses,<br />
and then the front rails; the last bit is the horse’s<br />
name and the distance to the finishing line, along<br />
with the current state of where the ball should go.<br />
You’ll notice that the variables describing some<br />
positions have two or three simple additions, rather<br />
than a single number. This makes it a lot easier to<br />
spot where the individual offsets are applied when<br />
developing the code, but you could pre-add them if it<br />
worries you. The movePhase variable list shows if the<br />
current target for the ball is at the start or the end of<br />
the line. The horse is checked at each movement to<br />
see if it has crossed the winning line, and there’s also<br />
provision for the unlikely event of a dead heat.<br />
Taking it further<br />
You can modify the amount of movement a horse<br />
makes each time, thus requiring more or fewer ball<br />
movements per game. The game could easily be<br />
extended to more players; with each player needing<br />
four GPIO ports, there are ample resources for six<br />
players without resorting to any extra electronics.<br />
You could replace the single horse graphic with a<br />
number of frames to make smoother, more realistic<br />
movement like we did in the Olympic Swimming game<br />
(The MagPi #48); however, the original idea was to<br />
reproduce the mechanical fairground attraction.<br />
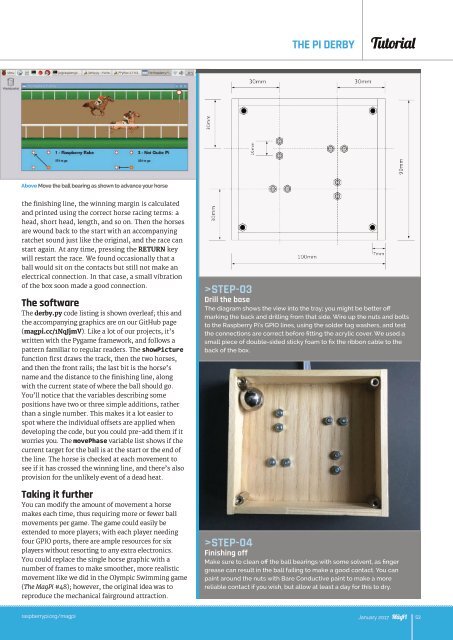
>STEP-03<br />
Drill the base<br />
The diagram shows the view into the tray; you might be better off<br />
marking the back and drilling from that side. Wire up the nuts and bolts<br />
to the Raspberry Pi's GPIO lines, using the solder tag washers, and test<br />
the connections are correct before fitting the acrylic cover. We used a<br />
small piece of double-sided sticky foam to fix the ribbon cable to the<br />
back of the box.<br />
>STEP-04<br />
Finishing off<br />
Make sure to clean off the ball bearings with some solvent, as finger<br />
grease can result in the ball failing to make a good contact. You can<br />
paint around the nuts with Bare Conductive paint to make a more<br />
reliable contact if you wish, but allow at least a day for this to dry.<br />
raspberrypi.org/magpi January 2017 53