

-ORIENTED
MagPi54
MagPi54

Create successful ePaper yourself
Turn your PDF publications into a flip-book with our unique Google optimized e-Paper software.
Tutorial<br />
STEP BY STEP<br />
JOHN COLE<br />
Travelling bearded nerd with a heart<br />
powered by coffee and an unfocused<br />
mind. 2016 Presidential candidate.<br />
Engineer at Dexter Industries.<br />
dexterindustries.com<br />
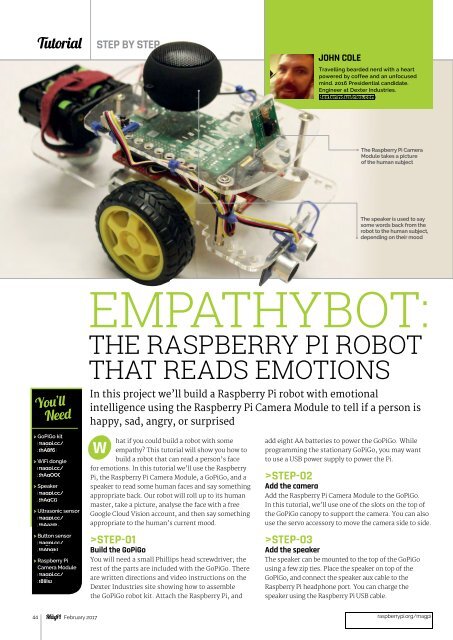
The Raspberry Pi Camera<br />
Module takes a picture<br />
of the hmanset<br />
The speaker is used to say<br />
some words back from the<br />
robot to the human subject,<br />
depending on their mood<br />
You’ll<br />
Need<br />
EMPATHYBOT:<br />
THE RASPBERRY PI ROBOT<br />
THAT READS EMOTIONS<br />
In this project we’ll build a Raspberry Pi robot with emotional<br />
intelligence using the Raspberry Pi Camera Module to tell if a person is<br />
happy, sad, angry, or surprised<br />
> GoPiGo kit<br />
magpi.cc/<br />
2hA8f6i<br />
> WiFi dongle<br />
magpi.cc/<br />
2hAgOOC<br />
> Speaker<br />
magpi.cc/<br />
2hAgCi7<br />
> Ultrasonic sensor<br />
magpi.cc/<br />
2hAazds<br />
> Button sensor<br />
magpi.cc/<br />
2hAhqE1<br />
> Raspberry Pi<br />
Camera Module<br />
magpi.cc/<br />
28IjIsz<br />
W<br />
hat if you could build a robot with some<br />
empathy? This tutorial will show you how to<br />
build a robot that can read a person’s face<br />
for emotions. In this tutorial we’ll use the Raspberry<br />
Pi, the Raspberry Pi Camera Module, a GoPiGo, and a<br />
speaker to read some human faces and say something<br />
appropriate back. Our robot will roll up to its human<br />
master, take a picture, analyse the face with a free<br />
Google Cloud Vision account, and then say something<br />
appropriate to the human’s current mood.<br />
>STEP-01<br />
Build the GoPiGo<br />
You will need a small Phillips head screwdriver; the<br />
rest of the parts are included with the GoPiGo. There<br />
are written directions and video instructions on the<br />
Dexter Industries site showing how to assemble<br />
the GoPiGo robot kit. Attach the Raspberry Pi, and<br />
add eight AA batteries to power the GoPiGo. While<br />
programming the stationary GoPiGo, you may want<br />
to use a USB power supply to power the Pi.<br />
>STEP-02<br />
Add the camera<br />
Add the Raspberry Pi Camera Module to the GoPiGo.<br />
In this tutorial, we’ll use one of the slots on the top of<br />
the GoPiGo canopy to support the camera. You can also<br />
use the servo accessory to move the camera side to side.<br />
>STEP-03<br />
Add the speaker<br />
The speaker can be mounted to the top of the GoPiGo<br />
using a few zip ties. Place the speaker on top of the<br />
GoPiGo, and connect the speaker aux cable to the<br />
Raspberry Pi headphone port. You can charge the<br />
speaker using the Raspberry Pi USB cable.<br />
44 February 2017<br />
raspberrypi.org/magpi