

-ORIENTED
MagPi54
MagPi54

Create successful ePaper yourself
Turn your PDF publications into a flip-book with our unique Google optimized e-Paper software.
NIGHT-VISION CAMERA TRAP<br />
Tutorial<br />
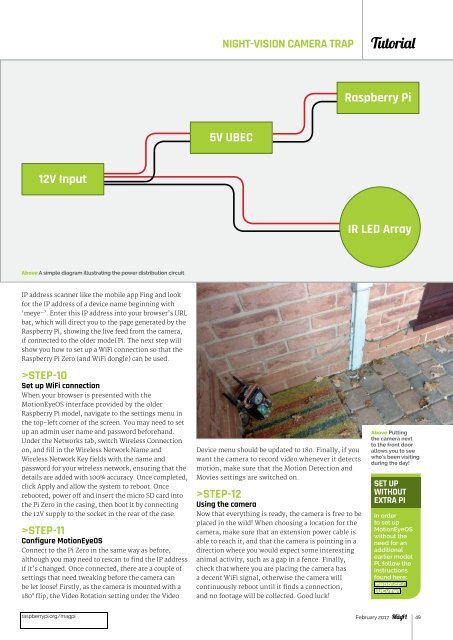
Raspberry Pi<br />
5V UBEC<br />
12V Input<br />
IR LED Array<br />
Above A simple diagram illustrating the power distribution circuit<br />
IP address scanner like the mobile app Fing and look<br />
for the IP address of a device name beginning with<br />
‘meye-’. Enter this IP address into your browser’s URL<br />
bar, which will direct you to the page generated by the<br />
Raspberry Pi, showing the live feed from the camera,<br />
if connected to the older model Pi. The next step will<br />
show you how to set up a WiFi connection so that the<br />
Raspberry Pi Zero (and WiFi dongle) can be used.<br />
>STEP-10<br />
Set up WiFi connection<br />
When your browser is presented with the<br />
MotionEyeOS interface provided by the older<br />
Raspberry Pi model, navigate to the settings menu in<br />
the top-left corner of the screen. You may need to set<br />
up an admin user name and password beforehand.<br />
Under the Networks tab, switch Wireless Connection<br />
on nd fi in the iree etwor me nd<br />
iree etwor ey fied with the nme nd<br />
password for your wireless network, ensuring that the<br />
details are added with 100% accuracy. Once completed,<br />
click Apply and allow the system to reboot. Once<br />
reooted power o nd inert the miro rd into<br />
the Pi Zero in the casing, then boot it by connecting<br />
the 12V supply to the socket in the rear of the case.<br />
>STEP-11<br />
Configure MotionEyeOS<br />
Connect to the Pi Zero in the same way as before,<br />
though you my need to ren to find the ddre<br />
if it’s changed. Once connected, there are a couple of<br />
settings that need tweaking before the camera can<br />
be let loose! Firstly, as the camera is mounted with a<br />
ip the ideo ottion etting under the ideo<br />
evie menu houd e updted to . iny i you<br />
want the camera to record video whenever it detects<br />
motion, make sure that the Motion Detection and<br />
Movies settings are switched on.<br />
>STEP-12<br />
Using the camera<br />
Now that everything is ready, the camera is free to be<br />
placed in the wild! When choosing a location for the<br />
camera, make sure that an extension power cable is<br />
able to reach it, and that the camera is pointing in a<br />
direction where you would expect some interesting<br />
animal activity, such as a gap in a fence. Finally,<br />
check that where you are placing the camera has<br />
a decent WiFi signal, otherwise the camera will<br />
ontinuouy reoot unti it find onnetion<br />
and no footage will be collected. Good luck!<br />
Above Putting<br />
the camera next<br />
to the front door<br />
allows you to see<br />
who’s been visiting<br />
during the day!<br />
SET UP<br />
WITHOUT<br />
EXTRA PI<br />
In order<br />
to set up<br />
MotionEyeOS<br />
ithot the<br />
need for an<br />
additional<br />
earlier model<br />
Pi, follo the<br />
instructions<br />
fon here<br />
magpi.cc/<br />
1UCvYwV<br />
raspberrypi.org/magpi February 2017 49