

-ORIENTED
MagPi54
MagPi54

You also want an ePaper? Increase the reach of your titles
YUMPU automatically turns print PDFs into web optimized ePapers that Google loves.
Tutorial<br />
STEP BY STEP<br />
HENRY BUDDEN<br />
olloing the releae of the aerr<br />
Pi hen he a , Henr taght<br />
himelf to coe an to ereak<br />
electronic, an ha hare thi<br />
roce ith the orl on hi eite<br />
magpi.cc/2eCbaMf<br />
You’ll<br />
Need<br />
> Raspberry Pi<br />
Zero v1.3 and<br />
Raspberry Pi 1 B<br />
or B+<br />
> Pi NoIR<br />
Camera Module<br />
magpi.cc/<br />
2hND1tW<br />
> Pi Zero<br />
camera cale<br />
magpi.cc/<br />
1V5N9dh<br />
> USB to micro-<br />
USB adapter<br />
> Infrared<br />
illuminator<br />
magpi.cc/<br />
2jxw3sT<br />
> 12V power supply<br />
> Power supply<br />
adapters<br />
magpi.cc/<br />
2hNFuEy<br />
> 5V UBEC<br />
magpi.cc/<br />
2hNMv8z<br />
> ii ongle ith<br />
antenna<br />
> Waterproof case<br />
> o hort<br />
length of<br />
mer ire<br />
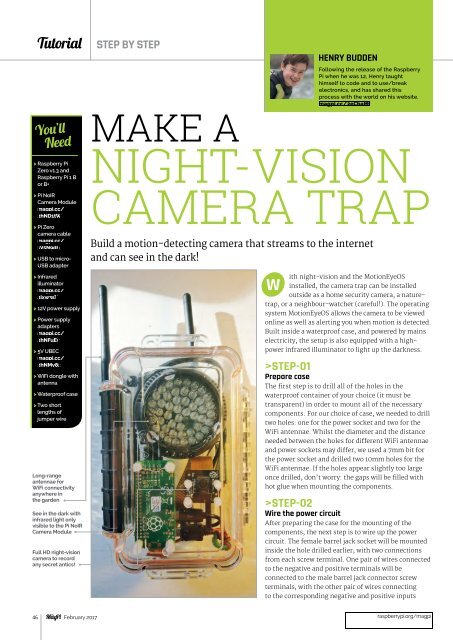
Long-range<br />
antennae for<br />
WiFi connectivity<br />
anywhere in<br />
the garden<br />
See in the dark with<br />
infrared light only<br />
se to the o<br />
Camera Module<br />
Full HD night-vision<br />
camera to record<br />
any secret antics!<br />
MAKE A<br />
NIGHT-VISION<br />
CAMERA TRAP<br />
Build a motion-detecting camera that streams to the internet<br />
and can see in the dark!<br />
W<br />
ith night-vision and the MotionEyeOS<br />
installed, the camera trap can be installed<br />
outside as a home security camera, a naturetrap,<br />
or a neighbour-watcher (careful!). The operating<br />
system MotionEyeOS allows the camera to be viewed<br />
online as well as alerting you when motion is detected.<br />
Built inside a waterproof case, and powered by mains<br />
electricity, the setup is also equipped with a highpower<br />
infrared illuminator to light up the darkness.<br />
>STEP-01<br />
Prepare case<br />
he firt tep i to dri o the hoe in the<br />
waterproof container of your choice (it must be<br />
transparent) in order to mount all of the necessary<br />
components. For our choice of case, we needed to drill<br />
two holes: one for the power socket and two for the<br />
WiFi antennae. Whilst the diameter and the distance<br />
needed etween the hoe or dierent ii ntenne<br />
nd power oet my dier we ued mm it or<br />
the power socket and drilled two 10mm holes for the<br />
WiFi antennae. If the holes appear slightly too large<br />
one dried dont worry the gp wi e fied with<br />
hot glue when mounting the components.<br />
>STEP-02<br />
Wire the power circuit<br />
After preparing the case for the mounting of the<br />
components, the next step is to wire up the power<br />
circuit. The female barrel jack socket will be mounted<br />
inside the hole drilled earlier, with two connections<br />
from each screw terminal. One pair of wires connected<br />
to the negative and positive terminals will be<br />
connected to the male barrel jack connector screw<br />
terminals, with the other pair of wires connecting<br />
to the corresponding negative and positive inputs<br />
46 February 2017<br />
raspberrypi.org/magpi