

-ORIENTED
MagPi54
MagPi54

You also want an ePaper? Increase the reach of your titles
YUMPU automatically turns print PDFs into web optimized ePapers that Google loves.
PAN-TILT HAT<br />
Review<br />
pimoroni.com<br />
£30 / $37<br />
Maker<br />
Says<br />
Let your<br />
Raspberry Pi<br />
and camera<br />
look at<br />
the world<br />
around you<br />
Pimoroni<br />
PAN-TILT HAT<br />
Related<br />
RASPBERRY<br />
PI CAMERA<br />
MOUNT<br />
It doesn’t move,<br />
but if all you’re<br />
after is a camera<br />
mount, you can<br />
pick one up<br />
from The Pi Hut<br />
for a tenth of<br />
the price.<br />
£3 / $3.69<br />
magpi.cc/2hRtkdT<br />
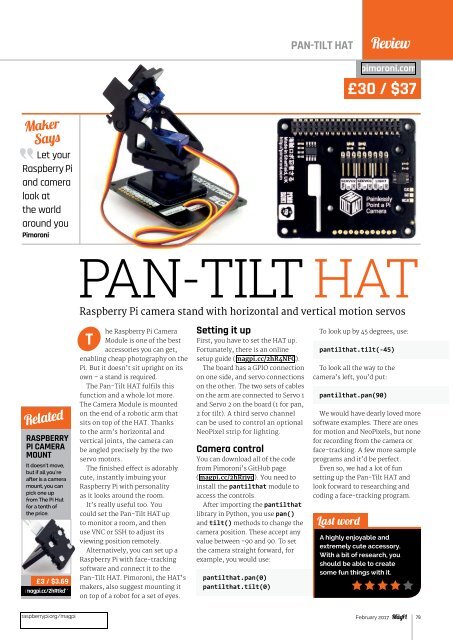
Raspberry Pi camera stand with horizontal and vertical motion servos<br />
T<br />
he Raspberry Pi Camera<br />
Module is one of the best<br />
accessories you can get,<br />
enabling cheap photography on the<br />
Pi. But it doesn’t sit upright on its<br />
own – a stand is required.<br />
he nit ufi thi<br />
function and a whole lot more.<br />
The Camera Module is mounted<br />
on the end of a robotic arm that<br />
sits on top of the HAT. Thanks<br />
to the arm’s horizontal and<br />
vertical joints, the camera can<br />
be angled precisely by the two<br />
servo motors.<br />
he finihed eet i dory<br />
cute, instantly imbuing your<br />
Raspberry Pi with personality<br />
as it looks around the room.<br />
It’s really useful too. You<br />
could set the Pan-Tilt HAT up<br />
to monitor a room, and then<br />
use VNC or SSH to adjust its<br />
viewing position remotely.<br />
Alternatively, you can set up a<br />
Raspberry Pi with face-tracking<br />
software and connect it to the<br />
Pan-Tilt HAT. Pimoroni, the HAT’s<br />
makers, also suggest mounting it<br />
on top of a robot for a set of eyes.<br />
Setting it up<br />
First, you have to set the HAT up.<br />
Fortunately, there is an online<br />
setup guide (magpi.cc/2hR4NFC).<br />
The board has a GPIO connection<br />
on one side, and servo connections<br />
on the other. The two sets of cables<br />
on the arm are connected to Servo 1<br />
and Servo 2 on the board (1 for pan,<br />
2 for tilt). A third servo channel<br />
can be used to control an optional<br />
NeoPixel strip for lighting.<br />
Camera control<br />
You can download all of the code<br />
from Pimoroni’s GitHub page<br />
(magpi.cc/2hRrjyo). You need to<br />
install the pantilthat module to<br />
access the controls.<br />
After importing the pantilthat<br />
library in Python, you use pan()<br />
and tilt() methods to change the<br />
camera position. These accept any<br />
value between -90 and 90. To set<br />
the camera straight forward, for<br />
example, you would use:<br />
pantilthat.pan(0)<br />
pantilthat.tilt(0)<br />
To look up by 45 degrees, use:<br />
pantilthat.tilt(-45)<br />
To look all the way to the<br />
camera’s left, you’d put:<br />
pantilthat.pan(90)<br />
We would have dearly loved more<br />
software examples. There are ones<br />
for motion and NeoPixels, but none<br />
for recording from the camera or<br />
face-tracking. A few more sample<br />
programs and it’d be perfect.<br />
Even so, we had a lot of fun<br />
setting up the Pan-Tilt HAT and<br />
look forward to researching and<br />
coding a face-tracking program.<br />
Last word<br />
A highly enjoyable and<br />
extremely cute accessory.<br />
With a bit of research, you<br />
should be able to create<br />
some fun things with it.<br />
raspberrypi.org/magpi February 2017<br />
79