A-Series LED Light Source
The owner's manual for the LED Light Source for A-Series microscopes
The owner's manual for the LED Light Source for A-Series microscopes

You also want an ePaper? Increase the reach of your titles
YUMPU automatically turns print PDFs into web optimized ePapers that Google loves.
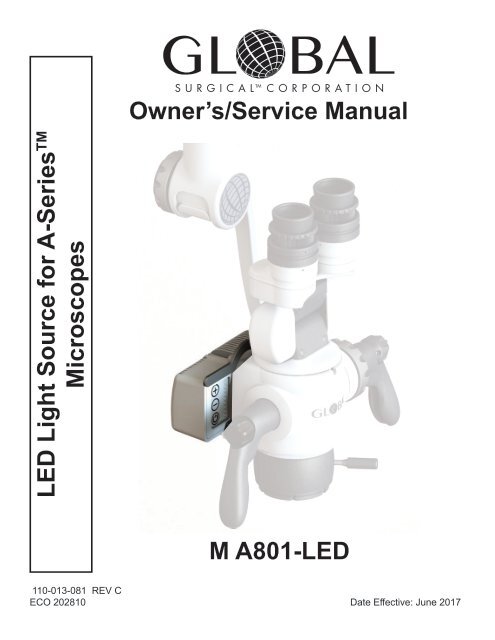
Owner’s/Service Manual<br />
<strong>LED</strong> <strong>Light</strong> <strong>Source</strong> for A-<strong>Series</strong> TM<br />
Microscopes<br />
M A801-<strong>LED</strong><br />
110-013-081 REV C<br />
ECO 202810 Date Effective: June 2017
When contacting Global Surgical Corporation for either Customer Service or Technical<br />
Service, it will be helpful if you have your Customer Identification Number and your<br />
Customer Order Number available. Please take a moment to record these numbers<br />
(printed on your invoice) in the spaces below.<br />
Customer Identification Number:<br />
Customer Order Number:<br />
3610 Tree Court Industrial Blvd.<br />
St. Louis, MO 63122<br />
1-800-861-3585<br />
If outside the USA:1-636-861-3388<br />
COPYRIGHT NOTICE<br />
© Copyright 2015, Global Surgical Corporation. No part of this publication may be copied,<br />
photocopied, reproduced, translated, or reduced to any electronic medium or machine-readable<br />
form, in whole or in part, without the prior written consent of Global Surgical Corporation,<br />
3610 Tree Court Industrial Blvd., St. Louis, MO 63122
Congratulations on your purchase of the<br />
A-<strong>Series</strong> M A801-<strong>LED</strong> <strong>LED</strong> <strong>Light</strong> <strong>Source</strong>.<br />
We truly appreciate your business,<br />
and we’re grateful for the trust you’ve placed in us.
TABLE OF CONTENTS<br />
Section 1 Important Safety Information......................................................................................... 1-1<br />
1.1 Symbol Definitions............................................................................................................... 1-1<br />
1.2 Warnings and Cautions....................................................................................................... 1-2<br />
Section 2 Product Information........................................................................................................ 2-1<br />
2.1 Introduction........................................................................................................................... 2-1<br />
2.2 Specifications....................................................................................................................... 2-2<br />
2.3 M A801-<strong>LED</strong> <strong>LED</strong> <strong>Light</strong> <strong>Source</strong> Components.................................................................... 2-3<br />
Section 3 Operating Instructions.................................................................................................... 3-1<br />
3.1 Power ON/OFF ..................................................................................................................... 3-1<br />
3.2 Brightness Settings and Memory....................................................................................... 3-2<br />
3.3 Filter:...................................................................................................................................... 3-2<br />
3.4 Filter Lever............................................................................................................................ 3-3<br />
Section 4 Installation Instructions.................................................................................................. 4-1<br />
4.1 Installation of the M A801-<strong>LED</strong> <strong>LED</strong> <strong>Light</strong> <strong>Source</strong> to the A-<strong>Series</strong> Microscope............. 4-1<br />
4.1.1 Horizontal or 45° Arm Cover Removal................................................................................ 4-1<br />
4.1.2 Spring Arm Cover Removal................................................................................................. 4-2<br />
4.1.3 Extension Arm Cover Removal........................................................................................... 4-2<br />
4.1.4 Installing the <strong>LED</strong> to Microscope........................................................................................ 4-3<br />
4.2 Installing Cables................................................................................................................... 4-3<br />
4.2.1 Reinstalling the Extension Arm Cover............................................................................... 4-4<br />
4.2.2 Reinstalling the Spring Arm Cover..................................................................................... 4-4<br />
4.2.3 Reinstalling Horizontal Arm Cover .................................................................................... 4-4<br />
4.2.4 Reinstalling 45° Arm Cover................................................................................................. 4-4<br />
Section 5 Care and Maintenance..................................................................................................... 5-1<br />
5.1 Cleaning and Disinfecting................................................................................................... 5-1<br />
5.2 Maintenance.......................................................................................................................... 5-1<br />
5.3 Storage Conditions.............................................................................................................. 5-1<br />
Section 6 Troubleshooting.............................................................................................................. 6-1<br />
6.1 Troubleshooting................................................................................................................... 6-1<br />
Section 7 Service and Warranty...................................................................................................... 7-1<br />
7.1 Warranty Information........................................................................................................... 7-1<br />
7.2 Technical Services Department.......................................................................................... 7-2<br />
Section 8 Technical Information..................................................................................................... 8-1
Section 1<br />
Important Safety Information<br />
THE SAFETY AND SATISFACTION OF OUR CUSTOMERS AND THEIR PATIENTS<br />
! WARNING ARE THE HIGHEST PRIORITIES OF GLOBAL SURGICAL CORPORATION. THIS<br />
MANUAL CONTAINS IMPORTANT INFORMATION REGARDING THE SAFE AND<br />
PROPER USE OF THIS EQUIPMENT AND SHOULD BE READ THOROUGHLY BY<br />
ALL OPERATORS PRIOR TO THEIR FIRST USE OF THE EQUIPMENT. FAILURE TO<br />
READ AND UNDERSTAND THIS MATERIAL COULD RESULT IN INJURY TO<br />
PATIENTS OR PERSONNEL OR IN DAMAGE TO THE EQUIPMENT.<br />
1.1 Symbol Definitions<br />
This symbol on the product is an attention symbol, alerting the user to read the Owner’s Manual<br />
for important installation, operating instructions or safety information.<br />
This symbol on the product indicates a potential electrical shock hazard, and alerts the user to read<br />
the Owner’s Manual for important safety information.<br />
This symbol alerts the user that this product emits bright light.<br />
This symbol indicates a surface that could be hot to the touch.<br />
For Professional Use Only.<br />
Intensity UP.<br />
Intensity Down.<br />
On/Off.<br />
Symbol indicating “not for general waste.” Recycle per the EUROPEAN WASTE ELECTRICAL AND<br />
ELECTRONIC EQUIPMENT (WEEE) DIRECTIVE.<br />
-20°C<br />
4°F<br />
+60°C<br />
104°F<br />
Storage Temperature<br />
!<br />
WARNING<br />
This symbol indicates a situation in which incorrect handling through disregard of a warning<br />
might result in death or serious personal injury.<br />
!<br />
CAUTION<br />
This symbol indicates a situation in which incorrect handling through disregard of a caution might<br />
result in personal injury or may result in damage to property.<br />
NOTICE<br />
This symbol indicates a message to avoid property damage or additional information to help<br />
complete a procedure.<br />
1-1
Section 1<br />
1.2 Warnings and Cautions<br />
Important Safety Information<br />
WARNING<br />
DISCONNECT ALL ELECTRICAL POWER PRIOR TO CLEANING AND DISINFECTING. RISK<br />
OF ELECTRICAL SHOCK RESULTING IN DEATH OR INJURY IS POSSIBLE IF THE<br />
ELECTRICAL POWER IS NOT DISCONNECTED.<br />
!<br />
WARNING NO MODIFICATION OF THIS EQUIPMENT IS ALLOWED.<br />
CONNECT ONLY THE ITEMS THAT HAVE BEEN SPECIFIED AS PART OF THE MEDICAL<br />
! WARNING EQUIPMENT SYSTEM.<br />
THE USE OF POWER CORDS, POWER SUPPLY AND DC EXTENSION CABLE OTHER THAN<br />
! WARNING THOSE INCLUDED WITH THE <strong>LED</strong> LIGHT SOURCE AND ILLUMINATION MODULE AND<br />
SUPPLIED BY GLOBAL SURGICAL CORPORATION MAY RESULT IN INCREASED<br />
EMISSIONS OR DECREASED IMMUNITY OF THE <strong>LED</strong> LIGHT SOURCE AND ILLUMINATION<br />
MODULE.<br />
THE <strong>LED</strong> LIGHT SOURCE SHOULD NOT BE USED ADJACENT TO OR STACKED WITH OTHER<br />
! WARNING EQUIPMENT AND THAT IF ADJACENT OR STACKED USE IS NECESSARY, THE <strong>LED</strong> LIGHT<br />
SOURCE AND ILLUMINATION MODULE SHOULD BE OBSERVED TO VERIFY NORMAL<br />
OPERATION IN THE CONFIGURATION IN WHICH IT WILL BE USED.<br />
!<br />
CAUTION Possibly hazardous optical radiation emitted from this product.<br />
CAUTION<br />
Do not stare at operating lamp. May be harmful to the eyes.<br />
CAUTION<br />
Heat sink fins may become hot to touch after prolonged use. Disconnect unit and allow unit to<br />
cool before handling.<br />
!<br />
CAUTION It is highly recommended that the installation of this unit be performed by qualified personnel.<br />
! CAUTION To prevent any potential electromagnetic interference, do not use any kind of cellular phone<br />
near the light source.<br />
! CAUTION When used in clinical or residential areas near radio or TV units, this equipment may be subject<br />
to radio interference. To avoid adverse electromagnetic effects, do not operate this equipment<br />
near RF energy equipment.<br />
CAUTION<br />
Surface temperature during use can reach 118°F (48°C).<br />
CAUTION<br />
<strong>Light</strong> source can cause permanent eye damage if viewed directly with the unprotected eye.<br />
To reduce the chance of eye damage, always set the intensity control to the minimum level<br />
and insert into the microscope before turning on the power.<br />
! CAUTION Do not block the heat sink fins of the light source. Overheating and possible equipment<br />
failure may occur.<br />
!<br />
CAUTION Do not submerse the light source for cleaning and disinfecting<br />
1-2
Section 2<br />
2.1 Introduction<br />
Product Information<br />
This manual covers the installation and operation of the M A801-<strong>LED</strong> <strong>LED</strong> <strong>Light</strong> <strong>Source</strong> for use with the<br />
A-<strong>Series</strong> Microscope Systems. The M A801-<strong>LED</strong> <strong>LED</strong> <strong>Light</strong> <strong>Source</strong> is a high-efficiency light source utilizing<br />
state-of-the-art superior light emitting diode (<strong>LED</strong>) illumination technology.<br />
The medical equipment system is made up of the M A801-<strong>LED</strong> <strong>LED</strong> <strong>Light</strong> <strong>Source</strong>, and Extension Cable.<br />
Intended Use: The light source is intended to be installed on surgical microscopes that are manufactured by<br />
Global Surgical Corporation for the purpose of illuminating the area of interest. The illumination allows for<br />
visible observation and camera documentation. It is intended to be operated by trained medical professionals<br />
in surgical and dental operatories, examination rooms, offices and clinics, and it should be protected from<br />
unauthorized use.<br />
Contraindications: The light source is not intended to be used as a curing light.<br />
The frequently used functions include powering on/off and adjusting the brightness intensity.<br />
Figure 2-1 The M A801-<strong>LED</strong> <strong>LED</strong> <strong>Light</strong> <strong>Source</strong><br />
2-1
Section 2<br />
2.2 Specifications<br />
Product Information<br />
Below lists the general specifications for the M 801-<strong>LED</strong> <strong>LED</strong> <strong>Light</strong> <strong>Source</strong>.<br />
Table 2-1 Specifications<br />
ITEM<br />
SPECIFICATION<br />
<strong>Light</strong> <strong>Source</strong> Type<br />
<strong>Light</strong> Emitting Diode (<strong>LED</strong>)<br />
Color Temperature 5500°K<br />
<strong>LED</strong> Life<br />
50,000 Hours (typical)<br />
Brightness Control Controls <strong>Light</strong> Output Range from 30%-100%<br />
Power Consumption<br />
25 Watts<br />
Input Voltage 90-240 VAC, 50/60 Hz, 0.9A<br />
Output Voltage 25-35 VDC,(Variable, Dependant on Brightness) Constant 0.70A<br />
Mode of Operation<br />
Water Resistant<br />
Operation Environment:<br />
Temperature<br />
Relative Humidity<br />
Air Pressure<br />
Storage Environment:<br />
Temperature<br />
Relative Humidity<br />
Air Pressure<br />
Dimensions<br />
Continuous Operation<br />
Non-Protected Equipment, IPX0<br />
+10° to +40°C (50° to 104°F)<br />
0 to 95%<br />
700 to 1060 kPa<br />
-20° to +60°C (-4° to 140°F)<br />
0 to 95%<br />
700 to 1060 kPa<br />
4.70 in (119 mm) W x 3.25 in (83 mm) H x 3.0 in (76 mm) D<br />
Weight 1.65 lbs (74 kg 140g)<br />
IEC 62471 Risk Group 0<br />
Regulations / Standards<br />
Maximum Optical Radiation<br />
Output<br />
Maximum Variation of Output<br />
Conforms to AAMI Std ES60601-1 & IEC 60601-1-6<br />
Certified to CSA Stds C22.2 #s 60601-1 & 60601-1-6<br />
FCC 47CFR 15B 15.103<br />
IEC 60601-2-57<br />
118.2 Lx<br />
147 Lx<br />
W<br />
W<br />
W<br />
Spectral Irradiance 3.7 x 10 -3 @ 400nm,3.23 x 10 -3 @ 750nm,3.32 x 10 -3 @ 1000nm<br />
M 2<br />
M 2<br />
M 2<br />
2-2
Section 2<br />
2.3 M A801-<strong>LED</strong> <strong>LED</strong> <strong>Light</strong> <strong>Source</strong> Components<br />
Product Information<br />
1. Table 2-2 Lists the main components of the M A801-<strong>LED</strong> <strong>LED</strong> <strong>Light</strong> <strong>Source</strong> and See Figure 2-2 for the<br />
location of each component.<br />
Table 2-2 M A800-<strong>LED</strong> <strong>LED</strong> <strong>Light</strong> <strong>Source</strong> Components<br />
ITEM NO. ITEM FUNCTION<br />
1 Power Input Cable Power to the <strong>LED</strong>.<br />
2 Intensity Control Controls the light output range from 30% - 100%.<br />
3 Power Switch Turns the <strong>LED</strong> <strong>Light</strong> <strong>Source</strong> on and off.<br />
4 Filter Lever Allows Dental Composite Filter or Green Filter to be moved into place.<br />
5 <strong>Light</strong> Level Indicator<br />
Displays the intensity level of the <strong>LED</strong>. The number of lights displayed<br />
corresponds to the intensity level.<br />
4<br />
1<br />
2<br />
3<br />
5<br />
Figure 2-2 M A800-<strong>LED</strong> <strong>LED</strong> <strong>Light</strong> <strong>Source</strong> Components<br />
2-3
Section 3<br />
3.1 Power ON/OFF<br />
Operating Instructions<br />
Plug in the system into a hospital grade earth-ground AC outlet. Turn power on to the system by depressing<br />
the <strong>LED</strong> power button. The green indicator light at the lowest setting will come on indicating that there is power<br />
to the system. When the <strong>LED</strong> power button is depressed again the lights will extinguish indicating that the<br />
power to the system is turned off. Depress the power button again and the <strong>LED</strong> will come on at the last<br />
intensity setting used.<br />
Green<br />
Indicator<br />
<strong>Light</strong>s<br />
Press to<br />
turn ON<br />
and OFF<br />
This Green<br />
Indicator<br />
<strong>Light</strong> will<br />
illuminate after<br />
the system is<br />
plugged in the<br />
first time.<br />
Figure 3-1 Power On/Off<br />
CAUTION<br />
Surface temperatures during use can reach 118°F (48°C)<br />
CAUTION<br />
Heat sink fins may become hot to touch after prolonged use. Disconnect unit and<br />
allow unit to cool before handling.<br />
CAUTION<br />
<strong>Light</strong> source can cause permanent eye damage if viewed directly with the<br />
unprotected eye. To reduce the chance of eye damage, set the intensity control<br />
always to the minimum level and insert into the microscope before turning on the<br />
power<br />
When used in clinical or residential areas near radio or TV units, this equipment may<br />
! CAUTION be subjected to radio interference to avoid adverse electromagnetic effects, do not<br />
operate this equipment near RF energy equipment.<br />
!<br />
CAUTION<br />
To prevent any potential electromagnetic interference, do not use any kind of cellular<br />
phone near the light source<br />
NOTICE<br />
Use of tinted eye wear such as sunglasses is recommended for patients, assistants, etc. to reduce<br />
any visual discomfort associated with the use of the <strong>LED</strong> <strong>Light</strong> <strong>Source</strong>.<br />
3-1
Section 3<br />
3.2 Brightness Settings and Memory<br />
Operating Instructions<br />
1. There are 9 levels of brightness which can be selected using the and buttons while the power is<br />
on. The level of brightness is indicated by the green indicator lights located on the keypad/control panel.<br />
An indicator light will light up for each increase in brightness. See Figure 3-2.<br />
2. The button is used to increase the brightness setting. Each press will increase the light source<br />
brightness. Any additional press of will have no effect once the highest setting is reached.<br />
3. The button is used to decrease the brightness setting. Each press will decrease the light source<br />
brightness. Any additional press of will have no effect once the lowest setting is reached.<br />
4. Each button performs its intended function when the button is pressed. Holding a button has no effect.<br />
For example to increase the brightness from minimum to maximum, the user must press and release<br />
the button 8 times. Pressing and holding the button will only increase the brightness to the next<br />
higher setting.<br />
5. The light source has a recall feature. This feature remembers the last level of brightness used before<br />
being powered off. Any time the light source is powered on, the brightness level will be at the last level<br />
used.<br />
Press +<br />
to increase intensity<br />
Green Indicator <strong>Light</strong>s<br />
Press -<br />
to decrease intensity<br />
Press to<br />
turn ON and OFF<br />
Lowest intensity<br />
Indicator <strong>Light</strong><br />
Figure 3-2 Adjusting the Intensity<br />
3.3 Filter:<br />
1. The <strong>LED</strong> <strong>Light</strong> <strong>Source</strong> emits white light, which includes all the colors of light combined in the visible<br />
light spectrum. Depending on what area of the patient is illuminated, a filter may be used to enhance the<br />
observation through the microscope. Global Surgical offers two kinds of filters: an amber filter (composite)<br />
and a green filter.<br />
2. The use of the amber filter (composite) helps reduce the emissions of wavelengths below 520 nm (blue<br />
light) which are used to cure dental resins.<br />
3. The use of the green filter provides a higher contrast of tissue by reducing the emissions of wavelengths<br />
around 650 nm (red light).<br />
3-2
Section 3<br />
3.4 Filter Lever<br />
Operating Instructions<br />
1. Ensure the M A801-<strong>LED</strong> <strong>LED</strong> <strong>Light</strong> <strong>Source</strong> is plugged in and turn on the power switch. The filter lever<br />
can be positioned, DOWN for no filter, or in the CENTER for Amber Dental Composite Filter, and UP for the<br />
Green Filter. See Figure 3-3<br />
Filter Lever DOWN<br />
for<br />
NO FILTER<br />
Filter Lever CENTER<br />
for<br />
AMBER DENTAL<br />
COMPOSITE FILTER<br />
Filter Lever UP<br />
for<br />
GREEN FILTER<br />
Figure 3-3 Adjusting the Filter<br />
3-3
Section 4<br />
4.1 Installation of the M A801-<strong>LED</strong> <strong>LED</strong> <strong>Light</strong> <strong>Source</strong> to the A-<strong>Series</strong> Microscope<br />
Installation Instructions<br />
IT IS HIGHLY RECOMMENDED THAT THE INSTALLATION OF THIS EQUIPMENT BE<br />
! WARNING PERFORMED BY QUALIFIED TECHNICIANS. INSTALLATION BY UNQUALIFIED<br />
INDIVIDUALS COULD RESULT IN PERSONAL INJURY.<br />
!<br />
WARNING<br />
CONNECT ONLY THE ITEMS THAT HAVE BEEN SPECIFIED AS PART OF THE<br />
MEDICAL EQUIPMENT SYSTEM.<br />
! CAUTION It is recommended that eye protection be worn while performing the following<br />
procedure.<br />
!<br />
CAUTION The edge of the spring arm cover may be sharp and could cut fingers.<br />
4.1.1 Horizontal or 45° Arm Cover Removal<br />
1. Using a #2 Phillips screwdriver, remove the machine screw securing the cover and remove the cover, as<br />
shown in Figure 4-1<br />
Remove Cover<br />
Remove 2 Screws<br />
Remove Cover<br />
Remove Screw<br />
Horizontal Fixed Arm Version<br />
45° Arm Version<br />
Figure 4-1. Removing the Horizontal and 45° Covers<br />
4-1
Section 4<br />
4.1.2 Spring Arm Cover Removal<br />
Installation Instructions<br />
1. Secure the spring arm in the maximum upward position by tightening the tension and rotation tension<br />
knobs.<br />
2. Using a small flat blade screwdriver, pry off the four (4) caps on both sides of the arm assembly.<br />
3. Remove the four (4) Phillips head screws with a #2 Phillips screwdriver.<br />
4. Grip the underside of the spring arm cover near the microscope end with your thumbs and lift upwards,<br />
guide the cover up and off of the spring arm.<br />
Remove Cover<br />
Remove 4 Screws<br />
Remove 4 Caps<br />
Grasp the cover here<br />
on both sides to<br />
remove cover<br />
Figure 4-2 Spring Arm<br />
4.1.3 Extension Arm Cover Removal<br />
1. Rotate the extension arm 90 degrees to the spring arm and remove the machine screws from the top of the<br />
cover and lift up.<br />
Remove 2 Screws<br />
Remove Cover<br />
Figure 4-3 Extension Arm<br />
4-2
Section 4<br />
Installation Instructions<br />
NOTICE<br />
Allow enough slack in the <strong>LED</strong> power cord to permit free movement of the microscope assembly<br />
and the horizontal/45 degree and spring arm assemblies.<br />
4.1.4 Installing the <strong>LED</strong> to Microscope<br />
1. Place the <strong>LED</strong> <strong>Light</strong> <strong>Source</strong> against the back of the microscope body so that the control panel is on the left<br />
side of the microscope and the filter lever is on the top.<br />
2. Connect the <strong>LED</strong> to the microscope body using the 5/64” allen wrench to install the four (4) 6-32 button<br />
head screws (provided). See Figure 4-4<br />
3. Route the <strong>LED</strong> power cord up into the bottom of the coupler arm and into the extension arm body.<br />
4. Route the power cord through the spring arm and into the horizontal arm.<br />
5. Connect the cable from the <strong>LED</strong> to the power supply module.<br />
6-32<br />
Screws<br />
Filter Lever<br />
<strong>LED</strong> <strong>Light</strong> <strong>Source</strong><br />
Figure 4-4 Installing the <strong>LED</strong> <strong>Light</strong> <strong>Source</strong><br />
4.2 Installing Cables<br />
If it is necessary to add or replace a cable, complete the following steps.<br />
1. Using a #2 Phillips screwdriver, remove the seven (7) screws (horizontal arm assy) and eight (8)<br />
(45 degree arm assembly) from the covers as shown. See Figure 4-1, 4-2, and 4-3<br />
NOTICE<br />
To access the spring arm screws, you first need to remove the four (4) covers by prying them<br />
off.<br />
2. Gently lift off all the covers and set aside.<br />
3. To remove the spring arm cover, the arm must be in a slightly upward orientation.<br />
NOTICE<br />
It maybe necessary to gently spread the spring arm cover apart from the bottom to remove it.<br />
4. Route the cable through the arms, following the route of the installed wiring.<br />
5. Once the cable is routed, carefully move the microscope to assure unobstructed movement.<br />
6. Adjust cables as necessary and replace covers in reverse of the steps used to remove them.<br />
4-3
Section 4<br />
4.2.1 Reinstalling the Extension Arm Cover<br />
Installation Instructions<br />
1. Reinstall the cover on the extension arm. Install the machine screws on the top of the cover.<br />
4.2.2 Reinstalling the Spring Arm Cover<br />
1. Reinstall the spring arm cover.<br />
2. Install the four screws. Tighten securely with a #2 Phillips screwdriver.<br />
3. Snap the four (4) white caps over the four (4) screws and press firmly to snap in place.<br />
4.2.3 Reinstalling Horizontal Arm Cover<br />
1. Place the plastic cover on the arm with the front tab in the slot.<br />
2. Pivot the cover downward until it is firmly seated on the arm.<br />
3. Reinstall the arm cover screw on the rear of the arm using a #2 Phillips screwdriver.<br />
4.2.4 Reinstalling 45° Arm Cover<br />
1. Place the plastic cover on the arm with the front tab in the slot.<br />
2. Pivot the cover downward until it is firmly seated on the arm.<br />
3. Reinstall the screws on the rear of the arm using a #2 Phillips screwdriver.<br />
<strong>LED</strong><br />
<strong>LED</strong> Power Cord<br />
102-004-631<br />
Multi Socket<br />
Outlet<br />
<strong>LED</strong> Power Cord<br />
102-004-631<br />
<strong>LED</strong> <strong>Light</strong> <strong>Source</strong><br />
Extension Cable, M 801<br />
Multi Socket Outlet<br />
Figure 4-5 Routing the Cable<br />
4-4
Section 5<br />
Care and Maintenance<br />
DISCONNECT ALL ELECTRICAL POWER PRIOR TO CLEANING AND DISINFECTING.<br />
! WARNING RISK OF ELECTRICAL SHOCK RESULTING IN DEATH OR INJURY IS POSSIBLE IF<br />
THE ELECTRICAL POWER IS NOT DISCONNECTED.<br />
!<br />
CAUTION Do not submerse the light source for cleaning and disinfecting.<br />
NOTICE<br />
Clean and disinfect after every patient according to CDC and OSHA requirements for<br />
non-critical devices.<br />
5.1 Cleaning and Disinfecting<br />
1. The unit can be cleaned with any cleaning agent, which is used for external cleaning of electrical<br />
equipment, according to instructions given by the manufacturer of the cleaning solution. Do not use<br />
cleaning agents that are not permitted for use with plastics, i.e., ammonia, acetone, salty acids<br />
(HCI), etc.<br />
2. Do not allow excessive moisture or liquids to come in direct contact with the unit.<br />
3. Avoid spraying optical components.<br />
4. Do not allow cleaning agents or liquids to enter the power input.<br />
5. Use any disinfectant agents which are commonly applied while disinfecting surfaces of electric medical<br />
equipment. Such disinfectant agents are usually in the form of sprays or damp cloths.<br />
6. Follow the instructions given by the manufacturer of the disinfectant solution.<br />
5.2 Maintenance<br />
This product has no serviceable parts inside. Do not attempt to open the power unit. Preventive maintenance<br />
of the <strong>LED</strong> light source is not essential and will not affect the performance of the product.<br />
5.3 Storage Conditions<br />
The <strong>LED</strong> <strong>Light</strong> source should be stored in a normal medical office environment with 68-77°F (20-25°C)<br />
temperatures and relative humidity approximately 50% to reduce the possibility of damage to the <strong>LED</strong>. It is<br />
also recommended to cover the <strong>LED</strong> to keep dust and other debris off of the unit. If possible, the original<br />
packaging or other protective padding should be used to protect the unit from physical damage when stored<br />
before installation.<br />
5-1
Section 6<br />
Troubleshooting<br />
! CAUTION The <strong>LED</strong> <strong>Light</strong> <strong>Source</strong> should be returned to Global Surgical for service.<br />
6.1 Troubleshooting<br />
Table 6-1 (below) lists some symptoms, possible causes, and solutions<br />
Table 6-1 Troubleshooting Guide<br />
Symptoms<br />
Solutions<br />
Ensure that the AC power cord is properly connected.<br />
No Power to the system<br />
<strong>LED</strong> <strong>Light</strong> <strong>Source</strong> does not<br />
turn on.<br />
Verify building circuit breaker is not tripped, or that another device works in<br />
the same outlet.<br />
Check the systems fuses. If necessary, replace. Replace both fuses if either<br />
is blown. See the M A730 Surgical Operating Microscope System Owner’s<br />
Manual (110-013-079) for fuse replacement instructions.<br />
Remove horizontal arm, spring, 45 degree, extension cover, check for<br />
damaged or pinched cable.<br />
Ensure filter wheel is located at one of the three correct positions.<br />
Ensure the <strong>LED</strong> extension cable is properly connected to the <strong>LED</strong> cable,<br />
and to the multi-socket outlet.<br />
For all other issues not<br />
covered above<br />
Call Global Surgical Technical Support See Section 7.2 for contact<br />
information.<br />
6-1
Section 7<br />
7.1 Warranty Information<br />
Global Surgical Corporation warranty information is located at:<br />
Service and Warranty<br />
http://www.globalsurgical.com/Home/Warranty.html<br />
90-Day Money-back Guarantee on Microscopes and Accessories<br />
The microscope and microscope accessories you purchase will be unconditionally guaranteed and risk-free.<br />
You may return a product to Global in good condition for any reason within 90 days of invoice and receive a full<br />
product refund. Custom microscope parts are excluded from this policy.<br />
Microscope Limited Lifetime Warranty<br />
Your microscope will include an unprecedented lifetime warranty, including parts and labor, for all optical and<br />
support components. Please refer to detailed Limited Lifetime Warranty below.<br />
Upgradeable<br />
We will continue to do our best to design our microscopes to be modular and upgradeable, thus greatly minimizing<br />
the possibility of obsolescence.<br />
Microscope Limited Lifetime Warranty<br />
Except as set forth in this Limited Lifetime Warranty, Global Surgical Corporation (the “Company”) hereby warrants that each microscope<br />
product manufactured and sold by the company (“Product”) shall be free from defects in materials and workmanship under normal<br />
use and service for the life of the Product. This warranty is non-transferable and is valid only with respect to the original purchase of<br />
the Product. The Company’s obligation under this warranty shall be limited to repairing or replacing, at the Company’s facility and at the<br />
Company’s expense, any parts of components that are demonstrated to be defective. The purchaser shall be responsible for shipment<br />
of the Product to and from the Company’s facility at 3610 Tree Court Industrial Boulevard, St. Louis, Missouri, 63122, Attention: Technical<br />
Service, or such other facility as the Company may otherwise designate. Under certain circumstances which are pre-approved by<br />
the Company, necessary repairs may be made at the purchaser’s facility.<br />
A return authorization is required before returning any Product for warranty service by calling 1-800-861-3610. The customer is responsible<br />
for all shipping expenses. Global Surgical suggests using a method that will allow you to track the package in the event it does not<br />
arrive. Global also recommends you insure the package.<br />
This warranty shall not be applicable to: (l) any electrically-driven products sold by the Company, (II) any products which are not<br />
manufactured by the Company which may be attached to the Product, such as video equipment, camera equipment, recording devices,<br />
monitors, printers (III) any components which are consumable or are required to be replaced or disposed of in connection with normal<br />
use of the Product, such as lamps, fiber optic cables, rubber eyecups and drapes, or (IV) any product which was purchased prior to<br />
April 27, 1994.<br />
This warranty shall be void and of no effect: (I) if the Product is damaged due to misuse, use in a manner other than pursuant to the<br />
instructions for the use of Product, abuse, physical mishandling or natural causes such as flood, fire, earthquake, or other perils, as<br />
determined by the Company, or (II) if any repairs or replacements are made by persons not authorized by the Company to perform such<br />
services.<br />
The warranties set forth herein are in lieu of any and all other warranties, expressed or implied, including, without limitation, warranties<br />
of merchantability and fitness for a particular purpose. Purchaser’s rights thereunder are granted in lieu of any other rights purchaser<br />
may have and purchaser hereby waives all other rights, warranties, remedies or guarantees whatsoever with respect to the product.<br />
The Company shall not be liable for any third parties with respect to the product or its performance. Further, the Company shall not be<br />
liable for, and purchaser hereby releases the Company from any direct, or indirect, consequential, special, and incidental or punitive<br />
damages with respect to the product. In no event shall the Company be liable for any breach of warranty or other claim in an amount<br />
exceeding the purchase price of the product.<br />
Warranty for Microscope products not included in the Limited Lifetime Warranty:<br />
Electrical and electronic components, except for the <strong>LED</strong> lightsource, have a one-year warranty. The <strong>LED</strong> lightsource has a three-year<br />
warranty.<br />
Consumables such as fiber optic cables, eyecups etc., have a one-year warranty. <strong>Light</strong> bulbs have a warranty equal to that given by<br />
the manufacturer.<br />
This warranty applies to the U.S. and Canada only.<br />
For International warranty information: Email: international@globalsurgical.com<br />
Phone: 1-636-861-3388, Fax: 1-636-861-2969<br />
7-1
Section 7<br />
7.2 Technical Services Department<br />
Service and Warranty<br />
When contacting our Technical Support Department, you will be served by highly knowledgeable representatives in an<br />
efficient manner. If service is required at your location, a skilled technician will be dispatched within 24 hours.<br />
If you have questions that are not covered in this manual, please call the Global Surgical Technical Services Department<br />
as listed below:<br />
Toll Free Number: 1-800-861-3610<br />
Technical Services Representatives: 1-636-861-3388<br />
Fax Number: 1-636-861-5284<br />
Email:<br />
techservice@globalsurgical.com<br />
The staffing hours for the Global Surgical Technical Services Department are Monday through Friday from 8:00 am to 5:00<br />
pm Central Standard Time.<br />
Internet Access<br />
The Global Surgical Technical Services web site has information about additional products and services and can be<br />
reached online at: http://www.globalsurgical.com.<br />
Service Information<br />
In the event of any malfunction, you should immediately contact the Global Surgical Technical Services Department for assistance.<br />
A Customer Identification Number and Customer Order Number will be needed when contacting the Technical<br />
Services Department. These numbers are printed on your invoice. To save time in the event service is needed, record<br />
these numbers in the spaces provided in the front of this manual.<br />
A Return Material Authorization (RMA) number must be obtained from the Global Surgical Technical Services<br />
Department prior to returning a product for repair. The following information must accompany all returned units:<br />
1. Your name, address and telephone number<br />
2. The RMA number<br />
3. A description of the problem<br />
Ship or return the product to:<br />
Global Surgical Corporation<br />
3610 Tree Court Industrial Blvd.<br />
St. Louis, MO 63122<br />
Attention: Technical Services Department<br />
7-2
Section 8<br />
Technical Information<br />
Appendix A<br />
Guidance and manufacturer’s declaration<br />
Appendix A-1 Electromagnectic emissions<br />
Appendix A-2 Electromagnetic immunity<br />
Appendix A-3 Recommended separation distances between portable and mobile RF<br />
communications equipment and the M A801 <strong>LED</strong> <strong>Light</strong> <strong>Source</strong><br />
! WARNING THE USE OF POWER CORD AND PLUG OTHER THAN THOSE INCLUDED WITH<br />
THE M A801-<strong>LED</strong> <strong>LED</strong> LIGHT SOURCE SUPPORT SYSTEM AND SUPPLIED BY<br />
GLOBAL SURGICAL CORPORATION MAY RESULT IN INCREASED EMISSIONS<br />
OR DECREASED IMMUNITY OF THE M A801-<strong>LED</strong> <strong>LED</strong> LIGHT SOURCE.<br />
! WARNING THE M A801-<strong>LED</strong> <strong>LED</strong> LIGHT SOURCE SHOULD NOT BE USED ADJACENT OR<br />
STACKED WITH OTHER EQUIPMENT AND IF ADJACENT OR STACKED USE<br />
IS NECESSARY, IT SHOULD BE VERIFIED THAT THE M A801-<strong>LED</strong> <strong>LED</strong> LIGHT<br />
SOURCE OPERATES NORMALLY IN THE CONFIGURATION IN WHICH IT WILL<br />
BE USED.<br />
! CAUTION When used in clinical or residential areas near radio or TV units, this equipment<br />
may be subjected to radio interference. To avoid adverse electromagnetic<br />
effects, do not operate this equipment near RF energy equipment.<br />
! CAUTION To prevent any potential electromagnetic interference, do not use any kind of<br />
cellular phone near the equipment.<br />
! CAUTION This equipment needs special precautions regarding EMC (Electromagnetic<br />
Compatibility) and needs to be installed and put into service according to the<br />
EMC information provided in Appendix A of this manual.<br />
! CAUTION Replacement parts, such as cables, must be purchased through Global<br />
Surgical Corporation to ensure proper compliance requirements. The use of<br />
other cables may affect EMC performance. Unauthorized use of these items will<br />
void warranty and may cause injury to you, others and/or the equipment.<br />
! CAUTION Portable and mobile RF communications equipment can affect medical electrical<br />
equipment.<br />
8-1
Section 8<br />
Technical Information<br />
Appendix A-1<br />
Guidance and manufacturer’s declaration – electromagnetic emissions<br />
The M A801-<strong>LED</strong> <strong>LED</strong> <strong>Light</strong> <strong>Source</strong> is intended for use in the electromagnetic environment specified below.<br />
The customer or the user of the M A801-<strong>LED</strong> <strong>LED</strong> <strong>Light</strong> <strong>Source</strong> should assure that it is used in such an<br />
environment.<br />
Emissions Test Compliance Electromagnetic environment -<br />
guidance<br />
RF emissions<br />
CISPR 11<br />
RF emissions<br />
CISPR 11<br />
Harmonic emissions<br />
IEC 61000-3-2<br />
Group 1<br />
Class A<br />
Class A<br />
The M A801-<strong>LED</strong> <strong>LED</strong> <strong>Light</strong> <strong>Source</strong> uses<br />
RF energy only for its internal function.<br />
Therefore, its RF emissions are very low<br />
and are not likely to cause any<br />
interference in nearby electronic<br />
equipment.<br />
The M A801-<strong>LED</strong> <strong>LED</strong> <strong>Light</strong> <strong>Source</strong> is<br />
suitable for use in all establishments other<br />
than domestic, and may be used in<br />
domestic establishments and those<br />
directly connected to the public<br />
low-voltage power supply network that<br />
supplies buildings used for domestic<br />
purposes, provided the following warning<br />
is heeded:<br />
Voltage fluctuations/flicker<br />
emissions<br />
IEC 61000-3-3<br />
Complies<br />
Warning: This system is intended for use<br />
by healthcare professionals only. This<br />
system may cause radio interference<br />
or may disrupt the operation of nearby<br />
equipment. It may be necessary to take<br />
mitigation measures, such as re-orienting<br />
or relocating M A801-<strong>LED</strong> <strong>LED</strong> <strong>Light</strong><br />
<strong>Source</strong> or shielding the location.<br />
8-2
Section 8<br />
Technical Information<br />
Appendix A-2<br />
Guidance and manufacturer’s declaration – electromagnetic immunity<br />
The M A801-<strong>LED</strong> <strong>LED</strong> <strong>Light</strong> <strong>Source</strong> is intended for use in the electromagnetic environment specified below.<br />
The customer or the user of the M A801-<strong>LED</strong> <strong>LED</strong> <strong>Light</strong> <strong>Source</strong> should assure that it is used in such an<br />
environment.<br />
Immunity Test IEC 60601 test level Compliance level<br />
Electrostatic discharge<br />
(ESD)<br />
IEC 61000-4-2<br />
Electrical fast transient/<br />
burst<br />
IEC 61000-4-4<br />
± 6 kV contact<br />
± 8 kV air<br />
± 2 kV for power supply<br />
lines<br />
± 1 kV for input/output<br />
lines<br />
± 6 kV contact<br />
± 8 kV air<br />
± 2 kV for power supply<br />
lines<br />
± 1 kV for input/output<br />
lines<br />
Electromagnetic<br />
environment - guidance<br />
Floors should be wood,<br />
concrete, or ceramic tile. If<br />
floors are covered with<br />
synthetic material, the relative<br />
humidity should be at least<br />
30%.<br />
Mains power quality should be<br />
that of a typical commercial or<br />
hospital environment.<br />
Surge<br />
IEC 61000-4-5<br />
± 1 kV line(s) to line(s)<br />
± 2 kV line(s) to earth<br />
± 1 kV line(s) to line(s)<br />
± 2 kV line(s) to earth<br />
Mains power quality should<br />
be that of a typical<br />
commercial or hospital<br />
environment.<br />
Voltage dips, short<br />
interruptions and voltage<br />
variations on power<br />
supply input lines<br />
IEC 61000-4-11<br />
95% dip in U T<br />
)<br />
for 0,5 cycle<br />
40 % U T<br />
(60% dip in U T<br />
)<br />
for 5 cycles<br />
70 % U T<br />
(30% dip in U T<br />
)<br />
for 25 cycles<br />
95% dip in U T<br />
)<br />
for 0,5 cycle<br />
40 % U T<br />
(60% dip in U T<br />
)<br />
for 5 cycles<br />
70 % U T<br />
(30% dip in U T<br />
)<br />
for 25 cycles<br />
Mains power quality should<br />
be that of a typical<br />
commercial or hospital<br />
environment. If the user of<br />
the M A801-<strong>LED</strong> <strong>LED</strong> <strong>Light</strong><br />
<strong>Source</strong> requires continued<br />
operation during power mains<br />
interruptions, it is recommended<br />
that the M A801-<strong>LED</strong><br />
<strong>LED</strong> <strong>Light</strong> <strong>Source</strong> be powered<br />
from an uninterruptible power<br />
supply or a battery.<br />
95% dip in U T<br />
)<br />
for 5 s<br />
95% dip in U T<br />
)<br />
for 5 s<br />
Power frequency (50/60<br />
Hz) magnetic field<br />
IEC 61000-4-8<br />
NOTE: UT is the a.c. mains voltage prior to application of the test level.<br />
3A/m 3A/m Power frequency magnetic<br />
fields should be at levels<br />
characteristic of a typical<br />
location in a typical<br />
commercial or hospital<br />
environment.<br />
8-3
Section 8<br />
Technical Information<br />
Appendix A-2<br />
Guidance and manufacturer’s declaration – electromagnetic immunity<br />
The M A801-<strong>LED</strong> <strong>LED</strong> <strong>Light</strong> <strong>Source</strong> is intended for use in the electromagnetic environment specified below.<br />
The customer or the user of the M A801-<strong>LED</strong> <strong>LED</strong> <strong>Light</strong> <strong>Source</strong> should assure that it is used in such an<br />
environment.<br />
Immunity Test IEC 60601 test level Compliance level<br />
Electromagnetic<br />
environment – guidance<br />
Portable and mobile RF communication<br />
equipment should be used no closer to any<br />
part of the M A801-<strong>LED</strong> <strong>LED</strong> <strong>Light</strong> <strong>Source</strong>,<br />
including cables, than the recommended<br />
separation distance calculated from the<br />
equation applicable to the frequency of the<br />
transmitter.<br />
Recommended separation distance<br />
d = 1.2√P<br />
d = 1.2√P 80 MHz to 800 MHz<br />
d = 2.3√P 800 MHz to 2.3 GHz<br />
Conducted RF<br />
IEC 61000-4-6<br />
3 Vrms<br />
150 kHz to 80 MHz<br />
3 Vrms<br />
where P is the maximum output power<br />
rating of the transmitter in watts (W)<br />
according to the transmitter manufacturer<br />
and d is the recommended separation<br />
distance in meters (m).<br />
Radiated RF<br />
IEC 61000-4-3<br />
3 V/m<br />
80 MHz to 2.5 GHz<br />
3 V/m<br />
Field strengths from fixed RF transmitters,<br />
as determined by an electromagnetic site<br />
survey,a should be less than the<br />
compliance level in each frequency<br />
range.b<br />
Interference may occur in the vicinity of<br />
equipment marked with the following<br />
symbol:<br />
8-4
Section 8<br />
Technical Information<br />
Appendix A-2<br />
NOTE 1: At 80 MHz and 800 MHz, the higher frequency range applies.<br />
NOTE 2: These guidelines may not apply in all situations. Electromagnetic propagation is affected by<br />
absorption and reflection from structures, objects and people.<br />
a Field strengths from fixed transmitters, such as base stations for radio (cellular/cordless) telephones and<br />
land mobile radios, amateur radio, AM and FM radio broadcast and TV broadcast cannot be predicted<br />
theoretically with accuracy. To access the electromagnetic environment due to fixed RF transmitters, an<br />
electromagnetic site survey should be considered. If the measured field strength in the location in which the<br />
M A801-<strong>LED</strong> <strong>LED</strong> <strong>Light</strong> <strong>Source</strong> is used exceeds the applicable RF compliance level above, the M A801-<strong>LED</strong><br />
<strong>LED</strong> <strong>Light</strong> <strong>Source</strong> should be observed to verify normal operation. If abnormal performance is observed,<br />
additional measures may be necessary, such as re-orienting or relocating the M A801-<strong>LED</strong> <strong>LED</strong> <strong>Light</strong><br />
<strong>Source</strong>.<br />
b Over the frequency range 150 kHz to 80 MHz, field strengths should be less than 3 V/m.<br />
8-5
Section 8<br />
Technical Information<br />
Appendix A-3<br />
Recommended separation distances between portable and mobile RF communications equipment and them<br />
M A801-<strong>LED</strong> <strong>LED</strong> <strong>Light</strong> <strong>Source</strong>.<br />
The M A801-<strong>LED</strong> <strong>LED</strong> <strong>Light</strong> <strong>Source</strong> is intended for use in an electromagnetic environment in which radiated<br />
RF disturbances are controlled. The customer or the user of the M A801-<strong>LED</strong> <strong>LED</strong> <strong>Light</strong> <strong>Source</strong> can help<br />
prevent electromagnetic interference by maintaining a minimum distance between portable and mobile RF<br />
communications equipment (transmitters) and M A801-<strong>LED</strong> <strong>LED</strong> <strong>Light</strong> <strong>Source</strong> as recommended below,<br />
according to the maximum output power of the communications equipment.<br />
Rated Maximum output<br />
power of transmitter<br />
W<br />
Separation distance according to frequency of transmitter<br />
m<br />
150 kHz to 80 MHz<br />
d=1.2√P<br />
80 MHz to 800 MHz<br />
d=1.2√P<br />
800 MHz to 2.5 GHz<br />
d=2.3√P<br />
0.01 0.12 0.12 0.23<br />
0.1 0.38 0.38 0.73<br />
1 1.2 1.2 2.3<br />
10 3.8 3.8 7.3<br />
100 12 12 23<br />
For transmitters rated at a maximum output power not listed above, the recommended separation distance d<br />
in meters (m) can be estimated using the equation applicable to the frequency of the transmitter, where P is<br />
the maximum output power rating of the transmitter in Watts (W) according to the transmitter manufacturer.<br />
NOTE 1: At 80 MHz and 800 MHz, the separation distance for the higher frequency range applies.<br />
NOTE 2: These guidelines may not apply in all situations. Electromagnetic propagation is affected by<br />
absorption and reflection from structures, objects and people.<br />
8-6
Global Surgical TM Corporation<br />
3610 Tree Court Industrial Blvd.<br />
St. Louis, MO 63122<br />
EMERGO EUROPE<br />
Prinsessegracht 20<br />
2514 AP The Hague<br />
The Netherlands