PSIAugust2018

You also want an ePaper? Increase the reach of your titles
YUMPU automatically turns print PDFs into web optimized ePapers that Google loves.
TEST<br />
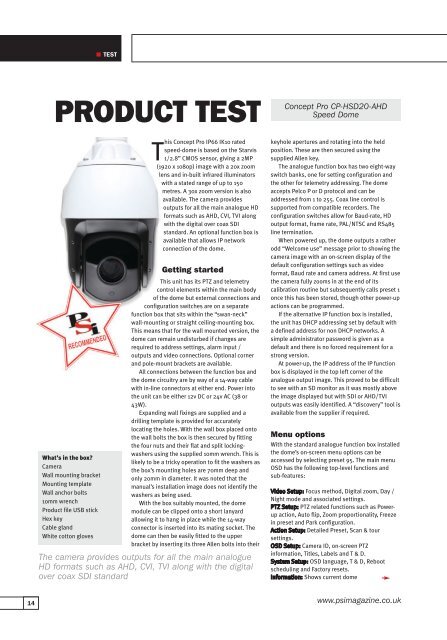
PRODUCT TEST<br />
Concept Pro CP-HSD20-AHD<br />
Speed Dome<br />
What’s in the box?<br />
Camera<br />
Wall mounting bracket<br />
Mounting template<br />
Wall anchor bolts<br />
10mm wrench<br />
Product file USB stick<br />
Hex key<br />
Cable gland<br />
White cotton gloves<br />
This Concept Pro IP66 IK10 rated<br />
speed-dome is based on the Starvis<br />
1/2.8” CMOS sensor, giving a 2MP<br />
(1920 x 1080p) image with a 20x zoom<br />
lens and in-built infrared illuminators<br />
with a stated range of up to 150<br />
metres. A 30x zoom version is also<br />
available. The camera provides<br />
outputs for all the main analogue HD<br />
formats such as AHD, CVI, TVI along<br />
with the digital over coax SDI<br />
standard. An optional function box is<br />
available that allows IP network<br />
connection of the dome.<br />
Getting started<br />
This unit has its PTZ and telemetry<br />
control elements within the main body<br />
of the dome but external connections and<br />
configuration switches are on a separate<br />
function box that sits within the “swan-neck”<br />
wall-mounting or straight ceiling-mounting box.<br />
This means that for the wall mounted version, the<br />
dome can remain undisturbed if changes are<br />
required to address settings, alarm input /<br />
outputs and video connections. Optional corner<br />
and pole-mount brackets are available.<br />
All connections between the function box and<br />
the dome circuitry are by way of a 14-way cable<br />
with in-line connectors at either end. Power into<br />
the unit can be either 12v DC or 24v AC (38 or<br />
43W).<br />
Expanding wall fixings are supplied and a<br />
drilling template is provided for accurately<br />
locating the holes. With the wall box placed onto<br />
the wall bolts the box is then secured by fitting<br />
the four nuts and their flat and split lockingwashers<br />
using the supplied 10mm wrench. This is<br />
likely to be a tricky operation to fit the washers as<br />
the box’s mounting holes are 70mm deep and<br />
only 20mm in diameter. It was noted that the<br />
manual’s installation image does not identify the<br />
washers as being used.<br />
With the box suitably mounted, the dome<br />
module can be clipped onto a short lanyard<br />
allowing it to hang in place while the 14-way<br />
connector is inserted into its mating socket. The<br />
dome can then be easily fitted to the upper<br />
bracket by inserting its three Allen bolts into their<br />
The camera provides outputs for all the main analogue<br />
HD formats such as AHD, CVI, TVI along with the digital<br />
over coax SDI standard<br />
keyhole apertures and rotating into the held<br />
position. These are then secured using the<br />
supplied Allen key.<br />
The analogue function box has two eight-way<br />
switch banks, one for setting configuration and<br />
the other for telemetry addressing. The dome<br />
accepts Pelco P or D protocol and can be<br />
addressed from 1 to 255. Coax line control is<br />
supported from compatible recorders. The<br />
configuration switches allow for Baud-rate, HD<br />
output format, frame rate, PAL/NTSC and RS485<br />
line termination.<br />
When powered up, the dome outputs a rather<br />
odd “Welcome use” message prior to showing the<br />
camera image with an on-screen display of the<br />
default configuration settings such as video<br />
format, Baud rate and camera address. At first use<br />
the camera fully zooms in at the end of its<br />
calibration routine but subsequently calls preset 1<br />
once this has been stored, though other power-up<br />
actions can be programmed.<br />
If the alternative IP function box is installed,<br />
the unit has DHCP addressing set by default with<br />
a defined address for non DHCP networks. A<br />
simple administrator password is given as a<br />
default and there is no forced requirement for a<br />
strong version.<br />
At power-up, the IP address of the IP function<br />
box is displayed in the top left corner of the<br />
analogue output image. This proved to be difficult<br />
to see with an SD monitor as it was mostly above<br />
the image displayed but with SDI or AHD/TVI<br />
outputs was easily identified. A “discovery” tool is<br />
available from the supplier if required.<br />
Menu options<br />
With the standard analogue function box installed<br />
the dome’s on-screen menu options can be<br />
accessed by selecting preset 95. The main menu<br />
OSD has the following top-level functions and<br />
sub-features:<br />
Video Setup: Focus method, Digital zoom, Day /<br />
Night mode and associated settings.<br />
PTZ Setup: PTZ related functions such as Powerup<br />
action, Auto flip, Zoom proportionality, Freeze<br />
in preset and Park configuration.<br />
Action Setup: Detailed Preset, Scan & tour<br />
settings.<br />
OSD Setup: Camera ID, on-screen PTZ<br />
information, Titles, Labels and T & D.<br />
System Setup: OSD language, T & D, Reboot<br />
scheduling and Factory resets.<br />
Information: Shows current dome<br />
14 www.psimagazine.co.uk