R8213 Select English Instruction Manual - Hornby (2)
You also want an ePaper? Increase the reach of your titles
YUMPU automatically turns print PDFs into web optimized ePapers that Google loves.
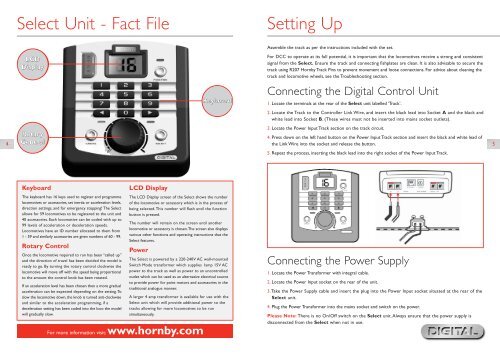
<strong>Select</strong> Unit - Fact File<br />
Setting Up<br />
LCD<br />
Display<br />
Keyboard<br />
Assemble the track as per the instructions included with the set.<br />
For DCC to operate at its full potential, it is important that the locomotives receive a strong and consistent<br />
signal from the <strong>Select</strong>. Ensure the track and connecting fishplates are clean. It is also advisable to secure the<br />
track using R207 <strong>Hornby</strong> Track Pins to prevent movement and loose connections. For advice about cleaning the<br />
track and locomotive wheels, see the Troubleshooting section.<br />
Connecting the Digital Control Unit<br />
1. Locate the terminals at the rear of the <strong>Select</strong> unit labelled ‘Track’.<br />
2. Locate the Track to the Controller Link Wire, and insert the black lead into Socket A and the black and<br />
white lead into Socket B. (These wires must not be inserted into mains socket outlets).<br />
3. Locate the Power Input Track section on the track circuit.<br />
Rotary<br />
4. Press down on the left hand button on the Power Input Track section and insert the black and white lead of<br />
4 Control<br />
the Link Wire into the socket and release the button.<br />
5<br />
5. Repeat the process, inserting the black lead into the right socket of the Power Input Track.<br />
Keyboard<br />
The keyboard has 16 keys used to register and programme<br />
locomotives or accessories, set inertia or acceleration levels,<br />
direction settings, and for emergency stopping! The <strong>Select</strong><br />
allows for 59 locomotives to be registered to the unit and<br />
40 accessories. Each locomotive can be coded with up to<br />
99 levels of acceleration or deceleration speeds.<br />
Locomotives have an ID number allocated to them from<br />
1 - 59 and similarly accessories are given numbers of 60 - 99.<br />
Rotary Control<br />
Once the locomotive required to run has been “called up”<br />
and the direction of travel has been decided the model is<br />
ready to go. By turning the rotary control clockwise the<br />
locomotive will move off with the speed being proportional<br />
to the amount the control knob has been rotated.<br />
If an acceleration level has been chosen then a more gradual<br />
acceleration can be expected depending on the setting.To<br />
slow the locomotive down, the knob is turned anti-clockwise<br />
and similar to the acceleration programming, if a<br />
deceleration setting has been coded into the loco the model<br />
will gradually slow.<br />
LCD Display<br />
The LCD Display screen of the <strong>Select</strong> shows the number<br />
of the locomotive or accessory which is in the process of<br />
being selected.This number will flash until the function<br />
button is pressed.<br />
The number will remain on the screen until another<br />
locomotive or accessory is chosen.The screen also displays<br />
various other functions and operating instructions that the<br />
<strong>Select</strong> features.<br />
Power<br />
The <strong>Select</strong> is powered by a 220-240V AC wall-mounted<br />
Switch Mode transformer which supplies 1amp 15V AC<br />
power to the track as well as power to an uncontrolled<br />
outlet which can be used as an alternative electrical source<br />
to provide power for point motors and accessories in the<br />
traditional analogue manner.<br />
A larger 4 amp transformer is available for use with the<br />
<strong>Select</strong> unit which will provide additional power to the<br />
tracks allowing for more locomotives to be run<br />
simultaneously.<br />
For more information visit:www.hornby.com<br />
Connecting the Power Supply<br />
1. Locate the Power Transformer with integral cable.<br />
2. Locate the Power Input socket on the rear of the unit.<br />
3.Take the Power Supply cable and insert the plug into the Power Input socket situated at the rear of the<br />
<strong>Select</strong> unit.<br />
4. Plug the Power Transformer into the mains socket and switch on the power.<br />
Please Note: There is no On/Off switch on the <strong>Select</strong> unit.Always ensure that the power supply is<br />
disconnected from the <strong>Select</strong> when not in use.


