

R8213 Select English Instruction Manual - Hornby (2)

You also want an ePaper? Increase the reach of your titles
YUMPU automatically turns print PDFs into web optimized ePapers that Google loves.
Running a Locomotive<br />
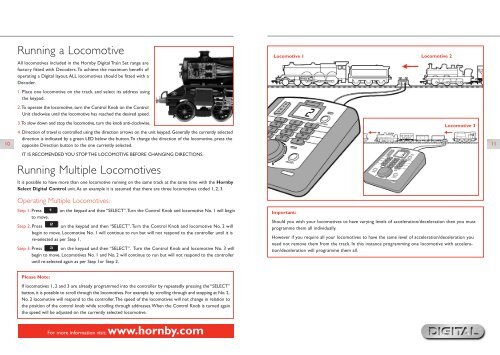
Locomotive 1 Locomotive 2<br />
All locomotives included in the <strong>Hornby</strong> Digital Train Set range are<br />
factory fitted with Decoders.To achieve the maximum benefit of<br />
operating a Digital layout,ALL locomotives should be fitted with a<br />
Decoder.<br />
1. Place one locomotive on the track, and select its address using<br />
the keypad.<br />
2.To operate the locomotive, turn the Control Knob on the Control<br />
Unit clockwise until the locomotive has reached the desired speed.<br />
3.To slow down and stop the locomotive, turn the knob anti-clockwise.<br />
Locomotive 3<br />
10<br />
4. Direction of travel is controlled using the direction arrows on the unit keypad. Generally the currently selected<br />
direction is indicated by a green LED below the button.To change the direction of the locomotive, press the<br />
opposite Direction button to the one currently selected.<br />
IT IS RECOMENDED YOU STOP THE LOCOMOTIVE BEFORE CHANGING DIRECTIONS.<br />
11<br />
Running Multiple Locomotives<br />
It is possible to have more than one locomotive running on the same track at the same time with the <strong>Hornby</strong><br />
<strong>Select</strong> Digital Control unit.As an example it is assumed that there are three locomotives coded 1, 2, 3.<br />
Operating Multiple Locomotives:<br />
Step 1. Press 1 on the keypad and then “SELECT”.Turn the Control Knob and locomotive No. 1 will begin<br />
to move.<br />
Step 2. Press<br />
2<br />
on the keypad and then “SELECT”.Turn the Control Knob and locomotive No. 2 will<br />
begin to move. Locomotive No. 1 will continue to run but will not respond to the controller until it is<br />
re-selected as per Step 1.<br />
Step 3. Press 3 on the keypad and then “SELECT”. Turn the Control Knob and locomotive No. 3 will<br />
begin to move. Locomotives No. 1 and No. 2 will continue to run but will not respond to the controller<br />
until re-selected again as per Step 1or Step 2.<br />
Important:<br />
Should you wish your locomotives to have varying levels of acceleration/deceleration then you must<br />
programme them all individually.<br />
However if you require all your locomotives to have the same level of acceleration/deceleration you<br />
need not remove them from the track. In this instance programming one locomotive with acceleration/deceleration<br />
will programme them all.<br />
Please Note:<br />
If locomotives 1, 2 and 3 are already programmed into the controller by repeatedly pressing the “SELECT”<br />
button, it is possible to scroll through the locomotives. For example by scrolling through and stopping at No. 2,<br />
No. 2 locomotive will respond to the controller.The speed of the locomotives will not change in relation to<br />
the position of the control knob while scrolling through addresses.When the Control Knob is turned again<br />
the speed will be adjusted on the currently selected locomotive.<br />
For more information visit:www.hornby.com