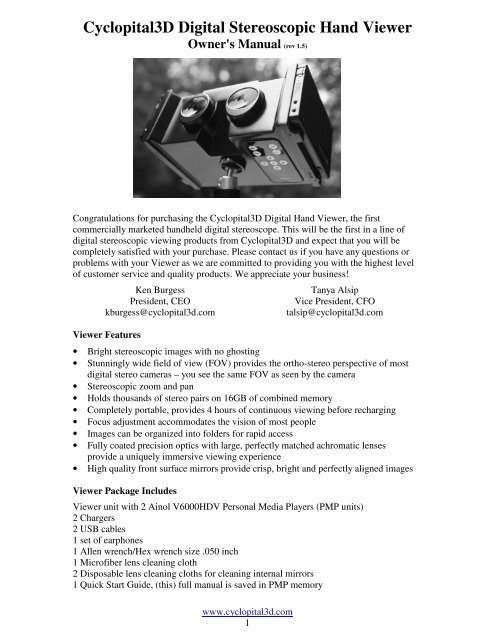
Cyclopital3D Digital Stereoscopic Hand Viewer Owner's Manual (rev ...
Cyclopital3D Digital Stereoscopic Hand Viewer Owner's Manual (rev ...
Cyclopital3D Digital Stereoscopic Hand Viewer Owner's Manual (rev ...

You also want an ePaper? Increase the reach of your titles
YUMPU automatically turns print PDFs into web optimized ePapers that Google loves.
<strong>Cyclopital3D</strong> <strong>Digital</strong> <strong>Stereoscopic</strong> <strong>Hand</strong> <strong>Viewer</strong><br />
<strong>Owner's</strong> <strong>Manual</strong> (<strong>rev</strong> 1.5)<br />
Congratulations for purchasing the <strong>Cyclopital3D</strong> <strong>Digital</strong> <strong>Hand</strong> <strong>Viewer</strong>, the first<br />
commercially marketed handheld digital stereoscope. This will be the first in a line of<br />
digital stereoscopic viewing products from <strong>Cyclopital3D</strong> and expect that you will be<br />
completely satisfied with your purchase. Please contact us if you have any questions or<br />
problems with your <strong>Viewer</strong> as we are committed to providing you with the highest level<br />
of customer service and quality products. We appreciate your business!<br />
Ken Burgess<br />
President, CEO<br />
kburgess@cyclopital3d.com<br />
<strong>Viewer</strong> Features<br />
www.cyclopital3d.com<br />
1<br />
Tanya Alsip<br />
Vice President, CFO<br />
talsip@cyclopital3d.com<br />
• Bright stereoscopic images with no ghosting<br />
• Stunningly wide field of view (FOV) provides the ortho-stereo perspective of most<br />
digital stereo cameras – you see the same FOV as seen by the camera<br />
• <strong>Stereoscopic</strong> zoom and pan<br />
• Holds thousands of stereo pairs on 16GB of combined memory<br />
• Completely portable, provides 4 hours of continuous viewing before recharging<br />
• Focus adjustment accommodates the vision of most people<br />
• Images can be organized into folders for rapid access<br />
• Fully coated precision optics with large, perfectly matched achromatic lenses<br />
provide a uniquely immersive viewing experience<br />
• High quality front surface mirrors provide crisp, bright and perfectly aligned images<br />
<strong>Viewer</strong> Package Includes<br />
<strong>Viewer</strong> unit with 2 Ainol V6000HDV Personal Media Players (PMP units)<br />
2 Chargers<br />
2 USB cables<br />
1 set of earphones<br />
1 Allen wrench/Hex wrench size .050 inch<br />
1 Microfiber lens cleaning cloth<br />
2 Disposable lens cleaning cloths for cleaning internal mirrors<br />
1 Quick Start Guide, (this) full manual is saved in PMP memory
<strong>Cyclopital3D</strong> <strong>Digital</strong> <strong>Stereoscopic</strong> <strong>Hand</strong> <strong>Viewer</strong><br />
<strong>Viewer</strong> Diagrams<br />
4<br />
1<br />
6<br />
8<br />
10<br />
<strong>Owner's</strong> <strong>Manual</strong> (<strong>rev</strong> 1.5)<br />
3<br />
3 4<br />
1<br />
12<br />
13<br />
14<br />
15<br />
22<br />
23<br />
www.cyclopital3d.com<br />
2<br />
5<br />
17<br />
2<br />
7<br />
9<br />
11<br />
24<br />
18<br />
19<br />
20<br />
16<br />
21
<strong>Cyclopital3D</strong> <strong>Digital</strong> <strong>Stereoscopic</strong> <strong>Hand</strong> <strong>Viewer</strong><br />
<strong>Viewer</strong> Diagram Legend<br />
<strong>Owner's</strong> <strong>Manual</strong> (<strong>rev</strong> 1.5)<br />
Note: Right and Left are referenced looking into the lenses.<br />
1. Left PMP power button (on top), press for two seconds to power Right PMP on<br />
2. Right PMP power button (on top), press for two seconds to power Left PMP on<br />
3. Left PMP “Down Arrow” (on top), use for correcting mis-sync condition<br />
4. Left PMP “Up Arrow” (on top), use for correcting mis-sync condition<br />
5. Focus knob, adjust for best focus<br />
6. Left PMP DC power-in port<br />
7. Right PMP DC power-in port<br />
8. Left PMP USB port<br />
9. Right PMP USB port<br />
10. Left PMP microSD card slot<br />
11. Right PMP microSD card slot<br />
12. Left PMP Volume control<br />
13. Left PMP Video out jack<br />
14. Left PMP Audio out / headphone<br />
15. Right PMP power switch (on bottom, MUST be ON to Use or Charge)<br />
16. Left PMP power switch (on bottom, MUST be ON to Use or Charge)<br />
17. Control panel, operates both PMP units simultaneously<br />
18. ¼ – 20 Tripod mount, for tabletop tripod or handle (not supplied)<br />
19. Port for Kensington cable lock<br />
20. Left PMP mounting set screws (4-40)<br />
21. Right PMP mounting set screw (4-40)<br />
22. Right PMP mounting set screw (4-40)<br />
23. Right PMP mounting set screw (4-40)<br />
24. <strong>Hand</strong>le, for picking the <strong>Viewer</strong> up off a table or out of a box<br />
The Control Panel:<br />
C1. Power button. Used to power off the PMP units (will not turn the units on)<br />
C2. >|| button. Used to start and stop slide shows and exit image zoom<br />
C3. +Vol. Used to turn the audio volume up, and to zoom in on images<br />
C4. –Vol. Used to turn the audio volume down, and to zoom out on images<br />
C5. Up-Arrow. Used to go “up” in menus and backwards when viewing images<br />
C6. Down-Arrow. Used to go “down” in menus and forwards when viewing images<br />
C7. Left-Arrow. Used to go “right” in menus and as an “escape” or “back” button<br />
C8. Right-Arrow. Used to go “left” in menus<br />
C9. “M” button. Used to “select” a function or as an “enter” button<br />
C1<br />
C3<br />
C7<br />
C6<br />
www.cyclopital3d.com<br />
3<br />
C2<br />
C4<br />
C5<br />
C8<br />
C9
<strong>Cyclopital3D</strong> <strong>Digital</strong> <strong>Stereoscopic</strong> <strong>Hand</strong> <strong>Viewer</strong><br />
<strong>Owner's</strong> <strong>Manual</strong> (<strong>rev</strong> 1.5)<br />
<strong>Viewer</strong> Usage<br />
Your <strong>Viewer</strong> comes preloaded with a sample set of some of Ken’s favorite photos; we<br />
thought you might be excited to view the samples before loading your own images.<br />
1. Turn on power for PMP units by pushing and holding for two seconds buttons 1 and 2 -<br />
Switches 15 & 16 should also be in the “ON” position. Look into eyepieces to see the<br />
menu light up and confirm that both PMP units are powered up. Note: Menu text will<br />
be <strong>rev</strong>ersed due to the Wheatstone design of the <strong>Viewer</strong>.<br />
2. Using the control panel on the bottom of the <strong>Viewer</strong> (17), Press the right arrow key<br />
(C8) to advance the function menu until the photo (camera) icon is highlighted. Then<br />
press the middle “M” button (C9) on the control panel to “select” the function. Note, if<br />
you accidentally select the wrong icon, the left arrow key (C7) on the control panel acts<br />
as your “back” button. When you select the photo function you will see a menu of<br />
folders identifying which “Disk” to access. “Local Disk” is the memory built into the<br />
PMP unit; “External Disk” is the optional microSD card. Select “Local Disk.” Now<br />
you will see a folder named “Samples,” select it and you see a list of images, select<br />
again to view the image highlighted in 3D.<br />
3. When your images are on the screen you should use the focus knob on top (5) of the<br />
<strong>Viewer</strong> to find the best position for your clearest viewing. You may need to adjust the<br />
focus knob for images with subjects that are closer up or far away.<br />
4. Advance to the next image by pressing the down-arrow button (C6) on the control<br />
panel, press the up-arrow button (C5) to go backwards through the images.<br />
5. When you are done viewing turn off the <strong>Viewer</strong> using the power button (C1) on the<br />
control panel (17).<br />
Notes:<br />
• Very important!! When charging the PMP units, the switches on the bottom of each<br />
unit (15 & 16) MUST be in the ON position.<br />
• The <strong>Viewer</strong> has a power save function that comes preset to turn the <strong>Viewer</strong> off after 30<br />
minutes of no activity. However, the PMP software is inconsistent and doesn’t always<br />
shut down for power save, so switching buttons15 & 16 to the “off” position is safest.<br />
• It's possible for the two PMP units to become mis-synchronized when viewing images;<br />
there are a few ways that this can happen, but the most common is when a button is<br />
accidentally pressed on the top of one PMP unit that advances the picture on that unit,<br />
but not the other. There are a few ways to recover from a mis-synchronized condition:<br />
1. Press one of the buttons labeled with an arrow on the top of the <strong>Viewer</strong> (3 or 4).<br />
One of the buttons advances to the next image on that side and the other goes back.<br />
Which one you need to press depends on which unit is “ahead” of the other. Try<br />
pressing one arrow and if that doesn't work, press the other arrow on the same unit<br />
twice.<br />
2. Another way to recover from mis-sync is to keep pressing the left arrow button<br />
(C7) on the control panel until both units are showing the same thing (menu), and<br />
then navigate back to where you were.<br />
3. Lastly you can turn both the units off (C1) and start over from power up.<br />
www.cyclopital3d.com<br />
- 4 -
<strong>Cyclopital3D</strong> <strong>Digital</strong> <strong>Stereoscopic</strong> <strong>Hand</strong> <strong>Viewer</strong><br />
<strong>Owner's</strong> <strong>Manual</strong> (<strong>rev</strong> 1.5)<br />
The Ortho-<strong>Stereoscopic</strong> Perspective and 3D “Realism”<br />
One of the main benefits of a lensed stereoscope is the ability to view images with an<br />
“Ortho-<strong>Stereoscopic</strong> Perspective” (OSP). The OSP is obtained when the physical<br />
Horizontal Field Of View (HFOV) of the viewed image is the same HFOV that the camera<br />
recorded. This is a very important factor in achieving the realism promised by 3D<br />
photography.<br />
Most digital 3D viewing systems (computer monitors or “picture frames”) provide only a<br />
very narrow HFOV as compared to “what the camera saw,” often resulting in severe 3D<br />
distortion. When a stereoscopic image is viewed with a HFOV that is narrower than the<br />
HFOV of the camera, the “stretch” in the z-axis makes objects in the scene look smaller<br />
than real life, like a scale model, causing the scene not to look “real.”<br />
In the “old days” the stereoscopes sold with stereoscopic cameras were “matched” to the<br />
cameras so that one always saw an ortho-stereoscopic perspective in the viewer. This was<br />
accomplished by using a lens in the viewer that had the same focal length as the (fixed fl)<br />
lens in the camera. Modern cameras with zoom lenses, and the numerous widely varied<br />
digital 3D viewing methods make Ortho-Stereo viewing much less probable these days. As<br />
a result most digital 3D is viewed with a HFOV that is way too narrow (except for<br />
telephoto shots that don't look real for other reasons).<br />
The <strong>Cyclopital3D</strong> <strong>Digital</strong> <strong>Hand</strong> <strong>Viewer</strong> (C3DV) is capable of presenting images with a<br />
physical HFOV of 50 degrees. This is wider than the HFOV of most digital cameras, so for<br />
a true OSP the image will usually not use the entire width of the screen.<br />
For example, the Fuji Real 3D W1 camera takes a picture with a HFOV of about 45<br />
degrees at it's widest (power on default) zoom. Un-cropped images with an aspect ratio of<br />
4:3 that fill the C3DV screen vertically will have a HFOV of about 40 degrees. This is<br />
slightly short of the OSP, but close enough to look real. If you set the Fuji to an image size<br />
that has an aspect ratio of 3:2 the un-cropped result will have a horizontal HFOV of 45<br />
degrees. This is pretty much exactly that of the camera. When set to a 3:2 aspect ratio, the<br />
Fuji W1 is essentially perfectly “matched” with the viewer to provide the OSP.<br />
The old “Stereo Realist” had a fairly narrow HFOV (32 deg) compared to todays cameras.<br />
Fortunately, it turns out that if you digitize a Realist image and maintain the original<br />
aspect ratio, the un-cropped result will fill the C3DV screen vertically and have exactly the<br />
correct width to provide the OSP!<br />
For any camera, pretty much all but the most wide angle shots can be cropped to provide<br />
the OSP in the <strong>Cyclopital3D</strong> viewer. Usually this means cropping the image vertically so it<br />
shows up as wide as the original scene. Zooming in with your stereo camera reduces the<br />
HFOV as seen by the camera and can cause 3D distortion unless you also view the scene in<br />
a narrow format (or increase the stereo base).<br />
The immersive nature of a lensed stereoscope blocks out visual distractions, really putting<br />
you in the picture. Interestingly, the feeling of realism can also be enhanced by pointing<br />
the viewer in the direction the picture was taken, up or down. The hand-held stereoscope<br />
gives you the ability to do this. For instance if a picture was taken looking up a tree, point<br />
the viewer up when you're looking at that scene. It's really quite remarkable! It's all about<br />
reproducing the sensory input exactly, for each eye, and for the gravity sensors in each ear!<br />
www.cyclopital3d.com<br />
- 5 -
<strong>Cyclopital3D</strong> <strong>Digital</strong> <strong>Stereoscopic</strong> <strong>Hand</strong> <strong>Viewer</strong><br />
<strong>Owner's</strong> <strong>Manual</strong> (<strong>rev</strong> 1.5)<br />
Preparing Images for your <strong>Viewer</strong>, step by step using StereoPhotoMaker (SPM)<br />
<strong>Digital</strong> stereo photographs are composed of two images, one for the left eye and one for<br />
the right. They can be stored in many different formats, in a single file or as separate files.<br />
One of the most common storage formats is “side by side” (SbS) in which both the left and<br />
right images of the view are placed next to each other and stored as one image in a single<br />
file. The SbS format has two variants, “wall-eyed” and “cross-eyed.” In a wall-eyed SbS<br />
file the image intended for the left eye is on the left, in cross-eyed format it's on the right.<br />
The Fuji W1 camera uses a storage format with a file extension of “MPO”, in SPM the<br />
MPO format is treated as a wall-eyed SbS format.<br />
The <strong>Cyclopital3D</strong> Stereoscope (<strong>Viewer</strong>) is based on the Wheatstone design of the 1830's<br />
which incorporates mirrors to provide a wide Field of View (FOV). As a result the <strong>Viewer</strong><br />
uses independent left and right files that must be flipped horizontally (mirrored) for correct<br />
viewing. The images may also be re-centered or offset in order to obtain the widest HFOV<br />
with the most comfortable viewing experience.<br />
Note that in the process described here the source images are assumed to be already<br />
mounted. That is that the alignment between the left and right views has been p<strong>rev</strong>iously<br />
adjusted and the “stereo window” has been set, either automatically or by hand, as per<br />
normal for digital stereo photographs. MPO files from the Fuji are automatically<br />
“mounted” in the camera. However, you can have the images “re-mounted” using any of<br />
the algorithms supported by SMP by simply “checking” the “Auto Alignment” option in<br />
SPM (described below).<br />
Two “template” files to be used in the “Multi Conversion” dialog in SPM are supplied by<br />
<strong>Cyclopital3D</strong> in order to simplify the conversion process, which can be found on the root<br />
directory of either PMP unit.<br />
The template file named “SbS_To_C3DV_800.mcv” produces images that are 800 pixels<br />
wide, the other one named SbS_To_C3DV_2400.mcv produces images that are 2400<br />
pixels wide. Both templates also provide for “offsetting” the images to control centering<br />
and overall convergence. You can use either one, but the smaller images load faster and<br />
consume less memory. Larger images may look better when you zoom in on them using<br />
the zoom function on the <strong>Viewer</strong>. If you don't zoom in much it's better to use images that<br />
are 800 pixels wide.<br />
Preparing the Images<br />
Preparing images for the <strong>Viewer</strong> is a two step process, first you create properly formated<br />
temporary SbS files from your source MPO or SbS files using the “Multi-Conversion”<br />
dialog in SPM. Then you split the temporary files into their right and left components<br />
using SPM's "Lossless Jpeg Multi Conversion..." dialog. The resulting files are what get<br />
loaded onto the <strong>Viewer</strong>, the temporary files can be discarded.<br />
The dialog on the following page is the “Multi Conversion” dialog in SPM, use the<br />
“Restore File” button to load one of the template files supplied, this action will set most of<br />
the parameters in the dialog so all you have to do is set the input and output folders.<br />
www.cyclopital3d.com<br />
- 6 -
<strong>Cyclopital3D</strong> <strong>Digital</strong> <strong>Stereoscopic</strong> <strong>Hand</strong> <strong>Viewer</strong><br />
<strong>Owner's</strong> <strong>Manual</strong> (<strong>rev</strong> 1.5)<br />
SPM Multi Conversion Dialog:<br />
Step by step instructions for using SPM to create files ready to load onto the <strong>Viewer</strong>:<br />
1) Start SPM and open the “File->Multi Conversion...” dialog<br />
2) Use the “Restore(File)” button to load either SbS_To_C3DV_800.mcv or<br />
SbS_To_C3DV_2400.mcv (depending on the output image size you desire).<br />
3) Set "Look in" to point to the source folder of SbS files you wish to process.<br />
4) Set "Output Folder" to a folder that will be used to store the SbS temporary files<br />
that will be created by this processing step.<br />
5) Press "Convert All Files"<br />
6) After the process completes, close the “Multi Conversion” dialog<br />
Notes:<br />
• Either template will also work for processing MPO files directly off the Fuji W1.<br />
• If you want to “re-mount your stereo images, “check” also the “Auto Alignment”<br />
function (and set it's parameters as described in the SPM help system).<br />
• If your source (SbS) images are in “cross-eyed” format, check the “Swap<br />
Left/Right" option. MPO images from the Fuji W1 are in “wall-eyed” format.<br />
7) Next, execute the "Lossless Jpeg Multi Conversion..." dialog to separate the side by<br />
side temporary files into left and right files for the viewer. The options in the dialog<br />
should be selected as shown on the next page:<br />
www.cyclopital3d.com<br />
- 7 -
<strong>Cyclopital3D</strong> <strong>Digital</strong> <strong>Stereoscopic</strong> <strong>Hand</strong> <strong>Viewer</strong><br />
<strong>Owner's</strong> <strong>Manual</strong> (<strong>rev</strong> 1.5)<br />
SPM Multi Conversion Dialog:<br />
The “Look in:” field should point to the directory that contains the temporary SbS<br />
files you created using the “Multi Conversion” dialog. The “Output folders” are<br />
where you will find the files that are ready to be transferred to the <strong>Viewer</strong>. Note,<br />
you can put both the left and right images into the same “Output Folder” by<br />
entering the same path in both the “Left Folder” and “Right Folder” fields. The left<br />
image names will end with “_l” and the right image names will end with “_r”. This<br />
convention is compatible with “CopyToC3DV.exe”.<br />
8) Press “Convert All Files” to create the files you will load onto the viewer. Load the<br />
left (_l) files on the Left PMP unit, and the right (_r) files on the Right PMP unit<br />
and your done. (see “Loading Images into your <strong>Viewer</strong>” below) Note: after this<br />
processing step is complete you may delete the temporary files created using the<br />
“Multi Conversion” dialog.<br />
Advanced Image Preparation options:<br />
The check mark in the “Save Borders” option of the “Multi Conversion” dialog tells<br />
SPM to use the parameters set in the “Boarder” dialog when saving the SbS image.<br />
The option is used in this procedure to control the “centering” of the images on the<br />
PMP units, which sets the overall convergence of the scene. It can also be used to<br />
better center the right and left images as seen through each eyepiece for people that<br />
have very narrow (less than 58 mm) or very wide (greater than 72 mm) eye spacing<br />
(interoculars). As most people fall within this range, modifying the value from its<br />
“default” is usually not necessary.<br />
www.cyclopital3d.com<br />
- 8 -
<strong>Cyclopital3D</strong> <strong>Digital</strong> <strong>Stereoscopic</strong> <strong>Hand</strong> <strong>Viewer</strong><br />
<strong>Owner's</strong> <strong>Manual</strong> (<strong>rev</strong> 1.5)<br />
If you do decide to modify the value you may consider creating multiple copies of<br />
your images on the viewer organized in separate directories for “Narrow”, “Normal”,<br />
and/or “Wide” eyed persons.<br />
The “offset from center” of each image is half the value set as the “L/R Space”<br />
parameter. This parameter is stored in the “Multi Conversion” template (.mcv) file, so<br />
it is set properly when you “Restore(File)” to load the settings in this dialog (even<br />
though it's not shown in the dialog). For images 800 pixels wide the “default” offset is<br />
40 pixels (20 pixels per side), for 2400 pixel wide images the “default” offset is 120<br />
pixels (60 pixels per side).<br />
You can set the offset to something other than 40 (for 800 pixel wide images) or 120<br />
(for 2400 pixel wide images). You might decrease the value of the offset to<br />
accommodate people with very narrow eyes, or increase it for people with very wide<br />
eyes. To do this, first load the appropriate .mcv file in the “Multi Conversion” dialog,<br />
then exit the dialog and use the “View->Border Options...” dialog from the main menu<br />
to change the “L/R Space” value to the desired total offset. Then re-enter the “Multi<br />
Conversion” dialog and change the "Width" setting to the total image width (800 or<br />
2400) minus half the new offset (half the “L/R Space”). Note, to change the border<br />
options you must have a stereo image loaded in SPM or the “View” menu option will<br />
be grayed out. Finally, you might want to save the new parameters in a new “template”<br />
by using the “Save” button in the “Multi Conversion” dialog.<br />
Note that everything in this “Border” dialog should be 0 except the L/R Space, which<br />
should be set to twice the distance each image will be shifted.<br />
Note also that you can just edit the .mcv file directly (with Notepad) to change the<br />
relevant parameters instead of using the rather complex process described above.<br />
www.cyclopital3d.com<br />
- 9 -
<strong>Cyclopital3D</strong> <strong>Digital</strong> <strong>Stereoscopic</strong> <strong>Hand</strong> <strong>Viewer</strong><br />
<strong>Owner's</strong> <strong>Manual</strong> (<strong>rev</strong> 1.5)<br />
Loading Images into your <strong>Viewer</strong><br />
Once you have appropriately formatted Left and Right image files you can load them into<br />
the <strong>Viewer</strong> from Windows computers using “Windows Explorer”, or by using the supplied<br />
CopyToC3DV.exe.<br />
Copy the left images of stereo pairs from your computer to the left PMP unit, and the right<br />
images to the PMP unit on the right (referenced looking into the lenses).<br />
For convenience, images may be organized hierarchically in a tree of folders. The image<br />
files are stored in (disk like) memory on the PMP units, in either built in memory (Local<br />
Disk) or on optional microSD memory cards (External Disk). Each PMP unit must be<br />
loaded separately. If two memory cards are used, one must contain the left images and the<br />
other the right, and they must be inserted into their respective Left and Right PMP units.<br />
The structure of folders and files MUST be identical on both the left and right PMP units.<br />
Any folder that exists on the left PMP unit must have a compliment on the right PMP unit.<br />
Complimentary folders must contain the same number of files (and folders) with “similar”<br />
names. The complimentary files and folders must be named so that they sort alphanumerically<br />
in the same sequence. One way to do this is to have all folders and files named<br />
identically on both the left and right PMP units, but this is not absolutely necessary. The<br />
characters may differ toward the end of a complimentary name pair, as long as they sort<br />
alpha-numerically in the same order on both PMP units. For instance, folders and files on<br />
the left PMP unit could have “_L” appended to the names, where and “_R” might be used<br />
on the right PMP unit.<br />
Some people like to keep both the left and right images of stereo pairs in the same folder<br />
on their computer, with the left images identified by a trailing “_L” (or _l) in the file name,<br />
while a trailing “_R” (or “_r”) identifies the right image of the pair. This is fine but it can<br />
make it difficult to copy just the left images to the left PMP and visa versa because<br />
“Windows Explorer” does not directly support doing so.<br />
To accommodate this storage format <strong>Cyclopital3D</strong> provides a program called<br />
CopyToC3DV.exe (found in the root folder of either PMP unit) to copy left or right image<br />
files stored in a single folder to the correct PMP unit. If you point CopyToC3DV to a<br />
directory that contains both sides of stereo pairs in separate image files, it will copy only<br />
the images with the trailing “_L” (or “_l”) in the file name to the left PMP unit and only<br />
the images with a trailing “_R” (or “_r”) in the file name to the right PMP unit.<br />
Note: It is no longer necessary to use CopyToC3DV.exe to copy stereo images to the PMP<br />
units as it was with PMP firmware versions prior to 10810. You may now use “Windows<br />
Explorer”, or “Finder” (on Apple computers) for this purpose.<br />
There is no installation required for CopyToC3DV, you may execute it “in place” by<br />
double clicking on it in “Windows Explorer”, or you may wish to copy it to your desktop<br />
for easy access. The program is Windows only and requires that you have Microsoft's<br />
“dotNet” installed on your computer. If you don't already have it you will get an error<br />
message when you run CopyToC3DV, in that case just go to:<br />
http://www.microsoft.com/NET/ and click “Install It Now...” Any version 2.0 or later will<br />
work fine.<br />
www.cyclopital3d.com<br />
- 10 -
<strong>Cyclopital3D</strong> <strong>Digital</strong> <strong>Stereoscopic</strong> <strong>Hand</strong> <strong>Viewer</strong><br />
<strong>Owner's</strong> <strong>Manual</strong> (<strong>rev</strong> 1.5)<br />
When you run CopyToC3DV you will see the following dialog:<br />
Using microSD memory cards<br />
Memory cards work just like internal memory in the PMP units, again you must make sure<br />
the file structures on the cards for the left and right units match, meaning that all files and<br />
folders sort alpha-numerically in the same sequence. To view images stored on microSD<br />
cards select the “External Disk” option under “Photo” in the main menu instead of “Local<br />
Disk”. With microSD cards the image storage capacity can be extended up to 64 GB total.<br />
For Apple Users<br />
There is no specialized support for converting images (splitting, mirroring and resizing) on<br />
a Mac or for transferring images from your Mac to the <strong>Viewer</strong>. However we recommend<br />
using “Boot Camp” or another Windows emulator to run SPM. Mac computers will<br />
recognize the PMP units and present their file systems as per normal. You can copy the left<br />
and right directory trees of images to the PMP units using “finder.”<br />
www.cyclopital3d.com<br />
- 11 -
<strong>Cyclopital3D</strong> <strong>Digital</strong> <strong>Stereoscopic</strong> <strong>Hand</strong> <strong>Viewer</strong><br />
<strong>Owner's</strong> <strong>Manual</strong> (<strong>rev</strong> 1.5)<br />
Loading and Viewing Video and Video “Slide Shows”<br />
The <strong>Viewer</strong> was developed primarily for the purpose of viewing 3D still images, however<br />
the PMP units do support video playback, with sound, in the following video formats:<br />
AVI, RM, RMVB, FLV, DAT, MOV, MPG, PMP, VOB. An impressive list, but each of<br />
these formats may also have different “flavors” or options, you will have to do a bit of<br />
testing yourself to make sure your video files are compatible with the PMP units.<br />
The way stereoscopic video is synchronized in the <strong>Viewer</strong> is by starting both sides playing<br />
at the same time. The units are not “gen-locked” and do not support “frame accurate” video<br />
synchronization, however synchronization might be “good enough” depending on how<br />
much motion is in your video recordings. If all your doing is playing still image “slide<br />
shows” using a video format to do the sequencing, pan and zoom (ala Ken Burns) and<br />
synchronized audio it should work fine.<br />
The PMP units also support wired video out (13) that shows everything seen on the LCD<br />
panels (menus, images, video etc.) on a alternate video display when connected. The wired<br />
video output formats supported by the PMP units range from NTSC Composite video to<br />
HD (1980x720p) component (RGB) output. So, at least theoretically you could drive two<br />
AV projectors and a sound system with the <strong>Viewer</strong> for stereoscopic projection to a group.<br />
Please check the <strong>Cyclopital3D</strong> website for more information on the subject of video<br />
support in the <strong>Viewer</strong>. We will be posting more information as we hear from customers<br />
about their desires, successes and issues with 3D video.<br />
www.cyclopital3d.com<br />
- 12 -
<strong>Cyclopital3D</strong> <strong>Digital</strong> <strong>Stereoscopic</strong> <strong>Hand</strong> <strong>Viewer</strong><br />
<strong>Owner's</strong> <strong>Manual</strong> (<strong>rev</strong> 1.5)<br />
Miscellaneous Functions<br />
• Setting background wallpaper. When viewing an image you may decide you would like<br />
to use it as the “system background” or “wallpaper.” To do so press “M” (C9) on the<br />
control panel and you will be presented with a list of options. “Set Wallpaper” is the<br />
last one on the bottom, use the “Down-Arrow” button (C6) on the Control Panel to<br />
highlight it and then press “M” again. Press the “Left-Arrow button (C7) to exit the<br />
menu.<br />
• Setting image transition format. You can setup different graphic effects for the<br />
transition from viewing one image to the next in the viewer. The “default” is a simple<br />
replacement, but you can do sweeps etc. instead. To change the transition type, press<br />
“M” (C9) while viewing any image. You will get the menu described above, select<br />
“switch mode” and choose the transition you like.<br />
• Automatic slide shows. You can enter a mode that automatically switches to the next<br />
image after a preset time by pressing the >|| button (C2) on the control panel while<br />
viewing an image. Press the same button again to stop the automatic slide show. The<br />
time images remain on the screen can be set using the same menu described above for<br />
setting the wallpaper. It is the first option called “timeslot”. You can set it to 1, 3, 5 or<br />
10 seconds. Note, unfortunately the timing for switching to the next picture is not<br />
really accurate enough to work for very long when viewing in 3D, after a time the two<br />
PMP units will fall out of Sync. This may be fixed in a future PMP firmware update,<br />
but for now the slide show function is not really very usable.<br />
• Zooming and Panning on images. You can zoom in and pan around on images while<br />
you are viewing them in 3D. Pressing the +Vol button (12) on the control panel zooms<br />
in, and pressing the -Vol button zooms out. While you are zoomed in the arrow buttons<br />
on the control panel can be used to pan around on the image. There are three zoom<br />
levels up to a maximum of 3X 800x480 or 2400 x 1440, if you are going to use zoom<br />
your images should be sized to be at least this big.<br />
• We set some of the options in the PMP units different than their “factory default”<br />
values, specifically as follows:<br />
In the Settings menu:<br />
▪ Language → English<br />
▪ Auto Power Off (inactivity time before power off) → 30 min<br />
▪ Screen Close (inactivity time before backlight turns off) → 1 min<br />
▪ Brightness → Level 5 (maximum brightness)<br />
In the menu obtained by pressing “M” (C9) while viewing an image:<br />
▪ Timeslot → 5s (for “slide shows”)<br />
▪ Switch Mode → Default (no “transition” between images)<br />
▪ Wallpaper → To one I happen to like ;-)<br />
www.cyclopital3d.com<br />
- 13 -
<strong>Cyclopital3D</strong> <strong>Digital</strong> <strong>Stereoscopic</strong> <strong>Hand</strong> <strong>Viewer</strong><br />
<strong>Owner's</strong> <strong>Manual</strong> (<strong>rev</strong> 1.5)<br />
Power Management and Charging<br />
• IMPORTANT: The power switches (15 and 16) on the bottom of the PMP units MUST<br />
be in the ON position when charging. If the power switches are in the OFF position the<br />
PMP units will NOT charge.<br />
• You must press both buttons (1 and 2) on the top of the PMP units for at least two<br />
seconds to turn the PMP units on. You can turn both PMP units off by pressing the<br />
“POWER” button (C1) on the control panel.<br />
• Your <strong>Viewer</strong> has built in batteries and can operate for up to 4 hours of continuous use<br />
on a single charge. Recharging of fully drained batteries can take up to 3 hours. A<br />
battery charge indicator is displayed in the upper left corner when the main menu is<br />
showing, they may be different for right and left so close one eye to see them<br />
separately.<br />
• Your <strong>Viewer</strong> control panel (17) uses a 3V lithium battery, CR2025. The control panel<br />
is attached to the bottom of your <strong>Viewer</strong> with several sturdy pieces of Velcro and can<br />
be removed when a battery change is necessary.<br />
• To charge you PMP units simply plug in your AC adapters and connect them to the<br />
PMP units (6 and 7). Each PMP unit has it's own battery and must be charged<br />
separately.<br />
• There are two types of chargers available, one that plugs into the Power-In Port (6 and<br />
7) and another that plugs into the USB port (8 and 9). You received two of one type or<br />
the other. In any case you may charge the PMP units through their USB ports by<br />
plugging them into a computer or a generic USB charger.<br />
• When you plug the units in to charge they will turn on automatically. However, when<br />
charging is complete and you unplug the units they will stay on and may drain the<br />
batteries. Be sure to turn the units off after charging if you don’t intend to use them<br />
right away.<br />
Care and Maintenance<br />
Use the lens cleaning cloth that was provided with your <strong>Viewer</strong>, or a similar microfiber lint<br />
free cloth to clean lenses. Do not spray liquid directly onto the <strong>Viewer</strong> and avoid getting<br />
any moisture in any openings.<br />
If it becomes necessary to clean the LCDs on the PMP units, the mirrors, or the backside of<br />
the lenses you may gain access by removing the PMP units from the side. Simply loosen<br />
the two set screws that hold each one in place using the 0.050” Allen Wrench provided and<br />
pull the unit outward. Be careful not to scratch the front surface mirrors, they are coated for<br />
scratch resistance but are still somewhat vulnerable. Use the sterile, disposable cleaning<br />
clothes for internal cleaning.<br />
www.cyclopital3d.com<br />
- 14 -
<strong>Cyclopital3D</strong> <strong>Digital</strong> <strong>Stereoscopic</strong> <strong>Hand</strong> <strong>Viewer</strong><br />
<strong>Owner's</strong> <strong>Manual</strong> (<strong>rev</strong> 1.5)<br />
Technical Notes<br />
• The PMP units used in the <strong>Viewer</strong> are manufactured by Ainol, a Chinese company. We<br />
chose these units because they are currently the best available for the purpose of hand<br />
held 3D viewing. The displays are of the LTPS variety, which have the smallest<br />
spacing between pixels of any LCD type and the colors are rich and beautiful. The<br />
units are too complex to document all the features they support here, this manual<br />
documents the functions you need to view 3D photos.<br />
• Keep an eye on our web site and we'll let you know if Ainol provides an update that<br />
significantly improves the function or usability of the 3D <strong>Viewer</strong>. If that happens we<br />
will post the update and instructions for how to do it on our web site.<br />
We will also be updating this manual and the <strong>Viewer</strong> support software as we get<br />
suggestions from our customers. So check in once and a while and please let us know what<br />
we can do to make the system better.<br />
www.cyclopital3d.com<br />
- 15 -
<strong>Cyclopital3D</strong> <strong>Digital</strong> <strong>Stereoscopic</strong> <strong>Hand</strong> <strong>Viewer</strong><br />
<strong>Owner's</strong> <strong>Manual</strong> (<strong>rev</strong> 1.5)<br />
Troubleshooting<br />
• Left/Right image synchronization errors. At some point the two PMP units may get<br />
“out of sync”. There are a few ways that this can happen, but the most common is<br />
when a button is accidentally pressed on one PMP unit that advances the picture on that<br />
unit, but not the other. There are a few ways to recover from a mis-synchronized<br />
condition:<br />
1. Press one of the buttons labeled with an arrow on the top of the <strong>Viewer</strong> (3 or 4).<br />
One of the buttons advances to the next image on that side and the other goes back.<br />
Which one you need to press depends on which unit is “ahead” of the other. Just try<br />
one, if that doesn't work, try pressing the other one (twice).<br />
2. Another way to recover from mis-sync is to keep pressing the left arrow button<br />
(C7) on the control panel until both units are showing the same thing (menu), and<br />
then navigate back to where you were.<br />
3. Lastly you can turn both the units off (C1) and start over from power up.<br />
• Image folders out of sync in Photo->Local Disk menu. If you accidentally enter<br />
“Record” mode (microphone icon in the main menu) a folder on the “Local Disk”<br />
named “record” will be automatically created by the PMP unit. If this happens on one<br />
unit and not both the folders on the two PMP units will be “out of sync”, to remedy the<br />
situation simply delete the “record” folder. There are two ways to do this:<br />
1. Connect the PMP unit to your computer using USB (8 or 9) and delete the folder<br />
using Windows Explorer.<br />
2. Delete the folder by using the buttons on the PMP unit itself (not the control panel).<br />
To delete the folder first highlight it under Photo->Local Disk using the control<br />
panel. Then quickly press the top power button (1 or 2) on the PMP unit that has<br />
the “record” folder highlighted. You will get a menu with the first option “delete”<br />
highlighted. Press the button on the opposite end of the same PMP unit twice (the<br />
button is not labeled on the case, but actually performs the “enter” or “select”<br />
function). The first press is to select the “delete” function, the second is to confirm<br />
the deletion.<br />
• If somehow a PMP unit gets set to a language other than English it can be set back to<br />
English using the icon that looks like a “globe” in the settings menu (gear icon).<br />
Choose the middle option for English. Unfortunately the only languages supported are<br />
Chinese, simplified Chinese, and English.<br />
www.cyclopital3d.com<br />
- 16 -
<strong>Cyclopital3D</strong> <strong>Digital</strong> <strong>Stereoscopic</strong> <strong>Hand</strong> <strong>Viewer</strong><br />
<strong>Owner's</strong> <strong>Manual</strong> (<strong>rev</strong> 1.5)<br />
Technical Support<br />
Your <strong>Viewer</strong> purchase comes with a lifetime of free technical support and firmware<br />
upgrades, and 90 days of hardware repair coverage, which commences on the shipping<br />
date.<br />
If you experience persistent technical problems after reading the troubleshooting<br />
recommendations in this manual and checking our website, http://www.cyclopital3d.com<br />
for additional troubleshooting information, you may send an email to<br />
kburgess@cyclopital3d.com for technical support. Support requests will normally be<br />
responded to in 24 hours.<br />
<strong>Viewer</strong> Specifications<br />
• 800 x 480 resolution (each eye)<br />
• Fully coated achromatic lenses<br />
• Scratch resistant front surface mirrors<br />
• Uses two Ainol V6000HDV PMP Units for image storage and display<br />
• 8GB of storage per PMP unit for a total of 16GB<br />
• Size: 200mm x 120mm x 95mm (7.9” x 4.75” x 3.75”)<br />
• Weight 850 grams (1 lb 14 oz)<br />
Product Warranty<br />
The <strong>Cyclopital3D</strong> <strong>Digital</strong> <strong>Hand</strong> <strong>Viewer</strong> includes with a 90-day warranty against<br />
manufacturing defects in material or workmanship. It is warranted for normal use; abuse of<br />
the product is not covered. If you drop it, it will break.<br />
The Ainol Personal Media Players include a separate manufacturer warranty that is<br />
transferred to the owner of the <strong>Cyclopital3D</strong> <strong>Viewer</strong>. But, if a PMP unit should fail you<br />
may contact <strong>Cyclopital3D</strong> and we will attempt to provide technical support or possibly<br />
replace the unit for you.<br />
Caution: this is a delicate precision product and should be treated with the same care<br />
given to any fine camera or lens. Do not apply excessive force to the focus mechanism or<br />
lens barrels.<br />
© 2009 <strong>Cyclopital3D</strong>, Incorporated. All rights reserved.<br />
www.cyclopital3d.com<br />
- 17 -