Cyclopital3D Digital Stereoscopic Hand Viewer Owner's Manual (rev ...
Cyclopital3D Digital Stereoscopic Hand Viewer Owner's Manual (rev ...
Cyclopital3D Digital Stereoscopic Hand Viewer Owner's Manual (rev ...

You also want an ePaper? Increase the reach of your titles
YUMPU automatically turns print PDFs into web optimized ePapers that Google loves.
<strong>Cyclopital3D</strong> <strong>Digital</strong> <strong>Stereoscopic</strong> <strong>Hand</strong> <strong>Viewer</strong><br />
<strong>Owner's</strong> <strong>Manual</strong> (<strong>rev</strong> 1.5)<br />
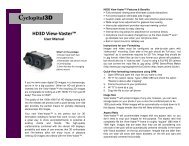
<strong>Viewer</strong> Usage<br />
Your <strong>Viewer</strong> comes preloaded with a sample set of some of Ken’s favorite photos; we<br />
thought you might be excited to view the samples before loading your own images.<br />
1. Turn on power for PMP units by pushing and holding for two seconds buttons 1 and 2 -<br />
Switches 15 & 16 should also be in the “ON” position. Look into eyepieces to see the<br />
menu light up and confirm that both PMP units are powered up. Note: Menu text will<br />
be <strong>rev</strong>ersed due to the Wheatstone design of the <strong>Viewer</strong>.<br />
2. Using the control panel on the bottom of the <strong>Viewer</strong> (17), Press the right arrow key<br />
(C8) to advance the function menu until the photo (camera) icon is highlighted. Then<br />
press the middle “M” button (C9) on the control panel to “select” the function. Note, if<br />
you accidentally select the wrong icon, the left arrow key (C7) on the control panel acts<br />
as your “back” button. When you select the photo function you will see a menu of<br />
folders identifying which “Disk” to access. “Local Disk” is the memory built into the<br />
PMP unit; “External Disk” is the optional microSD card. Select “Local Disk.” Now<br />
you will see a folder named “Samples,” select it and you see a list of images, select<br />
again to view the image highlighted in 3D.<br />
3. When your images are on the screen you should use the focus knob on top (5) of the<br />
<strong>Viewer</strong> to find the best position for your clearest viewing. You may need to adjust the<br />
focus knob for images with subjects that are closer up or far away.<br />
4. Advance to the next image by pressing the down-arrow button (C6) on the control<br />
panel, press the up-arrow button (C5) to go backwards through the images.<br />
5. When you are done viewing turn off the <strong>Viewer</strong> using the power button (C1) on the<br />
control panel (17).<br />
Notes:<br />
• Very important!! When charging the PMP units, the switches on the bottom of each<br />
unit (15 & 16) MUST be in the ON position.<br />
• The <strong>Viewer</strong> has a power save function that comes preset to turn the <strong>Viewer</strong> off after 30<br />
minutes of no activity. However, the PMP software is inconsistent and doesn’t always<br />
shut down for power save, so switching buttons15 & 16 to the “off” position is safest.<br />
• It's possible for the two PMP units to become mis-synchronized when viewing images;<br />
there are a few ways that this can happen, but the most common is when a button is<br />
accidentally pressed on the top of one PMP unit that advances the picture on that unit,<br />
but not the other. There are a few ways to recover from a mis-synchronized condition:<br />
1. Press one of the buttons labeled with an arrow on the top of the <strong>Viewer</strong> (3 or 4).<br />
One of the buttons advances to the next image on that side and the other goes back.<br />
Which one you need to press depends on which unit is “ahead” of the other. Try<br />
pressing one arrow and if that doesn't work, press the other arrow on the same unit<br />
twice.<br />
2. Another way to recover from mis-sync is to keep pressing the left arrow button<br />
(C7) on the control panel until both units are showing the same thing (menu), and<br />
then navigate back to where you were.<br />
3. Lastly you can turn both the units off (C1) and start over from power up.<br />
www.cyclopital3d.com<br />
- 4 -