

QUILTsocial Issue 13
Welcome to another thrilling issue of QUILTsocial! In this issue we show you ways to explore and use utility and decorative stitches for quilting your quilt and sewing on your binding. Using these stitches for quilting is an underrated method, but highly effective. We encourage you to choose any built-in stitch to add oomph to your binding, see the various stitch-outs. We also show you how to make and apply covered cording like a pro, the tutorial includes how to round the corners for a truly elegant finish. Another tutorial in this issue is how to work therm fleece into quilted projects, like the bowl cozy. Other free projects include the tic tac toe game set - all quilted using the latest Recess line from Banyan Batiks, and the quilted bench cushion cover. We take a close look at some awesome features on the Brother Dreamweaver XE and the ImageStitch app and the mysewnet on the PFAFF creative icon. Download this stunning issue!
Welcome to another thrilling issue of QUILTsocial! In this issue we show you ways to explore and use utility and decorative stitches for quilting your quilt and sewing on your binding. Using these stitches for quilting is an underrated method, but highly effective. We encourage you to choose any built-in stitch to add oomph to your binding, see the various stitch-outs. We also show you how to make and apply covered cording like a pro, the tutorial includes how to round the corners for a truly elegant finish. Another tutorial in this issue is how to work therm fleece into quilted projects, like the bowl cozy. Other free projects include the tic tac toe game set - all quilted using the latest Recess line from Banyan Batiks, and the quilted bench cushion cover. We take a close look at some awesome features on the Brother Dreamweaver XE and the ImageStitch app and the mysewnet on the PFAFF creative icon. Download this stunning issue!

You also want an ePaper? Increase the reach of your titles
YUMPU automatically turns print PDFs into web optimized ePapers that Google loves.
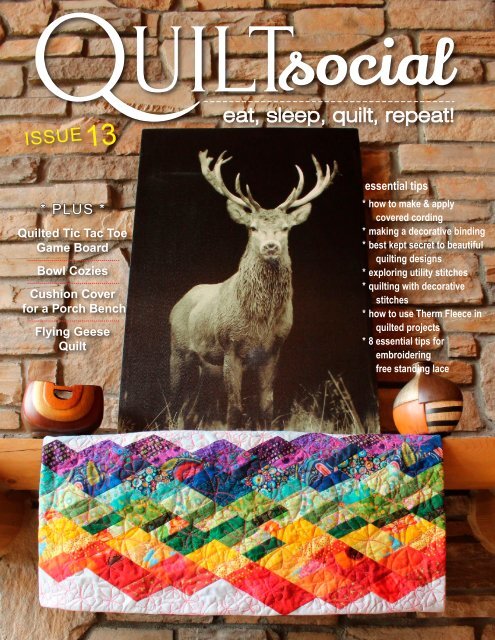
Q<br />
eat,<br />
ISSUE<strong>13</strong><br />
UILTsocial<br />
sleep, quilt, repeat!<br />
* PLUS *<br />
Quilted Tic Tac Toe<br />
Game Board<br />
Bowl Cozies<br />
Cushion Cover<br />
for a Porch Bench<br />
Flying Geese<br />
Quilt<br />
essential tips<br />
* how to make & apply<br />
covered cording<br />
* making a decorative binding<br />
* best kept secret to beautiful<br />
quilting designs<br />
* exploring utility stitches<br />
* quilting with decorative<br />
stitches<br />
* how to use Therm Fleece in<br />
quilted projects<br />
* 8 essential tips for<br />
embroidering<br />
free standing lace<br />
1
DESIGNER<br />
BRILLIANCE 80<br />
Sewing &<br />
Embroidery Machine<br />
•JoyOS ADVISOR <br />
• mySewnet —Wi-Fi<br />
Connectivity<br />
• deLuxe STITCH SYSTEM<br />
• 7” Large display with<br />
capacitive touch<br />
•Embroider designs up to<br />
360x350mm<br />
•Interchangeable Dual Feed<br />
foot included<br />
Introducing the Newest<br />
in Sewing and Embroidery Innovation from<br />
HUSQVARNA VIKING ®<br />
BRILLIANCE 75Q<br />
Computerized<br />
Sewing Machine<br />
•Interactive Colour Touch<br />
Screen<br />
• EXCLUSIVE SEWING<br />
ADVISOR ®<br />
• 10” (250mm) of spacious<br />
sewing surface<br />
•Exclusive stitch techniques:<br />
Dimensional stitches<br />
and Theme stitches<br />
•Straight stitch needle<br />
plate and sensor<br />
VIKING, DESIGNER BRILLIANCE, BRILLIANCE, JOYOS ADVISOR, DELUXE, MYSEWNET, EXCLUSIVE SENSOR<br />
VIKING, DESIGNER BRILLIANCE, BRILLIANCE, JOYOS ADVISOR, DELUXE, MYSEWNET, EXCLUSIVE SENSOR<br />
SYSTEM, and EXCLUSIVE SEWING ADVISOR are exclusive trademarks of Singer Sewing Limited LLC. HUSQVARNA<br />
SYSTEM, and EXCLUSIVE SEWING ADVISOR are exclusive trademarks of Singer Sewing Limited LLC. HUSQVARNA<br />
and the “H” Crown Device are trademarks of Husqvarna AB. ©2018 Singer Sourcing Limited LLC. All rights reserved.<br />
and the “H” Crown Device are trademarks of Husqvarna AB. ©2018 Singer Sourcing Limited LLC. All rights reserved.<br />
www.husqvarnaviking.com/en-CA
editor's letter<br />
Every time you sit at your sewing machine is<br />
it work or play?<br />
I've been working on my Spirals<br />
quilt, a quilt that was almost<br />
abandoned. But through some<br />
act of fate, it was ripped out and<br />
redesigned and used to practice<br />
quilting using decorative stitches.<br />
I learned that it's best to keep the<br />
decorative stitches from crossing<br />
the seam intersections and to<br />
use simpler, 'quiet' stitches for less<br />
overall movement. Mesmerized,<br />
I watched all the edges of the<br />
spirals stitch out, that's a lot of<br />
rows! A laser pointer would have<br />
made the task a lot easier to<br />
keep all my decorative stitches<br />
straighter, but now I'm nitpicking.<br />
More on this quilt in the next issue.<br />
In this issue, the fun continues.<br />
Sarah Vanderburgh has made<br />
a tic tac toe game board using<br />
Banyan Batiks Recess fabric<br />
collection, making it a great gift<br />
for toddlers (and a quiet one?)<br />
See what Christine Baker has to<br />
say about her experience and<br />
cool tips on using utilitarian and<br />
decorative stitches on the Brother<br />
Dreamweaver XE to quilt. The<br />
possibilities for quilting options<br />
are indeed infinite!<br />
Claire Haillot has a lot of fun<br />
adding oomph to a simple<br />
binding using the PFAFF creative<br />
icon stitch creator. If you're uber<br />
creative and can imagine all<br />
sorts of quilting designs, this may<br />
be for you!<br />
Jean Boyd shows you how to<br />
play with strips to make a bench<br />
cushion and we know, there too,<br />
the combinations are endless.<br />
You'll love how this project gives<br />
you the freedom to choose your<br />
ideal combination of strips.<br />
It's still that time of year when<br />
hot soups are such a comfort, see<br />
how easy it is to make a bowl<br />
cozy for that yummy bowl of<br />
soup. And actually, I'll be honest<br />
I'm not a winter person, but I<br />
enjoy how winter offers me more<br />
time at the sewing machine than<br />
let's say… outside in the garden.<br />
Enjoy the issue!<br />
Cheerfully,<br />
follow me on<br />
Q<br />
UILTsocial<br />
.com | issue <strong>13</strong><br />
3
Q<br />
<strong>QUILTsocial</strong><br />
◦<br />
{ daily blog<br />
◦<br />
{ weekly giveaways<br />
◦<br />
{ monthly newsletter<br />
◦<br />
{ quarterly magazine<br />
◦<br />
{ fun Facebook page<br />
◦<br />
{ yummy Pinterest page<br />
◦<br />
{ app on iTunes/Google Play<br />
◦{<br />
ALL of the above!<br />
<br />
.com<br />
eat, sleep, quilt, repeat<br />
* projects<br />
* techniques<br />
* product reviews<br />
ALL<br />
FREE!<br />
Visit <strong>QUILTsocial</strong>.com<br />
and download our free ebook<br />
Elaine’s Quilting Tech Tips!<br />
PUBLISHER, EDITOR-IN-CHIEF, ART DIRECTOR<br />
Carla A. Canonico<br />
carla@<strong>QUILTsocial</strong>.com<br />
PUBLISHER, ADVERTISING SALES<br />
John De Fusco<br />
john@<strong>QUILTsocial</strong>.com<br />
PHOTOGRAPHERS<br />
John De Fusco, Carla A. Canonico<br />
BLOGGERS/CONTRIBUTORS<br />
Christine Baker<br />
fairfieldroaddesigns.com<br />
Claire Haillot<br />
quiltingwithclaire.com<br />
Jean Boyd<br />
patternsbyjeanboyd.com<br />
Sarah Vanderburgh<br />
sewjoycreations.com<br />
GRAPHIC & WEB DESIGN<br />
Carla A. Canonico<br />
carla@<strong>QUILTsocial</strong>.com<br />
Sondra Armas<br />
WEB and IT Support<br />
Alejandro Araujo<br />
WEBSITE / BLOG : https://<strong>QUILTsocial</strong>.com<br />
Like us on Facebook : <strong>QUILTsocial</strong><br />
Follow us on Pinterest : quiltsocial<br />
Follow us on Twitter : @<strong>QUILTsocial</strong><br />
WHERE TO GET YOUR COPY<br />
<strong>QUILTsocial</strong> is a quarterly eMagazine published by A Needle<br />
Pulling Thread. It is available free for personal use online at<br />
https://<strong>QUILTsocial</strong>.com.<br />
A limited number of printed copies of <strong>QUILTsocial</strong> are available<br />
for purchase at select quilt shops and specialty stores. Ask for it<br />
at your local shop. <strong>QUILTsocial</strong> is not available by subscription.<br />
QUILT SHOPS<br />
If you are interested in carrying <strong>QUILTsocial</strong> in your store, please<br />
email john@<strong>QUILTsocial</strong>.com.<br />
EDITORIAL<br />
Designers and other contributors who would like to be<br />
considered for future issues please email carla@<strong>QUILTsocial</strong>.com<br />
with a brief description of your work and your proposed project<br />
for the magazine.<br />
©2019 <strong>QUILTsocial</strong>. All rights reserved. <strong>Issue</strong> <strong>13</strong>. ISSN 2368-59<strong>13</strong>.<br />
No part of this publication may be reproduced without written<br />
permission from the publisher.<br />
All designs, patterns, and information in this magazine are for<br />
private, non-commercial use only, and are copyrighted material<br />
owned by their respective creators or owners.<br />
Advertiser Index<br />
48 A Needle Pulling Thread Magazine<br />
17 Banyan Batiks<br />
47 Brother<br />
46 Business Directory<br />
39 Coats<br />
27 Gütermann Creativ<br />
02 Husqvarna Viking<br />
44 Melissa Marginet<br />
43 PFAFF<br />
42 <strong>QUILTsocial</strong>.com<br />
Q<br />
4 .com| issue <strong>13</strong><br />
UILTsocial
<strong>QUILTsocial</strong><br />
issue <strong>13</strong><br />
c o n t e n t s<br />
06<br />
07<br />
08<br />
09<br />
11<br />
12<br />
<strong>13</strong><br />
14<br />
15<br />
18<br />
20<br />
21<br />
24<br />
26<br />
28<br />
30<br />
32<br />
34<br />
35<br />
40<br />
6 fun fat quarters turn into a quilted game<br />
Piecing X blocks for quilted game<br />
Piecing O blocks for quilted game using trendy Banyan Batiks, Recess<br />
Making a quilted tic tac toe game board<br />
Completing the quilted tic tac toe game set<br />
Bowl cozies: a fun and useful project!<br />
5 easy steps to finish your bowl cozy<br />
Making a cushion cover for the porch<br />
Arrange strips, sew and spray baste<br />
How to make and apply covered cording like a pro!<br />
The beauty of quilting with the PFAFF creative icon<br />
PFAFF creative icon stitch creator lets you add oomph to a simple binding<br />
Why I’m so excited about the PFAFF ImageStitch app<br />
The best kept secret tobeautiful quilting designs<br />
How the PFAFF creative icon helped me finish a UFO quilt<br />
Exploring utility stitches on the Brother Dreamweaver XE<br />
Infinite possibilities for quilting with decorative stitches<br />
Machine quilting with a serpentine stitch<br />
Decorative stitches plus laser pointer = beautiful machine quilting<br />
8 essential tips for embroidering free standing lace<br />
Q<br />
.com|<br />
UILTsocial<br />
issue <strong>13</strong> 5
6 fun fat<br />
quarters<br />
turn into a<br />
quilted game<br />
Sarah Vanderburgh<br />
Quilted game made with Recess line from Banyan batiks<br />
How fun is this?! The Recess line from Banyan batiks is now in quilt<br />
shops and the designs definitely shout fun. But not just any kind<br />
of fun – fun with friends, outdoor fun, but especially fun to be had<br />
when playing games!<br />
This line of fabric inspired me to create a game to play, well,<br />
anywhere! Not an original game, but a classic one, pieced and<br />
quilted to travel or simply take outside to the backyard. Maybe<br />
a teacher might even enjoy having it in a classroom? Shhh! Let’s<br />
go play in our sewing rooms and make this quilted game using<br />
Northcott’s latest, Banyan Batiks.<br />
materials<br />
The 6 fat quarters from the Recess line used in this sample are:<br />
• board game top fabric 80115-91<br />
• board game backing fabric 80110-29<br />
• symbol fabric X 80114-63<br />
• symbol fabric X background fabric 80110-94<br />
• symbol fabric O 80114-99<br />
• symbol fabric O background fabric 80111-43<br />
You’ll also need some batting to quilt the game board and pieces:<br />
• cut one piece 18” x 21½” for the board<br />
• cut ten 5½” squares for the game pieces<br />
There’s enough fabric to make a travel bag to carry all the game<br />
pieces too! On to the cutting instructions.<br />
Quilted game board tied up<br />
Q<br />
6 .com| issue <strong>13</strong><br />
UILTsocial<br />
Photos by Sarah Vanderburgh
cutting instructions<br />
symbol fabric X 80114-63<br />
• 5 – 5½” squares<br />
• 5 – 1½” x 8½” strips<br />
• 5 – 1½” x 9½” strips<br />
symbol fabric X background fabric<br />
80110-94<br />
• 2 – 1½” x 21 strips<br />
• 5 – 5½” squares<br />
Cut pieces from fat quarter in this order<br />
to make best use of fabric:<br />
Cut 1 – 3” x 21” strip.<br />
Subcut into 2 – 1½” x 21” strips.<br />
Cut 2 – 5½” x 21” strips.<br />
Subcut into a total of 5 – 5½” squares.<br />
Reserve 4” x 21” strip.<br />
symbol fabric O 80114-99<br />
Cut 6 – 1½” x 21 strips.<br />
Subcut strips to make total pieces<br />
required, starting with longest strips and<br />
working down to squares.<br />
• 10 – 1½” x 5½” strips<br />
• 10 – 1½” x 3½” strips<br />
• 20 – 1½” squares<br />
symbol fabric O background fabric<br />
80111-43<br />
Cut pieces from fat quarter in this order<br />
to make best use of fabric:<br />
Cut 2 – 5½” x 18 strips.<br />
Subcut 1 strip into 3 – 5½” squares;<br />
subcut remaining strip into 3 – 1½”<br />
squares.<br />
Subcut second strip into 2 – 5½” squares<br />
and 4 more 1½” wide strips – cut each<br />
strip into 3 more 1½” squares.<br />
Cut 1 – 3½” x 18 strip.<br />
Subcut into 5 – 3½” squares.<br />
From remaining fabric cut 3 – 1½” wide<br />
strips (should be around 3½” in length).<br />
Subcut into 1½” squares to get to total of<br />
20 – 1½” squares.<br />
The game board fabric will be cut as<br />
it’s made.<br />
We’re off to a good start! Cutting into<br />
these fun fat quarters of Recess fabric<br />
makes me want to play in my sewing<br />
room all day.<br />
Quilted X block game pieces.<br />
Quilted O block game pieces.<br />
Piecing X blocks for quilted game<br />
The Recess fabric line has some bold<br />
colorways to choose from, but I chose<br />
to go with the gray-blue and the purple<br />
colorway and its 'masculine' looking prints.<br />
Let’s continue with the pieced X<br />
blocks!<br />
Make X blocks<br />
1. Cut one fabric X background square<br />
through one diagonal.<br />
2. Sew one cut edge to a long side of<br />
Fabric X 1½” x 8½” strip; press the<br />
seam to the background fabric.<br />
3. Sew the remaining background half<br />
along its cut edge to the opposite<br />
side of the Fabric X strip, lining up<br />
the two background halves using the<br />
points as visual guides.<br />
Press the seam to the background fabric.<br />
Background cut on diagonal with X strip ready to sew<br />
4. Cut diagonally through the unit<br />
opposite the pieced in Fabric X fabric.<br />
5. Sew one cut edge to a long side of<br />
Fabric X 1½” x 9½” strip; press the<br />
seam to the background fabric.<br />
Second diagonal cut<br />
6. Sew the remaining half of unit along<br />
it’s cut edge to the opposite side of<br />
the Fabric X strip; this time you can<br />
also use the pieced strip in Fabric X<br />
to line up the halves visually.<br />
Press the seam to the background fabric.<br />
Q<br />
.com|<br />
UILTsocial<br />
issue <strong>13</strong> 7
Line up inset strips and pin halves together.<br />
Trim the pieced X block to size.<br />
7. Trim the unit to 5½”<br />
square. I used a 6½”<br />
square ruler and lined up<br />
the guidelines to make<br />
my first two cuts along<br />
the top and right sides.<br />
Then I turned my unit and<br />
trimmed again. I did this two<br />
times and kept lining up my<br />
5½” guide marks on the ruler<br />
as well as the diagonal line<br />
in the middle of the ruler<br />
through the middle of my<br />
Fabric X.<br />
8. Repeat steps 1-7 to make<br />
4 more X blocks.<br />
The pieced X blocks are ready.<br />
I really like the blue print<br />
from the Recess fabric line – it<br />
makes me think of outdoor<br />
fun! Next up, we piece some<br />
O blocks.<br />
Five pieced X blocks<br />
Piecing O blocks<br />
for quilted game<br />
using trendy Banyan<br />
Batiks, Recess<br />
Opposite corner squares sewn onto middle<br />
unit square<br />
We’ll use two different fat quarters from<br />
the Recess fabric line to make pieced O<br />
blocks.<br />
Make O blocks<br />
To make one O block you’ll need:<br />
from O fabric<br />
• 2 – 1½” x 5½” strips<br />
• 2 – 1½” x 3½” strips<br />
• 4 – 1½” squares<br />
from O background fabric<br />
• 1 – 3½” square<br />
• 4 – 1½” squares<br />
Make middle unit<br />
1. Place one symbol fabric O square<br />
right side down on corner.<br />
2. Sew diagonally through middle of<br />
square parallel to corner – see photo<br />
on the left.<br />
3. Repeat on opposite corner.<br />
4. Cut corners leaving seam allowance.<br />
Press the seams to the added squares.<br />
5. Repeat on remaining 2 corners. Unit<br />
should measure 3½” square.<br />
Corner squares trimmed and pressed<br />
Four corner triangles added<br />
Q<br />
8 .com| issue <strong>13</strong><br />
UILTsocial
Steps to make top and bottom rows of pieced<br />
O blocks<br />
Make top and bottom units<br />
1. Place one background fabric square<br />
right side down on one end of a<br />
Fabric O 1½” x 5½” strip.<br />
2. Sew diagonally parallel to the corner.<br />
See photo.<br />
3. Repeat on opposite end of the strip<br />
with second background fabric<br />
square, with the diagonal again<br />
parallel to the corner.<br />
4. Cut corners off leaving seam<br />
allowances. Press the seams to the<br />
added squares.<br />
5. Repeat steps 1-4 on the remaining<br />
1½” x 5½” strips.<br />
Making a quilted<br />
tic tac toe<br />
game board<br />
Now all we need is a board to play on!<br />
My husband really likes the fabric I<br />
picked to use as the background for the<br />
quilted game board.<br />
Cut background fabric into 3 – 6½” x<br />
18” strips.<br />
1. Sew 1½” x 18” Fabric O background<br />
strip between two pieces of<br />
background fabric; press seams to<br />
the background fabric.<br />
2. Sew second background strip<br />
to opposite site of Fabric O<br />
background strip.<br />
Layout of three rows to make pieced O block<br />
Assemble middle row<br />
1. Sew long edge of 1½” x 3½” strip to<br />
one side of the 3½” square unit; press<br />
the seam to the strip.<br />
2. Sew remaining 1½” x 3½” strip to the<br />
opposite side of the 3½” square unit;<br />
press the seam to the strip.<br />
Layout for middle row assembly of pieced O block<br />
3. Repeat with a second Fabric O<br />
background strip to the sewn unit<br />
followed by final background strip.<br />
Press seams to the background fabric.<br />
Layout for adding columns to game board.<br />
Five completed pieced O blocks<br />
Assemble O block<br />
1. Sew one 1½” x 5½” strip unit to the<br />
top and one to the bottom of the<br />
unit made in step 2; press the seams<br />
to the added strips.<br />
The block should measure 5½” square.<br />
Repeat to make 4 more pieced O blocks.<br />
The Os are almost ready to play with the<br />
Xs – both still need to be quilted into<br />
game pieces. I really like how the flying<br />
paper planes get some special attention<br />
in the middle of the pieced O blocks. The<br />
Recess fabric line has been nothing but<br />
fun to design with and create this quilted<br />
game.<br />
Quilted game board<br />
Q<br />
.com|<br />
UILTsocial<br />
issue <strong>13</strong> 9
4. Cut the unit horizontally into 3 – 5¾”<br />
x 20½” background units.<br />
5. Sew a 1½” x 20½” Fabric O strip<br />
between the three units to make the<br />
game board. Press the seams to the<br />
background units.<br />
But wait, I almost forgot!<br />
Before sewing, make a thin tie out of<br />
Fabric O background fabric to sew into<br />
the game board seam:<br />
1. Cut a 1½” x 20½” strip of Fabric O<br />
background fabric.<br />
2. Lay Right Side Down on ironing<br />
surface and press ¼” over to the back.<br />
Repeat on other edges.<br />
3. Press ¼” over at each end then fold<br />
and press the two pressed edges<br />
together.<br />
4. Sew one seam down the middle of<br />
the tie.<br />
I put safety pins in at this point through<br />
all three layers of the top to keep the<br />
layers from shifting before quilting it.<br />
Change to a quilting needle and<br />
embroidery presser foot to topstitch<br />
around the board.<br />
Lining up blue strips and pinning final<br />
background row to board.<br />
Game board should measure 18” x 20½”.<br />
Turning gap pinned and safety pins in the<br />
game board.<br />
Remember to watch for the tie and keep<br />
it on the other side of the needle when<br />
topstitching!<br />
Completed game board top<br />
Trim backing fat quarter to size (18” x<br />
20½”).<br />
Layer batting with backing Right Side Up<br />
on top, then the game board Right Side<br />
Down.<br />
Pin all the way around leaving a 2” – 3”<br />
turning gap along one short side.<br />
Layers of game board ready for envelope method<br />
Tie edges pressed to the wrong side<br />
Bend the tie in half and pin the folded<br />
end between the backing and game<br />
board in the middle of the short side<br />
opposite the side with the turning gap.<br />
See the photo below.<br />
Sew all the way around the game board<br />
to sew the layers together, backstitching<br />
at each end of the turning gap and over<br />
the folded tie end for extra strength.<br />
Check that all three layers are secured in<br />
the seam all the way around the board,<br />
then clip the excess seam allowance at<br />
each corner.<br />
Turn the layers through the turning gap<br />
and roll the seams flat with your fingers.<br />
Use a tool of your choice to push out the<br />
board corners.<br />
Topstitching game board with a tie to the right of<br />
the stitching<br />
I stitched ¼” away from the strips on<br />
the board. You can add more quilting if<br />
you’d like.<br />
The game board is quilted. The Recess<br />
fabric really gets to show off on the<br />
board, doesn’t it? All that’s left is to quilt<br />
the game pieces with some more Recess<br />
fabric and make a traveling bag for them.<br />
A little more sewing before we can play!<br />
Tie tucked between layers to be sewn into seam<br />
Q<br />
10 .com| issue <strong>13</strong><br />
UILTsocial
Completing the quilted tic tac toe game set<br />
I’ve had some serious fun sewing Banyan<br />
Batiks Recess fabric into a quilted game.<br />
Let's finish it!<br />
Make blocks into quilted playing pieces<br />
1. Sandwich playing piece (X or O) with<br />
the corresponding background fabric.<br />
2. Lay batting square on pinning surface.<br />
3. Place backing square Right Side UP.<br />
4. Place pieced block Right Side DOWN.<br />
5. Pin around leaving a 2” turning gap<br />
on one side.<br />
6. Sew around, backstitching on both<br />
sides of the turning gap.<br />
7. Clip corners then turn playing piece<br />
right side out.<br />
8. Finger press gap seam and topstitch<br />
around edge.<br />
Repeat on remaining 9 game pieces.<br />
I quilted the corresponding shapes in<br />
the game pieces too – scroll back up<br />
to the first photo to see. The pieces do<br />
need some quilting to keep them flat<br />
and so that they will hold their shape if<br />
you need to wash them.<br />
Now that the quilting is done it’s time to<br />
make a bag to carry all the game pieces<br />
in. Lucky for us we have enough fabric<br />
leftover from the fat quarters to make<br />
one just the right size.<br />
Pieced O blocks ready to be quilted<br />
Make carrying bag<br />
Trim leftover O fabric to 8” x 21½”.<br />
1. Fold over each short end to make<br />
hems – fold ¼” then ¼” again and sew.<br />
2. Fold fabric in half Right Sides<br />
Together with hems lined up.<br />
3. Before going further make a tie with<br />
leftover X fabric for the bag:<br />
Cut X fabric to 1½” x 15”.<br />
X block pieces<br />
Repeat pressing and folding to make<br />
a tie in the same manner as tie made<br />
for the game board. (press ¼” each side<br />
towards the middle, press in half with<br />
each end folded ¼” in before pressing in<br />
half; sew once down the middle)<br />
4. Fold tie in half and pin approximately<br />
1” – 2” down between the folded bag<br />
fabric and pin to secure.<br />
5. Sew down each side of the<br />
bag, stitching over the tie twice,<br />
backstitching at the hem edge.<br />
6. On one bottom corner of the bag,<br />
line up the ruler with a 1½” square<br />
and cut off a square of fabric under<br />
the ruler.<br />
7. Make boxed corners by opening<br />
the fabric corner then making a<br />
straight edge between the corner<br />
of the square and sew across.<br />
8. Repeat on opposite bottom corner<br />
of bag.<br />
9. Turn the bag right side out.<br />
Optional: Zigzag or serge the seams of<br />
the bag (nice touch for gift giving and<br />
probably necessary if you need to wash<br />
it!)<br />
Now that the sewing fun is over, it’s<br />
time to play with the quilted game! The<br />
‘playability’ is huge and making it portable,<br />
with large size pieces just increases the<br />
fun. From young children to older, take<br />
your quilted game board made from<br />
Recess fabric out for some fun!<br />
Bag fabric hemmed and tie made<br />
Cutting square to box bag corner<br />
Boxed corner seam<br />
Carrying bag beside quilted game pieces<br />
11
Bowl cozies: a fun and useful project!<br />
Jean Boyd<br />
Bowl cozy made from 2 squares of fabric and Therm Fleece<br />
In June 2018, I showed you how to use Therm Fleece to make<br />
some coasters and mug rugs, in my post called How to use<br />
fusible web that goes in your printer and its characteristics.<br />
This heat resistant material is used for hot and cold insulation to<br />
provide protection from hot surfaces up to 390˚. Therm Fleece<br />
is designed as a liner and should not make direct contact with a<br />
heat source. It’s the perfect product to use for potholders, oven<br />
mitts, tea cozies and here – a bowl cozy.<br />
Therm Fleece and fabric ready to be sewn<br />
Bowl cozies are easy to make from just 2 squares of fabric and<br />
are great for holding a hot soup bowl or cold bowl of ice cream<br />
while sitting in front of the television or out on the patio. They<br />
can be made in any size to suit your favorite bowl.<br />
materials<br />
makes 1 bowl cozy<br />
• 2 – 10” squares of fabric. I used fabric from Northcott Banyan<br />
Batiks collection, Visual Sound.<br />
• 2 – 9½” squares of Therm Fleece. Cut a little off the corners to<br />
reduce bulk.<br />
Therm Fleece: perfect for hot mats, mug rugs, bowl cozies and more<br />
Sewing Instructions<br />
• Mark a center horizontal and vertical line on the white side<br />
of each Therm Fleece square.<br />
• Mark a small line on each center line, 2¼” from the outside<br />
edge.<br />
• Pin 1 square of Therm Fleece to the wrong side of each<br />
fabric square. Have the shiny side facing the wrong side of<br />
the fabric.<br />
• Using a walking foot, machine baste Therm Fleece to the<br />
wrong side of one fabric square, stitching close to the edge<br />
of the Therm Fleece. Have the shiny side next to the wrong<br />
side of the fabric. Do the same with the other fabric square.<br />
• Fold the square, with Therm Fleece attached, in half on one<br />
of the drawn lines. Stitch a dart from the small line to the<br />
outer edge, making the dart about ¾” wide. Do this on all 4<br />
sides. Do the same on the other fabric square.<br />
• Cut away the extra fleece from the darts and the outside<br />
edges to eliminate some bulk.<br />
Q<br />
12 .com| issue <strong>13</strong><br />
UILTsocial
Mark center lines and pin Therm Fleece to fabric.<br />
Sew a small dart on each side.<br />
Cut away extra fleece from darts.<br />
5 easy steps to finish your bowl cozy<br />
With just a few easy steps, you’ll<br />
have your bowl cozy ready to use<br />
in no time. Let’s get started!<br />
• Layer the 2 fabric squares,<br />
with Therm Fleece attached,<br />
right sides together.<br />
• Attach a walking or even-feed<br />
foot to your machine.<br />
• Using a ½” seam, stitch all<br />
around the outside edge,<br />
leaving a 3” opening for<br />
turning. Try not to leave the<br />
opening where the dart is.<br />
You can slightly round the<br />
corners for a nicer finish.<br />
• Trim seam allowance as<br />
required.<br />
• Turn the bowl right side out<br />
through the opening. Handstitch<br />
the opening closed.<br />
• Top-stitch around the<br />
outside edge.<br />
• You can also do some simple<br />
straight-line quilting in the<br />
center of the bowl to make<br />
sure the layers stay together<br />
smoothly.<br />
Photos by Jean Boyd<br />
Stitch Therm Fleece and fabric layers together.<br />
Simple straight line quilting in the center<br />
Top-stitch around outside edge<br />
This size bowl cozy will fit most regularsize<br />
soup bowls, but it’s easy to make<br />
smaller or larger bowl cozies, just by<br />
changing the size of the fabric squares.<br />
Smaller bowl cozies will need shorter<br />
darts and larger ones will need longer<br />
darts.<br />
You could also use just one square of Therm<br />
Fleece if you wish.<br />
You’re sure to enjoy using up some fabric<br />
scraps along with Therm Fleece to make<br />
some attractive and useful bowl cozies.<br />
Another bonus – they're reversible!<br />
Q<br />
.com|<br />
UILTsocial<br />
issue <strong>13</strong> <strong>13</strong>
Making a cushion cover for the porch<br />
This project is another one that will<br />
help use up some of your fabric stash<br />
and create a bench cushion that will be<br />
perfect for both inside and outside use.<br />
The bench pillow form I used is 16” x 38”<br />
and is available in fabric and craft stores.<br />
I used fabrics from Northcott Banyan Batiks<br />
collection for my bench cushion cover.<br />
materials<br />
• ½ yd [.4m] focus fabric; I used a large<br />
floral print<br />
• ½ yd [.4m] accent fabric (bright<br />
green); this is used for the cushion<br />
front and the corded edge<br />
• ¾ yd [.7m] background fabric<br />
• 1 yd [.9m] cushion back; I used the<br />
focus fabric with the large floral print<br />
• 120” of cording. I used a soft, ½”<br />
diameter Creativ Dekor cotton cording.<br />
Bench cushion<br />
Bench cushion form<br />
cutting instructions<br />
• accent fabric 2 – 1½” x WOF (width of<br />
fabric, approximately 40”)<br />
• background fabric 3 – 8½” x WOF<br />
• focus fabric 2 – 6½” x WOF<br />
• for ease of handling, cut the WOF<br />
strips in half so they measure<br />
approximately 20”.<br />
Let’s start sewing!<br />
• Make a strip set using 2 background<br />
strips, 1 accent strip and 1 focus fabric<br />
strip.<br />
• Press seams in one direction. Press<br />
carefully so you don’t distort the<br />
strip set.<br />
• Cut the strip set into 2½” segments.<br />
You’ll get 8 segments from the strip set.<br />
• Make 2 more strip sets like this and<br />
cut them into 2½” segments. You<br />
need 19 – 2½” segments for the<br />
cushion top, so you’ll only need to<br />
cut 3 segments from the last strip<br />
set. Keep the rest of the strip set for<br />
another project – maybe a smaller<br />
cushion?<br />
Keep reading to learn how to re-arrange<br />
the strips to create your own original<br />
cushion top!<br />
Banyan Batiks fabrics<br />
Strip set cut into 2½” segments<br />
Q<br />
14 .com| issue <strong>13</strong><br />
UILTsocial
Arrange<br />
strips,<br />
sew<br />
and<br />
spray<br />
baste<br />
Create your own original design!<br />
Once you have your 19 – 2½” strips cut, it’s time to start arranging them to<br />
create the cushion top. You can use a design wall or lay the strips on the<br />
pillow form until you find a pleasing design.<br />
When you’re satisfied with your design, sew the<br />
strips together using a ¼” seam. Handle carefully<br />
so you don’t stretch or distort the strips.<br />
Design Method 1: Arrange the 2½” strips on a design wall.<br />
Design Method 2: Arrange the 2½” strips on the pillow form.<br />
Sew the strips together.<br />
Q<br />
.com|<br />
UILTsocial<br />
issue <strong>13</strong> 15
Trim the top and bottom of the pieced rectangle so the edges<br />
are even. It should be 38½” wide. If it isn’t, you can add one<br />
more 2½” segment.<br />
Quilting the cushion top<br />
I did some “stitch in the ditch” quilting on all the seam lines<br />
and then added more vertical lines in a random design using<br />
monofilament “invisible” thread. There are several different<br />
invisible threads available in craft and quilt shops. They come in<br />
both light and dark colors, and also in different weights.<br />
You can also use a light-weight thread such as Gütermann 100%<br />
polyester in the color of your choice.<br />
Trim the top and bottom to make the edges even.<br />
Cut 1 piece of lightweight batting (there are several to choose<br />
from) and 1 piece of backing fabric so they are the same size<br />
as the cushion top. The backing fabric won’t show when the<br />
cushion is finished, so this is a good chance to use up some<br />
“ugly” fabric from your stash!<br />
Layer cushion top, batting and backing. Pin or baste the layers<br />
together. 505 Spray can be used for this. Make sure to read the<br />
instructions on the can before using this product. You can also<br />
pin-baste the layers together with safety pins.<br />
Stitch with light-weight or monofilament (invisible) thread.<br />
Make sure to use your walking or even-feed foot when machine<br />
quilting. If you have a foot with an open toe, it makes it even<br />
easier to see where to stitch.<br />
Layer top, batting and backing and baste with 505 Spray or safety pins.<br />
Q<br />
16 .com| issue <strong>13</strong><br />
UILTsocial<br />
Use a walking foot for machine quilting.<br />
When the quilting is finished, trim the rectangle to 17” x 39”,<br />
centering the design as desired.<br />
I find that the finished cushion top is a better shape if you<br />
round the corners or cut them on a slight angle. To do this, I<br />
made a cardboard template to use as a guide for cutting. I<br />
started the angle at 3½” from the corner and removed about ½”<br />
of fabric at the widest point at each corner.
Broken Glass is a new Essentials collection that mimics the look of broken<br />
glass. This bold line achieves its radiant color through a process applied<br />
to the fabric by hand. Our master artisan submerses his hands in a gel-like<br />
substance and hand paints each piece. Broken Glass comes in 22 colors and<br />
will give a striking effect to any project!<br />
Visit BanyanBatiks.com to view the entire collection, and use the Product<br />
Finder tool to search for a local quilt shop that carries Broken Glass.<br />
Tilting at Windmills<br />
48’’ x 72’’<br />
by B.B Studio<br />
Free Pattern Download<br />
at BanyanBatiks.com<br />
FREE Pattern & Video Tutorial<br />
Watch the step-by-step tutorial by<br />
Laura Coia of Sew Very Easy as she<br />
creates the Tilting at Windmills quilt<br />
at youtube.com/SewVeryEasy!<br />
17
How to make and<br />
apply covered<br />
cording like a pro!<br />
Bench cushion finished with covered cording<br />
Make the cording<br />
• I used a Creativ Dekor cotton cording<br />
that was ½” in diameter, but a smaller<br />
cord would work equally well.<br />
• From green accent fabric, cut 3 strips<br />
25⁄8” x WOF (width of fabric). Cut the<br />
ends of each strip on a 45° or 60° angle.<br />
• Sew the strips together to make 1<br />
strip long enough to go all around<br />
the cushion top with about 8” extra.<br />
• When you come to the corner, stop<br />
stitching about ½” from the corner<br />
and back stitch. Make a diagonal cut<br />
in the seam allowance of the cording.<br />
This will help to ease the cording<br />
around the corner.<br />
Use a zipper foot to stitch close to the cording.<br />
Cotton cording for the edge finish<br />
• Fold the green strip around the<br />
cording, right side out.<br />
• Using a zipper foot, stitch as close to<br />
the cording as possible. Be sure to<br />
keep the outside edges of the green<br />
fabric even.<br />
• If necessary, trim the seam allowance<br />
so it is ½” after the stitching is finished.<br />
• Place one end of the covered cord<br />
in the center of one side of the<br />
cushion top.<br />
• Starting about 12” from the corner,<br />
sew the covered cording to the<br />
cushion front. Make sure to stitch<br />
as close to the cording as possible<br />
and keep all outside raw edges even.<br />
Using a small plastic ruler pushed<br />
against the cording will help you stay<br />
close to the cording.<br />
Make a diagonal cut in the seam allowance.<br />
• Continue sewing the cording around<br />
all sides of the cushion top.<br />
• When you come to the last side,<br />
stitch about 8” past the corner and<br />
back stitch. Remove the cushion top<br />
from the machine.<br />
• Adjust the cording so it lies flat.<br />
Stitch the 2 ends of the cording<br />
fabric together using a 45° or 60°<br />
seam. Finger-press seam open. Trim<br />
excess fabric.<br />
Q<br />
18 .com| issue <strong>13</strong><br />
UILTsocial<br />
Stitch covered cording to the cushion top.
Sew ends of cording fabric together.<br />
Overlap edges of backing fabric and baste in place.<br />
• Trim the cording so the two ends<br />
butt up against each other.<br />
• It’s a good idea to tape these ends to<br />
prevent fraying.<br />
• Finish sewing the covered cording on<br />
the cushion top.<br />
• Trim the cushion back so it is the<br />
same size as the cushion front,<br />
keeping the opening in the center.<br />
• Trim the corners of the cushion back<br />
on an angle so they match the front.<br />
Trim corners of backing fabric to match cushion front.<br />
Trim ends of cording.<br />
You’re almost finished! Let’s make the<br />
cushion back.<br />
• From backing fabric, cut 2 pieces 17½”<br />
x 25”.<br />
• Fold 1 short edge on each piece to<br />
make a double fold hem and stitch<br />
in place.<br />
• Overlap the 2 pieces by about 4” and<br />
baste the 2 sections together.<br />
Jean Boyd<br />
patternsbyjeanboyd.com<br />
• Place the cushion back and front<br />
right sides together.<br />
• Pin the corners together first. Then<br />
pin as needed to keep all outside raw<br />
edges even.<br />
• Sew the front and back together,<br />
using a ½” seam. Stitch as closely as<br />
possible to the cording.<br />
• Insert the bench pillow form and<br />
adjust it as necessary for a good fit.<br />
Sometimes, the corners of the pillow<br />
form don’t fill the corners fully, so I<br />
just place a little bit of extra stuffing in<br />
those areas.<br />
Enjoy your custom-designed bench<br />
cushion to enjoy!<br />
Q<br />
.com|<br />
UILTsocial<br />
issue <strong>13</strong> 19
The beauty of<br />
quilting with the<br />
PFAF F creative icon<br />
Claire Haillot<br />
With the winter and holidays already upon us, I've<br />
been keeping myself busy indoors with my fantastic<br />
PFAFF creative icon and I must admit that it has<br />
changed my perspective on quilting.<br />
PFAFF creative icon comes with a carrying case for the embroidery unit and accessories.<br />
Making it that much easier to bring it to the cottage!<br />
I’ve had fun making quick and easy quilt projects<br />
while testing out the creative icon. However I have<br />
fallen short on the quilting part in the last two<br />
projects. I continuously ran out of time. It’s one<br />
thing quilting for the fun of it, but there’s added<br />
pressure when you have deadlines.<br />
So for the holiday season, I decided not to start<br />
any new project but to simply learn how to use<br />
the embroidery side of the creative icon. Cause<br />
let’s face it… so far I have really LOVED working<br />
with it, but haven’t used it to its full potential.<br />
If you’ve been reading all my blogs on <strong>QUILTsocial</strong><br />
so far and have been thinking about purchasing a<br />
PFAFF machine, all of the features I have presented<br />
are available on the PFAFF performance icon as<br />
well. What makes the creative icon so special is that<br />
it also comes loaded with the embroidery tray and<br />
hoops as well as many designs and apps to help<br />
you create more.<br />
My April posts featuring a baby quilt finally quilted!<br />
To start off, let’s go back to my April posts featuring<br />
a baby quilt featuring the lovely Sleepy Sloth fabrics<br />
from Northcott. All that was left was to quilt some<br />
hearts in the main blocks. I had my design in mind<br />
but I fell in love with the heart border design that<br />
was already programmed into the creative icon. So<br />
I decided that could be an easy introduction to the<br />
embroidery.<br />
I finally mustered up the courage to open the lovely<br />
PFAFF Embroidery Carrying Case that protects the<br />
embroidery unit with all the hoops. It’s all very well<br />
secured and It made me realize that I could easily<br />
travel with the case should I need to bring it up to<br />
the cottage.<br />
Due to the thickness of the quilt, I had to work my<br />
quilt onto the hoop. I was able to unscrew the clip<br />
of the hoop to ensure that it fits into it no problem.<br />
Embroidering the heart border design on my quilt using the PFAFF creative icon was nice<br />
and easy once I had secured the quilt in the hoop.<br />
Q<br />
20 .com| issue <strong>13</strong><br />
UILTsocial<br />
So the trick is to position the first hoop with the<br />
hook underneath your quilt, ensuring that the hook<br />
is located on the bottom right.<br />
Photos by Claire Haillot
Position the quilt and add the<br />
second hoop.<br />
Ensure that you see the writing so<br />
that you know it’s in the correct<br />
position. Then clip to close. I used the<br />
biggest size hoop which allowed me<br />
to embroider up to <strong>13</strong>.11” x <strong>13</strong>.78”. I<br />
duplicated the design 4 times and<br />
aligned it perfectly to my block. It really<br />
does help to have the biggest screen<br />
possible on the machine. I was able<br />
to play with the precision positioning<br />
on the screen to ensure that the<br />
embroidery would fall exactly where I<br />
wanted on the quilt.<br />
I found it easy to embroider using<br />
the single hole plate and the 6D<br />
embroidery foot. When the straight<br />
stitch plate is attached, the machine<br />
automatically sets to straight stitch<br />
mode, preventing damage to the<br />
needle and plate. The large workspace<br />
really helped out as I was positioning<br />
the hoop in the middle of the quilt and<br />
had at least 10” of the quilt hanging out<br />
on the right hand side.<br />
I also picked up some Sulky rayon 40wt<br />
thread in the midnight blue color to<br />
ensure that the thread wouldn’t break<br />
while embroidering. I love the look it<br />
gives to my quilt. It blends well with<br />
all the rest of my quilting made with<br />
my Blue Heaven blendable 12wt<br />
100% cotton Sulky thread. Another<br />
thing I learned while making this<br />
project was that the bobbins on the<br />
creative icon are 30% larger! I kept<br />
on wondering when I would run out<br />
of thread but I was able to embroider<br />
my three blocks without having to<br />
make a new bobbin!<br />
The first main block took no more<br />
than 20 minutes to figure out and<br />
embroider. The other 2 blocks, on<br />
the left side, gave me a bit of a<br />
workout as I decided to reduce<br />
the size of the hearts and make<br />
several more duplicates to cover<br />
the complete area. And the good<br />
news is that I was able to save both<br />
block quilting designs: I simply had<br />
to touch the heart on the bottom<br />
left of my screen for the creative<br />
icon to save the embroidery design.<br />
I gave each a distinctive name so<br />
that I can simply go into mysewnet<br />
and touch the cloud to retrieve the<br />
design should I want to use it again<br />
on another block.<br />
As this is my first quilt made using an<br />
embroidery system, I have to say that<br />
I’m really thrilled.<br />
Embroidery stitch out on PFAFF creative icon<br />
Finished baby quilt while vacationing at the cottage.<br />
PFAF F creative icon stitch creator<br />
lets you add oomph to a simple binding<br />
I’ll show you how the Stitch Creator helped me create<br />
a nice and quick binding. I only had two days to<br />
spend quilting before the holidays and four quilts to<br />
finish. So I decided to have at least one of the projects<br />
completely bound by machine. I’ll now show you my<br />
little tricks that make this binding look good!<br />
Let’s start by stitching the binding onto the quilt.<br />
Usually, we stitch the binding on the top of the quilt<br />
so that we can hand finish onto the back of the quilt.<br />
But since I’m machine stitching all, I start by stitching<br />
the binding onto the back of the quilt and proceed to<br />
stitch it the exact same way as I would on the top. But<br />
just in case you’re unsure of what the “same way” is,<br />
here’s the description:<br />
Using the PFAFF creative icon to finish this quilt was such a treat!<br />
Q<br />
.com|<br />
UILTsocial<br />
issue <strong>13</strong> 21
1. When stitching the binding onto the<br />
back of the quilt, I ensure that I stitch<br />
at a full ¼” as opposed to a scant. If<br />
you’re too close to the edge, your<br />
binding will not feel full when you<br />
touch it. It’s really important that it<br />
fits snuggly to the edge of your quilt<br />
to prevent a premature wear of the<br />
fabric. I also cut my strips to 2¼” and<br />
fold in half to ensure that it fits nicely.<br />
Stitch out to the corner of your quilt.<br />
5. I then fold the unsewn tail of the<br />
binding, aligning it with the 45<br />
degree seam and edge of the next<br />
side I’ll be stitching. You can finger<br />
press on the fold to ensure that it lays<br />
nice and flat. Fold the unsewn tail of<br />
the binding back onto the edge of<br />
the quilt and start stitching from the<br />
edge. Repeat for all four corners.<br />
Binding stitch is at a full ¼” seam allowance.<br />
2. I leave a 6” tail hanging, it will be<br />
useful to join the ends together.<br />
Using the PFAFF creative icon to bind<br />
my quilts makes this process fast and<br />
easy as I can install my binding using<br />
my regular ¼” foot and the integrated<br />
Dual-Feed technology. I get precision<br />
stitching. And since the creative icon<br />
has increased needle piercing force, it<br />
really goes through all the layers and I<br />
get a nice seam!<br />
As soon as the edge of the quilt aligns with the<br />
red line on the front of the foot, I know it’s time<br />
to stop.<br />
3. For great corners: I stop sewing and<br />
place my needle down when I reach<br />
¼” from the edge of the quilt. Since I’m<br />
using the ¼” foot on the creative icon,<br />
I can easily spot that moment as we<br />
have red lines on our foot that shows<br />
the ¼” before and after the needle. So<br />
as soon as the edge of the quilt aligns<br />
with the red line on the front of the<br />
foot, I know it’s time to stop.<br />
4. I rotate the quilt so that I can sew<br />
out of the quilt, stitching right<br />
until the end of the corner. Having<br />
the enhanced ergonomic design<br />
electronic knee-lift allows me to raise<br />
the presser foot while keeping my<br />
hands on the project, enabling me to<br />
rotate the quilt.<br />
Fold on the seam.<br />
Fold the tail of the binding to be sewn back onto<br />
the edge of the quilt.<br />
Start stitching on edge.<br />
Lay the binding ends on the edge of the quilt and<br />
fold the excess of the tail to be sewn back.<br />
I use the excess binding that I just trimmed<br />
off and align it open perpendicularly over the<br />
folded portion.<br />
6. Stop sewing about 12” from where<br />
you began to stitch the binding.<br />
Bring the tail of the binding yet to be<br />
sewn over the start of the binding<br />
and cut off excess (to be safe, I cut<br />
passed the sewn portion). Lay the<br />
binding ends on the edge of the quilt<br />
and fold the excess of the unsewn tail<br />
back. At this point, I use the excess<br />
binding that I just trimmed off and<br />
align it open perpendicularly over<br />
the folded portion, at the edge of the<br />
other binding (see photo). And I cut<br />
off the excess.<br />
Q<br />
22 .com| issue <strong>13</strong><br />
UILTsocial
I sew diagonally<br />
So that’s how I usually sew a binding<br />
onto a quilt.<br />
Usually, I finish by hand on the other side<br />
of the quilt. But for this project, I wanted<br />
to make something different which<br />
is why I stitched the binding onto the<br />
back of the quilt. I actually folded the<br />
binding onto the top of the quilt and<br />
used a decorative stitch on top to finish<br />
the binding. And I decided to create my<br />
own decorative stitch cause the creative<br />
icon lets me do it! Yes, I could have gone<br />
much fancier as it has more than 800<br />
stitches but I didn’t have much time.<br />
So I picked a design and incorporated it<br />
with the straight stitch and saved it on<br />
mysewnet cloud.<br />
Then the machine prompted me to<br />
change the needle plate and foot! I<br />
love it when the machine reminds me<br />
before I go and break another needle!<br />
So I changed the needle plate and foot<br />
and removed the Integrated Dual Feed<br />
and began sewing the binding onto the<br />
quilt top. I simply had to fold my corners<br />
and switch my stitch to straight to be<br />
able to move in and out of the corners<br />
easily. Because I had saved my stitch<br />
on mysewnet cloud it was easy to go<br />
back to my own stitch design once I had<br />
made a corner. It really didn’t take long<br />
for the binding to be finished.<br />
Cut off the excess and press the seams open.<br />
7. I then twist the tail of the binding<br />
to be sewn towards the quilt while<br />
ensuring that the right side of the<br />
fabric faces up. I align the edge of the<br />
beginning binding perpendicularly<br />
(right sides together) and I sew<br />
diagonally (the same way I sew my<br />
strips of binding together). I double<br />
check that the length of the binding<br />
matches the length of the quilt and I<br />
cut off the excess, pressing the seams<br />
open. Once done, I stitch the binding<br />
onto the edge of the quilt.<br />
Then the machine prompted me to change the<br />
needle plate and foot<br />
I simply had to fold my corners and switch my<br />
stitch to straight to be able to move in and out of<br />
the corners easily.<br />
My quilt was quilted and bound in a<br />
day. That’s how quick and easy it is to<br />
bind a quilt using the stitch creator.<br />
This left me with another day of testing<br />
out the wonderful embroideries of the<br />
creative icon.<br />
Stitch creator on the PFAFF creative icon<br />
Binding of quilt with PFAFF creative icon<br />
Q<br />
.com|<br />
UILTsocial<br />
issue <strong>13</strong> 23
Why I’m so excited about the PFAF F ImageStitch app<br />
The PFAFF creative icon is your bestie when it’s time to quilt a project!<br />
How the ImageStitch app works<br />
Once in the app with photo downloaded, you get to choose<br />
the type of embroidery you want. It can be scattered large or<br />
small or a simple line bold or thin. You can also use the eraser<br />
icon to remove the lines you do not wish to have. Once you’re<br />
happy with the look, you can save it onto your sewnet cloud.<br />
It will automatically download to your creative icon. I wanted<br />
to have the quilted ‘look’ as opposed an embroidered one, so I<br />
opted for LineArt bold and saved the design.<br />
I turned on the creative icon to find my downloaded<br />
embroidery design in mySewnet file! I simply touched the<br />
name and it opened the design on the creative icon screen. I<br />
was able to resize my design and position in the hoop where<br />
I wanted it. I then realized I needed the embroidery facing the<br />
other way as I had placed the quilt up-side down. Instead of<br />
having to re-hoop the quilt, I simply clicked the ‘mirror’ image<br />
and I was ready to start the embroidery.<br />
In my June 2018 post, I showed you how to perfect the flying<br />
geese block using the PFAFF creative icon while making a<br />
modern throw using the wonderful Canvas collection from<br />
Northcott.<br />
In the last post of that week, I started quilting and showed you<br />
how to use the Shape Creator. But I have to say that I found an<br />
easier way to quilt this project! And I have the ImageStitch app<br />
to thank for this: it’s the best app ever for quilters!<br />
ImageStitch is a free app available for your smartphone or tablet<br />
that lets you take a picture and transfer it into stitches for you to<br />
embroider. You can save the design on your mySewnet cloud<br />
and it will be synchronized to your mySewnet on your creative<br />
icon. So I designed my flying geese outline on my personal<br />
computer and printed it out. I then took a photo of it and went<br />
onto the ImageStitch app and incorporated it in the app.<br />
Introducing the best app ever: ImageStitch<br />
Q<br />
24 .com| issue <strong>13</strong><br />
UILTsocial
ImageStitch on your Smartphone<br />
Quilting Status on Sewnet app on your<br />
Smartphone<br />
My very own quilting design for flying geese<br />
Once again, I preferred using Sulky rayon solid 40wt thread<br />
in light silver to ensure that the thread wouldn’t break while<br />
embroidering. I love how it looks on my quilt! I used a light<br />
silver so that it would pop up in the red sections of the quilt. It<br />
blended well with all the rest of my quilting made with 100%<br />
cotton 40wt Sulky thread.<br />
What was also great about this is that I could start the<br />
embroidery onto my quilt and follow the progress on my cell<br />
phone thanks to the SewNotice app. I was able to go and start<br />
packing for the cottage and my cell phone would prompt me to<br />
go back when the embroidery was finished. I just had to go back<br />
to set the next position on the quilt and press start before getting<br />
back to packing.<br />
I truly enjoyed having the freedom to create my own quilt design<br />
and being able to have the creative icon stitch it in place. This<br />
has just opened up so many other new possibilities! I have so<br />
many UFOs that are in the quilting stage waiting for the perfect<br />
quilt design! Now I can sketch it and embroider it on the PFAFF<br />
creative icon thanks to the ImageStitch app. It really is the best<br />
app ever for quilters! Keep reading I'll show you another way to<br />
quilt triangles on your projects using the PFAFF creative icon.<br />
I truly enjoyed having the freedom to create my<br />
own quilt design<br />
Q<br />
.com|<br />
UILTsocial<br />
issue <strong>13</strong> 25
The best kept secret to<br />
beautiful quilting designs<br />
The PFAFF creative icon is my favorite quilting partner!<br />
Use Freezer Paper to create your design shapes<br />
Here’s another idea to help you<br />
change your perspective on<br />
quilting! I'm using the embroidery<br />
arm of the PFAFF creative icon.<br />
Here's my best kept secret to<br />
beautiful quilting designs without<br />
using the hoop.<br />
Remember my Flying Geese quilt I<br />
made using the Canvas collection<br />
from Northcott? I showed you<br />
how I got to quilt a row of flying<br />
geese on the project. But I also<br />
want to quilt a single flying<br />
geese using the Sulky Cotton<br />
Blendables12wt in Poppy color. I<br />
decided to go old school for this<br />
part of the project and thought<br />
it would be a great way to show<br />
you what I consider to be my best<br />
kept secret.<br />
I pulled out my freezer paper and<br />
copied the shape of my flying<br />
geese several times and cut them<br />
out. I then positioned them onto<br />
my quilt and ensured that I liked<br />
the overall layout. Once I was sure<br />
of their location, I used an iron<br />
to set them onto my quilt. Once<br />
they were in place I was able to<br />
go onto the creative icon and<br />
quilt around the freezer paper<br />
to achieve the quilting design I<br />
wanted.<br />
For this part I went back to the<br />
single needle plate, ¼” foot and<br />
Integrated dual-feed system. I<br />
love the finished look and feel<br />
with the sulky 12wt variegated<br />
threads. And the freezer paper<br />
is easy to remove once done: it<br />
simply peels off.<br />
If you have more complex<br />
designs you’d like to quilt onto<br />
your project, simply use Glad<br />
Press & Seal instead of Freezer<br />
paper. You can tear it off once<br />
done and for any little piece stuck<br />
underneath your stitch, simply<br />
use your iron. It won’t melt onto<br />
your project, it will just dry up and<br />
you can dust it off. It’s that simple.<br />
However, the PFAFF ImageStitch<br />
is my go-to app now instead.<br />
I hope you like my best kept<br />
secret to beautiful quilting<br />
designs. I was able to finish my<br />
second quilt in half a day using<br />
the great features of the PFAFF<br />
creative icon.<br />
Positioning your quilting designs on your quilt<br />
Quilting around the edge of your design<br />
Q<br />
26 .com| issue <strong>13</strong><br />
UILTsocial
27
The creative icon is really user-friendly<br />
How the<br />
PFAF F creative icon<br />
helped<br />
me finish a UFO quilt<br />
Auditioning Sulky Rayon threads on the project<br />
Have you tried the PFAFF creative icon?<br />
You need to do a test run at your nearest<br />
dealer! It's amazing.<br />
I had set two days aside before the<br />
holidays to be able to quilt them. What<br />
I didn’t expect was the fact that the<br />
creative icon is really user-friendly and<br />
I finished the quilts in less than two<br />
days… which meant that I had time on<br />
my hand to finish a UFO!<br />
I have to say that I never thought this<br />
day would come! I had made a rainbow<br />
panel almost two years ago and had<br />
no idea how to finish the project so I<br />
set it aside in my UFOs. But I noticed<br />
the cute butterfly embroidery outline<br />
that’s included in the creative icon and<br />
thought it will be perfect for that panel.<br />
I pulled out all the beautiful Sulky Rayon<br />
40 wt I had and auditioned them on<br />
the project. I decided on the Variable<br />
red to pink for this one. Usually, I go for a<br />
neutral thread colors so that the quilting<br />
doesn’t show too much, but I knew the<br />
embroidery would come out perfect so I<br />
didn’t hesitate to go bold.<br />
Q<br />
28 .com| issue <strong>13</strong><br />
UILTsocial
It was easy to choose the design and<br />
to position onto the project. Thanks to<br />
the large screen on the creative icon<br />
I was able to resize the pattern, rotate<br />
and duplicate to create the layout of<br />
my choice. I placed the project onto<br />
the hoop and began the embroidery. It<br />
was just wonderful to see the butterflies<br />
come to life on my project!<br />
Once the first overall layout was finished,<br />
I noticed that I had big areas without<br />
any quilting. It didn’t feel right to my<br />
artistic eye. So I decided to cheat with<br />
the creative icon. I would reposition<br />
the design layout and stitch only one<br />
butterfly in the location I wanted. You’re<br />
able to tell the creative icon at what<br />
stitch you want it to start. You can either<br />
press a location on the screen, or input<br />
the stitch number, the creative icon<br />
will go to that location and begin<br />
embroidering. Which is what I did!<br />
And I would press stop when the<br />
butterfly embroidery section was<br />
completed to my satisfaction.<br />
And that’s how the PFAFF creative<br />
icon helped me finish another UFO<br />
during my two-day quiltcation.<br />
I still can’t believe I got so much<br />
done in just two days. I went to the<br />
cottage with all the quilts to bind<br />
and truly enjoyed finishing them<br />
by hand. I felt an immense sense<br />
of accomplishment and came back<br />
home recharged a ready to go<br />
back to work during the day, and<br />
to my studio every time I have a<br />
few minutes I can call my own.<br />
Embroidery stitch out screen enable me to input<br />
the stitch number, the creative icon will go to<br />
that location and begin embroidering.<br />
I felt an immense sense of accomplishment when the binding was finished.<br />
Thanks to the large screen, it was easy to choose<br />
the design and to position onto the project.<br />
Claire Haillot<br />
quiltingwithclaire.com/wp<br />
Q<br />
.com|<br />
UILTsocial<br />
issue <strong>13</strong> 29
Exploring utility stitches on the<br />
Brother<br />
Dreamweaver<br />
XE Christine Baker<br />
The first set of stitches to show up on<br />
the screen are the utility stitches. I can<br />
use the slider on the left side of the<br />
screen to scroll through all of the ones<br />
that are available.<br />
The Dreamweaver XE<br />
This summer, on <strong>QUILTsocial</strong>, I showed<br />
you how to turn a charm square pack into<br />
nine patch blocks and snowball blocks. I’m<br />
using the Dreamweaver XE from Brother<br />
to finish these blocks into a modern<br />
baby quilt.<br />
Now we need to quilt it! I’m exploring<br />
some of the different stitches that are<br />
available on the Dreamweaver XE to<br />
decide how the baby quilt will be<br />
quilted. The first step is to select “Sewing”<br />
from the home screen.<br />
Scrolling through the stitches<br />
Stitch 1-35 looks interesting! I’ll select<br />
it first.<br />
The quilt top<br />
I was able to make a total of 42 blocks<br />
from my charm pack – 21 nine-patch<br />
and 21 snowball. I arranged them on my<br />
design wall, alternating the two blocks<br />
and sewed them together.<br />
Q<br />
30 .com| issue <strong>13</strong><br />
UILTsocial<br />
The home screen<br />
Stitch 1-35<br />
Photos by Christine Baker
The screen on the Dreamweaver XE now<br />
shows what the stitch will look like and<br />
indicates at the top of the screen that we<br />
need to attach the “J” presser foot before<br />
stitching out our sample.<br />
This stitch was 60 seconds. Not too bad!<br />
Now I’ll press the utility stitches – section<br />
2 key to access the second grouping of<br />
utility stitches.<br />
Adjusting stitch length and width<br />
It took 35 seconds to stitch a 10“ sample<br />
of stitch 2-16, and only 26 seconds to<br />
stitch a sample of 2-12. I wonder how<br />
fast the Dreamweaver XE can sew the<br />
serpentine stitch 2-17.<br />
Utility stitches – section 2<br />
Attach foot “J”<br />
I showed you on <strong>QUILTsocial</strong> how to<br />
easily change the presser foot on the<br />
Dreamweaver XE. Now that we’ve<br />
changed the foot we can try out<br />
this stitch on one of the small quilt<br />
sandwiches that I made using batting<br />
and 2 layers of fabric. Here’s what Stitch<br />
1-35 “Quilting Stippling” looks like in<br />
fabric and thread.<br />
I’m selecting stitch 2-16 and trying<br />
stitching it out on my quilt sandwich.<br />
Stitch 1-35 “Quilting Stippling”<br />
Since I’ll be using one (or two) of these<br />
stitches to quilt my baby quilt, I’m not<br />
only testing out how they look when<br />
stitched but also how long it takes to<br />
stitch them! I don’t want to be spending<br />
hours and hours quilting this small quilt,<br />
so I set my iPad up beside the sewing<br />
machine and using the timer to see how<br />
long it takes to stitch out a 10“ sample.<br />
Stitch 2-16<br />
Depending on the stitch selected, you<br />
may or may not be able to change<br />
the width and/or length of the stitch.<br />
If numbers show up on the screen as<br />
shown, then you can use the “+” or :-”<br />
buttons to adjust. If no numbers show in<br />
this area, then the stitch can’t be adjusted.<br />
The serpentine stitch “2-17”<br />
Q<br />
.com|<br />
UILTsocial<br />
issue <strong>13</strong> 31
Here are the stitch-outs, and time taken<br />
to stitch, for the four different utility<br />
stitches. As you can see we’re getting<br />
faster and faster and I quite like the way<br />
the serpentine stitch looks! I think that<br />
maybe one that I’ll use for quilting!<br />
Now that I’ve picked a fairly simple utility<br />
stitch to use on the baby quilt, I’ll check<br />
out some of the more complex stitches<br />
available on the Dreamweaver XE and<br />
pick a second one to use as well.<br />
Stitch-outs<br />
Infinite<br />
possibilities<br />
for quilting<br />
with decorative<br />
stitches<br />
I picked one of these stitches to use for<br />
quilting my baby quilt, but I’d like to<br />
use a more complex design as well. I’m<br />
checking out the character decorative<br />
stitches available on the machine.<br />
After selecting “Sewing” on the main<br />
screen, I press the Character Decorative<br />
Stitch key on the LCD screen of the<br />
Dreamweaver XE to access the many<br />
decorative stitches available.<br />
Dreamweaver XE<br />
There are 7 different sections of<br />
Character Decorative Stitches. I’m<br />
selecting the Section 6 key to access the<br />
first group of decorative stitches.<br />
Section “6”<br />
The Character Decorative Stitch key<br />
As on the utility stitches screen, you can<br />
scroll through the decorative stitches using<br />
the slider on the right side of the screen.<br />
Q<br />
32 .com| issue <strong>13</strong><br />
UILTsocial
Decorative stitch 6-065 looks amazing! I’ll<br />
try stitching out that one.<br />
Now I’ll try out Decorative stitch 6-1<strong>13</strong>.<br />
Scrolling through the stitches<br />
As I was scrolling through the options,<br />
I selected a few different stitches and<br />
realized that instead of just replacing<br />
the previous selection, the machine<br />
was adding one repeat of each design<br />
to the one before it. The possibilities<br />
for combining stitch patterns on the<br />
Dreamweaver XE are endless! I’ll explore<br />
THAT another time!<br />
Stitch 6-065<br />
Here it is on my sample. It’s AWESOME but<br />
it also took 60 seconds to stitch out only<br />
two repeats which are just over 2” long.<br />
That would take way too much time for<br />
this quilt, but I’m definitely keeping it in<br />
mind for a future project!<br />
Stitch 6-1<strong>13</strong><br />
That one’s amazing as well but took 80<br />
seconds to stitch about 3”. Stitch 6-086,<br />
shown below, took 50 seconds to stitch<br />
the same length.<br />
Combining stitches<br />
To delete stitches I don’t want to use,<br />
I just press the delete button at the<br />
bottom of the screen.<br />
Stitch-outs<br />
Make sure to pay attention to the display<br />
on the Dreamweaver XE when selecting<br />
stitches. It shows you what size the final<br />
stitching will be by indicating the % of<br />
the actual size that is displayed. The last<br />
group of stitches in section 6 are much<br />
bigger than the other stitches that I used<br />
and the machine is only displaying them<br />
at 50% of actual size.<br />
Deleting stitches<br />
Stitch out of 6-065<br />
Display size<br />
Q<br />
.com|<br />
UILTsocial<br />
issue <strong>13</strong> 33
Stitch-outs for many decorative stitches<br />
Here are some of the stitch-outs I did using stitches 6-166<br />
through 6-178. As you can see they are much bigger than the<br />
previous samples. They would be great for quilting an inner<br />
border on a quilt as most of them are about 1” wide. But, they<br />
do take a lot of time<br />
to sew. The fastest<br />
one – stitch 6-171<br />
– took 75 seconds<br />
to stitch a 6” long<br />
sample.<br />
So, I found a second<br />
stitch that I’ll use on<br />
the quilt – I’ll keep<br />
it a secret and show<br />
you. Now I need to<br />
layer my quilt!<br />
Layering the quilt<br />
Here it is layered<br />
with batting and backing. I used 505 Spray to keep the layers<br />
together and a few safety pins around the outside edge for<br />
added stability.<br />
Machine quilting with a<br />
serpentine stitch<br />
When I’m machine quilting a small project<br />
on my home machine I always try to<br />
use my walking foot when possible. The<br />
Dreamweaver XE has an amazing dual<br />
feed foot that is even better than a regular<br />
old walking foot for machine quilting! The<br />
dual feed foot is plugged into the back<br />
of the machine after securing it to the<br />
presser foot holder.<br />
Once the dual feed foot is plugged in,<br />
you’ll notice that some of the utility and<br />
decorative stitches are grayed out on the<br />
display screen. This feature shows which<br />
stitches can and can’t be used with the<br />
dual feed foot.<br />
You can see in the middle picture below<br />
that since the serpentine stitch isn't<br />
grayed out, it’s available to use with the<br />
dual feed foot! That’s awesome, because<br />
I’d like to use that foot as much as I can<br />
for the machine quilting. Using a walking<br />
foot or dual feed foot prevents the three<br />
layers of the quilt from shifting while<br />
you're quilting!<br />
Before using the serpentine stitch, I’ll<br />
quilt in-the-ditch between the blocks<br />
using the dual feed foot.<br />
The dual feed foot<br />
Q<br />
34 .com| issue <strong>13</strong><br />
UILTsocial<br />
Greyed out stitches<br />
Quilting in the ditch
I've stitched all the vertical and horizontal<br />
seams between the blocks. Here’s a close<br />
up of the in-the-ditch quilting using the<br />
Dreamweaver XE from Brother. I don’t usually<br />
do a lot of in-the-ditch quilting because I<br />
find it hard to keep the stitching right along<br />
the seam, but this machine makes it easy!!<br />
Now that my three layers are secured<br />
together with the in-the-ditch quilting, I’ll<br />
use the dual feed foot to quilt diagonally<br />
through all of the nine-patch blocks. Here’s a<br />
little video showing the steps I followed.<br />
Close up of in-the-ditch quilting<br />
Decorative stitches<br />
plus laser pointer<br />
= beautiful machine quilting<br />
Greyed out stitches<br />
I still have the dual feed foot attached to<br />
the machine and the grayed out stitches<br />
on the screen show that all of the<br />
stitches in this section can’t be used with<br />
this presser foot. Since I want to use the<br />
cute little kite stitch – 6-078 – I will have<br />
to attach a different presser foot.<br />
Foot “N”<br />
Once I unplug the dual feed foot, the<br />
display screen on the Dreamweaver XE<br />
shows that the correct presser foot for<br />
the selected stitch is foot “N”.<br />
Changing the foot<br />
So, I remove the dual feed foot and<br />
attach foot “N” to the machine.<br />
Q<br />
.com|<br />
UILTsocial<br />
issue <strong>13</strong> 35
Since I’ve already done a lot of machine quilting on the quilt<br />
using the dual feed foot, I don’t need to worry too much about<br />
the layers shifting as I quilt using the “N” foot.<br />
I select the kite stitch, activate the laser pointer and get ready to<br />
stitch.<br />
Here’s a video that I made showing the steps to follow.<br />
Close-up of the kite stitch<br />
The machine quilting is finished.<br />
Here’s a close-up of the kite stitch used to machine quilt across<br />
the diagonal of each of the snowball blocks. I think it looks SO<br />
cute!!<br />
Here it is – the machine quilting is finished. The Dreamweaver<br />
XE made this so easy to quilt!<br />
10 simple steps for binding with perfect corners<br />
I’m trimming the<br />
quilt and I’ll show<br />
you 10 simple steps<br />
for binding with<br />
perfect corners.<br />
The first thing I do is<br />
trim the edges of the<br />
baby quilt using a<br />
rotary cutter and ruler.<br />
It’s always a good<br />
idea to label quilts,<br />
but I have to admit,<br />
it’s my least favorite<br />
part of quilting!! This<br />
is the solution I’ve<br />
come up with.<br />
Trimming<br />
I ordered<br />
embroidered ribbon<br />
labels from It’s Mine<br />
Labels and I pin one of<br />
them to the back of<br />
the quilt in one of the<br />
corners. I make sure<br />
that the raw ends of<br />
the ribbon almost<br />
reach the raw edge<br />
of the quilt. Once the<br />
Add ribbon label<br />
binding is sewn on,<br />
the label is secured and there’s no hand stitching required!<br />
Now that I have this Dreamweaver XE embroidery machine, one<br />
of these days I’ll try embroidering my own ribbon labels!<br />
I’ve made my binding using a grey Colorworks Solid from<br />
Northcott following the same technique I’ve shown in previous<br />
<strong>QUILTsocial</strong> posts.<br />
Q<br />
36 .com| issue <strong>13</strong><br />
UILTsocial
Now I’ll select the “quilting stitches” key<br />
on the LCD screen.<br />
Step 2<br />
Flip the binding to the right of the corner,<br />
so that the raw edge of the binding<br />
makes a continuous line with the raw<br />
edge of the second side of the quilt.<br />
Step 5<br />
Once the binding is sewn to all four sides<br />
of the quilt, go to one corner and fold<br />
one side of the binding over to the front<br />
of the quilt.<br />
Select “quilting stitches”<br />
The screen shows that I need to attach<br />
the “J” presser foot.<br />
Flip to the right<br />
Step 3<br />
Fold the binding over so that the fold is<br />
lined up with the first side of the quilt<br />
and the raw edge of the binding is laying<br />
along the raw edge of the second side of<br />
the quilt.<br />
Fold one side over<br />
Step 6<br />
Fold the second side of the binding to<br />
the front and pin both sides in place,<br />
making sure that the edges meet in<br />
the corner.<br />
Install the “J” foot<br />
Step 1<br />
Start by sewing the binding to the raw<br />
edge of the first side of the quilt and<br />
stop ¼” from the end. Back-stitch to sew<br />
reinforcement stitches before cutting<br />
the thread.<br />
Fold to the left<br />
Step 4<br />
Starting right at the folded end of the<br />
binding, back-stitch at the edge of the<br />
quilt and then sew along the raw edge<br />
of the binding using a ¼” seam until you<br />
get to the second corner of the quilt.<br />
Repeat Steps 1-4.<br />
Fold the second side<br />
¼” from the end<br />
Stitch from the outer corner<br />
Q<br />
.com|<br />
UILTsocial<br />
issue <strong>13</strong> 37
Step 7<br />
Select a decorative stitch on the<br />
Dreamweaver XE. If necessary, adjust the<br />
width and length of the stitch. I’m using<br />
Utility stitch 3-16 which looks a lot like a<br />
hand stitched cross-stitch.<br />
Step 10<br />
Use the needle down feature on the<br />
Dreamweaver XE to drop the needle<br />
where the two corners of the binding<br />
meet and then pivot to stitch the<br />
next side.<br />
Press<br />
Step 9<br />
Keep sewing along the binding,<br />
allowing the decorative stitch to stitch<br />
the edge of the binding down. When<br />
you get to the corner, use an awl to<br />
hold down the corner of the folded<br />
binding to make sure that it doesn’t<br />
move before it gets stitched.<br />
Pivot at the corner<br />
Here's my binding, sewn down with<br />
stitch 3-16 on the Dreamweaver XE.<br />
And here’s my finished baby quilt,<br />
pieced and machine quilted with the<br />
Dreamweaver XE from Brother.<br />
Adjust width<br />
Step 8<br />
Working from the front of the quilt,<br />
line up the edge of the binding<br />
under the presser foot, then press<br />
the “Reinforcement Stitch” button to<br />
start sewing.<br />
Use an awl<br />
The finished binding<br />
I really love how my baby quilt turned<br />
out and I’m really happy that I was<br />
finally able to use one of the charm<br />
packs that my friend Nellie brought me<br />
when she returned from Quiltweek in<br />
Lancaster last year!<br />
The Brother Dreamweaver XE made<br />
piecing and quilting this quilt a<br />
delight! I can’t wait to discover more of<br />
its great features while working on my<br />
next project!<br />
Christine Baker<br />
FairfieldRoadDesigns.com<br />
38 | issue <strong>13</strong>
Your Favorite<br />
Thread Brand<br />
With over 350 colors, Coats Dual Duty XP ® has<br />
exceptional performance and durability for<br />
hand and machine sewing on all fabrics.<br />
Coats & Clark, Greer, SC 29650<br />
makeitcoats.com<br />
17-011 © 2017 Coats & Clark. All rights reserved. Coats & Clark is a registered trademark.<br />
39
THE Dream Machine 2<br />
THE Dream Machine 2<br />
Rayon threads<br />
Sulky Ultra Solvy stabilizer<br />
Q<br />
40 .com| issue <strong>13</strong><br />
UILTsocial<br />
8 essential tips<br />
for embroidering free<br />
standing lace<br />
I’m using the embroidery features on<br />
THE Dream Machine 2 from Brother to<br />
share these awesome tips on how to<br />
make bookmarks using free standing<br />
lace (FSL).<br />
I have to be honest with you, up until last<br />
month I’d never even heard of FSL, but<br />
one day I stumbled upon a FSL design<br />
while researching embroidery designs<br />
online and I was intrigued.<br />
I downloaded these super cute<br />
FSL bookmark designs and tried to<br />
embroider one, but it went HORRIBLY<br />
wrong!! My stabilizer ripped, my threads<br />
broke, and I figured that I might need<br />
some professional help!<br />
So I emailed Brother educator Lynn<br />
Swanson and asked if she had any tips<br />
for doing free standing lace embroidery.<br />
She obviously knows what she’s talking<br />
about because my next attempt was<br />
very successful, so I asked if I could share<br />
her great tips with you here!<br />
TIP 1<br />
Choose a design that says it is either<br />
for “free standing lace” or “FSL”. When<br />
you’re looking online, the design will<br />
say that it’s appropriate for FSL. Regular<br />
embroidery designs are made so that<br />
the fabric keeps the design together. No<br />
fabric and the threads will just unravel.<br />
FSL designs are stitched in a way that the<br />
thread keeps the design together.<br />
TIP 2 use the correct thread<br />
Make sure to use the thread type the<br />
design calls for – if it calls for cotton<br />
thread make sure to use cotton and<br />
not rayon. Lynn says that she has used<br />
30 weight and also up to 50 weight<br />
depending on what the pattern calls for<br />
– but don’t substitute rayon if the pattern<br />
suggests cotton. She’s also used rayon<br />
thread and some metallic thread if the<br />
pattern calls for it.<br />
75/11 sharp needles<br />
Hoop very tightly<br />
The base stitching
TIP 3 stabilizer<br />
Lynn says that she’d had the best<br />
results usings heavy duty watersoluble<br />
stabilizer. She likes Sulky<br />
Ultra Solvy but has also used<br />
Brother water soluble stabilizer.<br />
TIP 4 needles<br />
Lynn likes to use a 75/11 sharp<br />
or ultra sharp needle. You want<br />
to have a narrow (thin) needle<br />
because when the needle<br />
perforates the stabilizer so you<br />
want as small a hole as possible.<br />
TIP 5 hooping<br />
Make sure you hoop the<br />
stabilizer tightly, tighter than if<br />
you were stabilizing fabric.<br />
The base stitching for the free<br />
standing lace embroidery<br />
is what keeps it all together<br />
when the stabilizer is removed.<br />
As you can see THE Dream<br />
Machine 2, first stitches the<br />
whole background (green) in a<br />
criss-cross pattern and then the<br />
design is stitched on top.<br />
With the addition of more<br />
thread colors, the design is<br />
coming to life!<br />
Below is the original bookmark,<br />
and a second one that was<br />
increased in size before stitching.<br />
TIP 6 trimming<br />
Trim away the excess stabilizer<br />
around the bookmarks as close<br />
a possible without clipping any<br />
of the threads.<br />
TIP 7 soak in warm water<br />
Fill a bowl with warm water<br />
and lay the design in it. It<br />
sure doesn’t take long for the<br />
stabilizer to dissolve away!<br />
TIP 8 drying<br />
Once the stabilizer is dissolved<br />
remove the design and lay it on a<br />
thick towel to dry.<br />
Now that my bookmarks are dry,<br />
they can be used to keep my<br />
spot in my next great read! And<br />
wouldn’t these be cute presents?<br />
There are FSL designs available<br />
for ornaments and houses,<br />
doilies and more! Just type<br />
in “FSL” on your favorite<br />
embroidery design website to<br />
see what’s available.<br />
Christine Baker<br />
FairfieldRoadDesigns.com<br />
Adding more layers of stitching<br />
The free standing lace bookmarks<br />
Trim away excess stabilizer<br />
Soaking in the hot water<br />
Drying on a towel<br />
The finished bookmark<br />
41
don't miss these<br />
projects & tutorials online!<br />
Q<br />
UILTsocial<br />
.com<br />
How to make an<br />
embroidered mug rug<br />
using mySewnet news-feed<br />
READ NOW<br />
READ NOW<br />
READ NOW<br />
Making a reversible table<br />
runner using Banyan Batiks<br />
Rock City<br />
42<br />
and there's so much more!<br />
Mini quilt with buttons<br />
becomes very adorable
43
905-715-7725<br />
www.thatsewingplace.ca<br />
SPECIALIZING IN SEWING MACHINE<br />
SALES/SERVICE/CLASSES<br />
AUTHORIZED DEALER FOR<br />
Kelly’s Creative Sewing<br />
Machines and More...<br />
902-435-7380<br />
www.kellyscreativesewing.ca<br />
804 Main Street<br />
Dartmouth, Nova Scotia B2W 3V1<br />
kellyscreativesewing@gmail.com<br />
Specialize in Sewing, Embroidery machines,<br />
Sergers and Long arm Quilting Systems<br />
www.sewwithvision.net<br />
902-479-2227<br />
480 Parkland Dr,<br />
Halifax, NS B3S 1P9, Canada<br />
Your Authorized Dealer for:<br />
Perfection starts here.<br />
Ottawa Valley Authorized Dealer<br />
Sewing, Knitting & Having a Good Time<br />
Arnprior Shopping Centre<br />
375 Daniel St S, Arnprior, ON K7S 3K6<br />
6<strong>13</strong>-623-0500<br />
www.sewinspired.ca<br />
info@sewinspired.ca<br />
Q<br />
44 .com| issue <strong>13</strong><br />
UILTsocial
<strong>QUILTsocial</strong> bloggers<br />
in this issue<br />
Claire Haillot<br />
quiltingwithwclaire.com<br />
Married with three young boys,<br />
Claire Haillot shares her passion<br />
for quilting among her neighbors<br />
in the United States and<br />
Canada as well as her cousins in<br />
France. Claire has been active<br />
in the quilting industry since<br />
2004. In 2006, she started her<br />
own line of patterns and later<br />
began publishing patterns and<br />
articles in Canadian, European<br />
and American magazines. She<br />
collaborated with PlumEasy<br />
patterns to launch the Dancing<br />
Diamonds. Claire has also won<br />
a few awards for her work. Most<br />
recently her quilt Remembering<br />
Sotchi won Best of Show in<br />
special exhibit A Celebration of<br />
Color at the International Quilt<br />
Festival in Chicago April 2018.<br />
Christine Baker<br />
FairfieldRoadDesigns.com<br />
Christine has been designing and<br />
publishing quilt patterns for the<br />
last 10 years under the business<br />
name Fairfield Road Designs.<br />
Her patterns range from fusible<br />
applique and piecing to felted wool<br />
applique and punchneedle. You can<br />
see all her patterns on her website.<br />
Sarah Vanderburgh<br />
sewjoycreations.com<br />
Sarah loves to play with color and<br />
quilts are her playground! A selftaught<br />
quilter, She's been designing<br />
her own quilts for almost 20 years.<br />
She's inspired by happy fabrics,<br />
selvages, traditional blocks and<br />
nature. She's also a wife, mother,<br />
and elementary school teacher, and<br />
enjoy drinking coffee on my front<br />
porch in northern Ontario.<br />
Jean Boyd<br />
patternsbyjeanboyd.com<br />
Jean has been designing and<br />
publishing patterns since 1997. Her<br />
work has been published in several<br />
magazines across North America.<br />
Jean holds a Fiber Arts Certificate in<br />
quilting and has taught extensively<br />
throughout Canada, including six<br />
national Quilt Canada conferences.<br />
She was named "Canadian Teacher<br />
of the Year" in 2003 by the Canadian<br />
Quilters Association and has won<br />
numerous awards for her quilts.<br />
45
BUSINESS DIRECTORY To list your business in this space please call 1.866.969.2678.<br />
Brenda Franklin Designs<br />
7570 Mapleton SR 18 RR 1, Alma, ON N0B 1A0<br />
519.638.9958 bfdesigns.on.ca<br />
help@bfdesigns.on.ca<br />
More than 500 charts available for counted<br />
needlework, latch hook rugs, beadwork, beaded<br />
knits and knitting patterns. Mail/fax order or ask<br />
for our products at your local shop. Contact us for<br />
custom designs or needle felted sculpture.<br />
Brampton Sew & Serge<br />
289 Rutherford Rd S, Unit 7, Brampton, ON L6W 3R9<br />
905.874.1564 sewnserge.com<br />
monique@bramptonsewnserge.com<br />
Welcome to Your One Stop Sewing Centre! We are<br />
authorized dealers of Baby Lock, Husqvarna Viking,<br />
and Singer sewing machines and sergers. We also<br />
offer a full schedule of sewing classes for everyone.<br />
Bytowne Threads - Ottawa, ON<br />
1.888.831.4095 bytownethreads.com<br />
mlj@bytownethreads.com<br />
Featuring Aurifil thread from Italy. Long staple<br />
Egyptian cotton threads - 270 colours in 12, 28, 40<br />
and 50 wt; 88 colours in 80 wt. Polyester Aurilux -<br />
240 high sheen colours. Wool threads - 192 colours.<br />
Many kits available. Check our website!<br />
Canadian National Fabric - Brampton, ON<br />
https://canadiannationalfabric.com/<br />
info@canadiannationalfabric.com<br />
We are an online fabric shoppe offering a wide<br />
variety of fabrics, patterns, books and notions for all<br />
your sewing needs. Flat rate Canada wide shipping<br />
of $5. Shop in person available by appointment!<br />
Country Concessions<br />
1 Dufferin St, Cookstown, ON L0L 1L0<br />
705.458.4546 or toll-free 1.888.834.4407<br />
countryconcessions.com<br />
info@countryconcessions.com<br />
Visit our lovely and unique quilt shop in the quaint<br />
village of Cookstown. We have over 7000 bolts of<br />
cotton fabrics plus a wide selection of patterns, books<br />
& notions. You will be so glad you came for a visit.<br />
Gitta's<br />
271 Lakeshore Rd E, Mississauga, ON L5G 1G8<br />
905.274.7198 gittas.com<br />
questions@gittas.com<br />
Gitta's, named after owner Gitta Al-Basi, nestled in<br />
the east village of Port Credit, is the place where<br />
stitchers meet with their stitching friends, shop for<br />
stitching supplies and see the new stitching designs<br />
from Europe and the United States.<br />
Hardanger House, designs by Betty Stokoe<br />
PO Box 1223, Stettler, AB T0C 2L0<br />
403.742.2749 bettystokoe@gmail.com<br />
tnplisting.com/hardanger-house.html<br />
Hardanger embroidery charts and kits. Designs<br />
feature contemporary adaptations of this traditional<br />
cutwork embroidery from Norway. Shop online<br />
at etsy.com/shop/HardangerHouse. Some digital<br />
downloads available.<br />
Haus of Stitches<br />
626 Main Street, Humboldt, SK S0K 2A0<br />
306.682.0772 or toll-free 1.800.344.6024<br />
hausofstitches.ca<br />
Our one of a kind store offers everything you need<br />
for sewing, quilting, knitting, rug hooking and<br />
needlework. Authorized dealers for Janome and Elna.<br />
Heartfelt Fibre Arts<br />
42 Industrial St, Toronto, ON M4G 1Y9<br />
647.920.3616 heartfeltfibrearts.com<br />
info@hearftfeltfibrearts.com<br />
Canadian Fibre Arts supply store specializing in<br />
high-quality, unique fibre and tools for all of your<br />
knitting, felting, rug hooking and stitching needs.<br />
Impressions Embroidery & Engraving<br />
#8-449 Mayor Magrath Dr S, Lethbridge, AB T1J 3L8<br />
403.942.3934 impressionslethbridge.ca<br />
impressions22@shaw.ca<br />
Our shop does embroidery and laser engraving.<br />
Laser engraving is a beautiful process for fabric,<br />
as nothing cuts cleaner and more precisely than a<br />
laser. We now carry a nice array of fabric as well to<br />
compliment the abilities of the laser.<br />
Kelly's Creative Sewing<br />
804 Main St, Dartmouth, NS B2W 3V1<br />
902.435.7380 kellyscreativesewing.ca<br />
kellyscreativesewing@gmail.com<br />
We offer sales and on-site service of high-end<br />
domestic embroidery, sewing machines and sergers,<br />
as well as a variety of educational programs.<br />
Needles & Knits<br />
15040 Yonge St, Aurora, ON L4G 1M4<br />
905.7<strong>13</strong>.2066 needlesandknits.com<br />
Fabulous selection of yarns. Extremely<br />
knowledgable and expert help. Cozy and friendly<br />
atmosphere. Classes. Guild night every first Tuesday<br />
of the month. Tea with Tove, the owner, every<br />
Thursday from 6-8pm.<br />
Needleworker's Delight / Silkweaver Fabrics<br />
Plaza K 181 Route 1 South, Metuchen, NJ 08840<br />
732-388-4545 needleworkersdelight.com<br />
info@needleworkersdelight.com<br />
Standard & specialty Zweigart Fabrics & canvas,<br />
hand-dyed fabrics, floss, fibers, towels, tableware,<br />
leaflets/designs, painted canvases, notions, tools,<br />
baby items, home decor, and so much more!<br />
Pine Ridge Knit & Sew<br />
17477 Hwy 2 PO Box 68, Trenton, ON K8V 5R1<br />
6<strong>13</strong>.392.1422 pineridgeknitsew.com<br />
yvette@pineridgeknitsew.com<br />
We have knitting machines by Artisan and Silver<br />
Reed, embroidery machines by Husqvarna/Viking<br />
& White. Sewing notions and supplies, books and<br />
software. Hands-on lessons and classes. Wide variety<br />
of yarns, threads, dress and pant zippers.<br />
Serenity Knits<br />
525 Brooker Ridge #102, Newmarket, ON L3X 2M2<br />
905.710.3283 serenityknits.ca<br />
info@serenityknits.ca<br />
We offer a wide selection of high quality yarns as well<br />
as needles, hooks, patterns and notions. We also offer<br />
a large variety of classes from beginner to the more<br />
advanced.<br />
Sew Fancy Inc.<br />
Guelph, ON<br />
519.824.4127 sewfancy.com<br />
sales@sewfancy.com<br />
Your Premier Canadian Source for Specialty Sewing<br />
Supplies including Smocking, Heirloom Sewing,<br />
Goldwork, Silk Ribbon Embroidery, Needle Tatting,<br />
Swarovski Crystals, Sashiko, Quilting and more. Visit<br />
the website for the latest in sewing supplies.<br />
Sew Inspired<br />
375 Daniel St S, Arnprior, ON K7S 3K6<br />
6<strong>13</strong>.623.0500 sewinspired.ca<br />
info@sewinspired.ca<br />
Your Ottawa Valley PFAFF® Authorized Dealer. We<br />
have a large supply of quilting & sewing supplies,<br />
knitting supplies, as well as in stock PFAFF® sewing<br />
machines. We also have a listing of sewing and<br />
quilting classes.<br />
Sew With Vision<br />
480 Parkland Dr, Halifax, NS B3S 1P9<br />
902.479.2227 sewwithvision.net<br />
Authorized PFAFF, HUSQVARNA VIKING, and SINGER<br />
dealer and service provider offering an extensive line<br />
of sewing, embroidery and serger machines, as well<br />
as long-arm quilting systems.<br />
That Sewing Place<br />
16610 Bayview Ave #10, Newmarket, ON L3X 1X3<br />
905.715.7725 thatsewingplace.ca<br />
jaret&liana@thatsewingplace.ca<br />
Introducing That Sewing Place as your sewing<br />
source and Authorized Dealers for Bernina and<br />
Brother machines. Jaret & Liana focus on placing<br />
your sewing needs first, providing outstanding<br />
support, service, and training.<br />
The Quilt Store / Evelyn's Sewing Centre<br />
17817 Leslie St, Unit 40, Newmarket, ON L3Y 8C6<br />
905.853.7001 or toll-free 1.888.853.7001<br />
The Quilt Store West<br />
695 Plains Rd E, Unit 6, Burlington, ON L7T 2E8<br />
905.631.0894 or toll-free 1.877.367.7070<br />
thequiltstore.ca<br />
Now with 2 locations to serve you, we are your Quilt<br />
Store Destination! The staff here at The Quilt Store<br />
is always on hand to provide Quilt Wisdom, Quilt<br />
Inspiration and most of all we pride ourselves as the<br />
place to make... All Your Quilt Dreams Come True!<br />
The Stitcher's Muse<br />
99 Commercial Street, Nanaimo, BC V9R 5G3<br />
250.591.6873 thestitchersmuse.com<br />
info@thestitchersmuse.com<br />
A divine little shop with supplies for all your hand<br />
stitching needs! Friendly, knowledgeable, helpful<br />
staff. Cross stitch, canvaswork, needlepoint,<br />
embroidery, counted thread, lace making and<br />
more. Books, patterns, fabric, threads, tools.<br />
The Yarn Guy<br />
15 Gower St, Toronto, ON M4B 1E3<br />
416.752.1828 or toll-free 1.800.836.6536<br />
theyarnguy.com info@sewknit.ca<br />
See us on Facebook, follow us on Twitter!<br />
Knitting machines, sewing machines, repairs, parts<br />
for Passap, Studio, Singer, Silver Reed, Superba,<br />
White. Sewing notions and supplies, books, ball<br />
yarns, coned yarns, TAMM yarns, Paton's yarns,<br />
Bernat yarns, Phentex yarns, Bernat kits & crafts.<br />
Ultimate Sewing Centre<br />
191 Bloor St East, Oshawa, ON L1H 3M3<br />
905.436.9193 ultimatesewing.com<br />
ultimatesewing@bellnet.ca<br />
For all your sewing needs be sure to call Durham’s<br />
largest one stop shop: Janome and Elna Sewing<br />
Machines, Sergers, & Embroidery machines,<br />
over 3000 bolts of first quality cottons, Floriani<br />
Embroidery supplies, the latest notions, books, &<br />
patterns, year round classes, and so much more!<br />
Upper Canada Quiltworks<br />
PO Box 64, Brockville, ON K6V 5T7<br />
6<strong>13</strong>.345.3956 Fax: 6<strong>13</strong>.342.3327<br />
uppercanadaquiltworks.com<br />
Visit us online for a wide selection quilt patterns<br />
and books. Techniques include felted wool, fusible<br />
appliqué, punchneedle, rag quilting and printing<br />
photos on fabric.<br />
Q<br />
46 .com| issue <strong>13</strong><br />
UILTsocial
The new star of<br />
the quilting world<br />
Featuring brilliant StitchVision technology that lets you take your quilts to the next level.<br />
192 Disney embroidery<br />
designs built right in<br />
Projects guidelines and<br />
grids for sewing precise lines,<br />
angles, corners and more<br />
Extra large 10 5/8” x 16”<br />
hoop with comfortable<br />
spring lever release<br />
65 square inch workspace<br />
and a <strong>13</strong>.1” needle-to-arm<br />
distance<br />
Visit your Brother authorized dealer, or go to brother.ca to discover more.<br />
INSPIRING CREATIVITY FOR GENERATIONS<br />
Photos are for illustration purposes only. Brother and its logo are trademarks of Brother Industries, Ltd., Japan. All specifications are subject to change without notice. All registered trademarks referenced herein are the property of their respective companies.<br />
©2018 Brother International Corporation (Canada) Ltd. 1, rue Hôtel de Ville, Dollard-des-Ormeaux, Québec, H9B 3H6. 12/2018 - 2018_398<br />
47
Get more quilting fun in<br />
A NEEDLE PULLING THREAD<br />
QUILT SEW KNIT CROCHET CROSS STITCH EMBROIDER HOOK RUGS<br />
A NEEDLE PULLING THREAD<br />
A Needle Pulling Thread<br />
QUILT SEW KNIT CROCHET CROSS STITCH EMBROIDER HOOK RUGS<br />
2018 <strong>Issue</strong> 47<br />
84<br />
The Beauty of<br />
Texture<br />
Surface Honeycomb Stitch<br />
60<br />
16<br />
30<br />
Exploring<br />
painting<br />
&<br />
needlework<br />
Thoughtful Soles<br />
Wiggle Room socks<br />
Volume <strong>13</strong> <strong>Issue</strong> 2<br />
Artist Reviews<br />
with<br />
Lise Belanger<br />
Claire Haillot<br />
Make<br />
H<br />
& Be<br />
appy!<br />
Visit www.ANPTmag.com to order!<br />
48


