

QUILTsocial Issue 13
Welcome to another thrilling issue of QUILTsocial! In this issue we show you ways to explore and use utility and decorative stitches for quilting your quilt and sewing on your binding. Using these stitches for quilting is an underrated method, but highly effective. We encourage you to choose any built-in stitch to add oomph to your binding, see the various stitch-outs. We also show you how to make and apply covered cording like a pro, the tutorial includes how to round the corners for a truly elegant finish. Another tutorial in this issue is how to work therm fleece into quilted projects, like the bowl cozy. Other free projects include the tic tac toe game set - all quilted using the latest Recess line from Banyan Batiks, and the quilted bench cushion cover. We take a close look at some awesome features on the Brother Dreamweaver XE and the ImageStitch app and the mysewnet on the PFAFF creative icon. Download this stunning issue!
Welcome to another thrilling issue of QUILTsocial! In this issue we show you ways to explore and use utility and decorative stitches for quilting your quilt and sewing on your binding. Using these stitches for quilting is an underrated method, but highly effective. We encourage you to choose any built-in stitch to add oomph to your binding, see the various stitch-outs. We also show you how to make and apply covered cording like a pro, the tutorial includes how to round the corners for a truly elegant finish. Another tutorial in this issue is how to work therm fleece into quilted projects, like the bowl cozy. Other free projects include the tic tac toe game set - all quilted using the latest Recess line from Banyan Batiks, and the quilted bench cushion cover. We take a close look at some awesome features on the Brother Dreamweaver XE and the ImageStitch app and the mysewnet on the PFAFF creative icon. Download this stunning issue!

You also want an ePaper? Increase the reach of your titles
YUMPU automatically turns print PDFs into web optimized ePapers that Google loves.
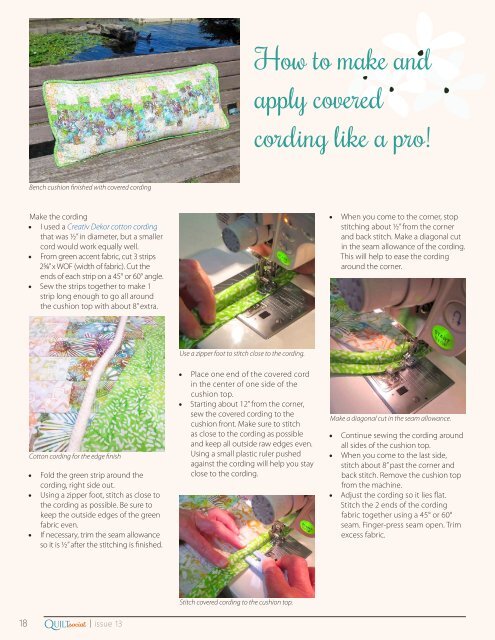
How to make and<br />
apply covered<br />
cording like a pro!<br />
Bench cushion finished with covered cording<br />
Make the cording<br />
• I used a Creativ Dekor cotton cording<br />
that was ½” in diameter, but a smaller<br />
cord would work equally well.<br />
• From green accent fabric, cut 3 strips<br />
25⁄8” x WOF (width of fabric). Cut the<br />
ends of each strip on a 45° or 60° angle.<br />
• Sew the strips together to make 1<br />
strip long enough to go all around<br />
the cushion top with about 8” extra.<br />
• When you come to the corner, stop<br />
stitching about ½” from the corner<br />
and back stitch. Make a diagonal cut<br />
in the seam allowance of the cording.<br />
This will help to ease the cording<br />
around the corner.<br />
Use a zipper foot to stitch close to the cording.<br />
Cotton cording for the edge finish<br />
• Fold the green strip around the<br />
cording, right side out.<br />
• Using a zipper foot, stitch as close to<br />
the cording as possible. Be sure to<br />
keep the outside edges of the green<br />
fabric even.<br />
• If necessary, trim the seam allowance<br />
so it is ½” after the stitching is finished.<br />
• Place one end of the covered cord<br />
in the center of one side of the<br />
cushion top.<br />
• Starting about 12” from the corner,<br />
sew the covered cording to the<br />
cushion front. Make sure to stitch<br />
as close to the cording as possible<br />
and keep all outside raw edges even.<br />
Using a small plastic ruler pushed<br />
against the cording will help you stay<br />
close to the cording.<br />
Make a diagonal cut in the seam allowance.<br />
• Continue sewing the cording around<br />
all sides of the cushion top.<br />
• When you come to the last side,<br />
stitch about 8” past the corner and<br />
back stitch. Remove the cushion top<br />
from the machine.<br />
• Adjust the cording so it lies flat.<br />
Stitch the 2 ends of the cording<br />
fabric together using a 45° or 60°<br />
seam. Finger-press seam open. Trim<br />
excess fabric.<br />
Q<br />
18 .com| issue <strong>13</strong><br />
UILTsocial<br />
Stitch covered cording to the cushion top.


