NMRA RH October 2018

Create successful ePaper yourself
Turn your PDF publications into a flip-book with our unique Google optimized e-Paper software.
JMRI Programming<br />
A step by step guide to DecoderPro<br />
Ian Watton<br />
Part 1<br />
Several months ago I hosted<br />
a meet of the Kent and East<br />
Sussex Group at my house,<br />
one of the items I had on<br />
show was programming DCC locos<br />
via JMRI DecoderPro. If you’ve not<br />
used this software I highly recommend<br />
it, not only is it free, but the capabilities<br />
far outweigh any dependency<br />
on handheld DCC system where<br />
programming is required. It really<br />
comes into its own when programming<br />
sound decoders, CVs (configurable<br />
variables used to control<br />
functions/operations in the decoder)<br />
which can stretch into the hundreds<br />
and combinations of which CVs are<br />
required for which sound/light combination,<br />
run into the thousands. So<br />
here is a guide on how to make the<br />
most of DecoderPro.<br />
JMRI DecoderPro can be downloaded<br />
from their website: http://jmri.<br />
sourceforge.net/ In order to program<br />
a DCC Decoder you will need an<br />
interface unit between your PC and<br />
your DCC System. The likely cost<br />
is £45 to £70 for those systems that<br />
don’t have a computer interface<br />
already, in the case of Digitrax, the<br />
LocoBuffer (£60) enables so much<br />
more than just programming and the<br />
NCE PowerPro, Digitrax DCS240,<br />
ESU Ecos, and many other systems<br />
have the computer interface<br />
in place already - so no cost at all.<br />
The SPROG Programmer (http://<br />
www.sprog-dcc.co.uk/) currently £65<br />
comes complete with a power supply.<br />
This is the system I have - a SPROG<br />
IIv4 with JMRI version 4.12 on my<br />
PC. This version of JMRI will only<br />
run on Windows 7 and above, as it<br />
requires Java version 8 (a problem I<br />
found when hooking up an old laptop<br />
running Windows XP - it couldn’t<br />
cope!)<br />
26 ROUNDHOUSE - <strong>October</strong> <strong>2018</strong><br />
So having installed the SPROG<br />
IIv4 and reading back the COM<br />
port it’s attached to (the install DVD<br />
explained everything), it’s time to<br />
start DecoderPro. The first screen is<br />
the Preferences which gets Decoder<br />
Pro talking to the DCC System.<br />
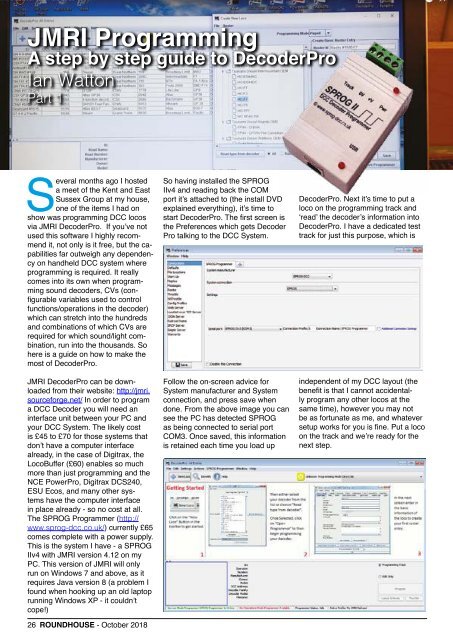
Follow the on-screen advice for<br />
System manufacturer and System<br />
connection, and press save when<br />
done. From the above image you can<br />
see the PC has detected SPROG<br />
as being connected to serial port<br />
COM3. Once saved, this information<br />
is retained each time you load up<br />
DecoderPro. Next it’s time to put a<br />
loco on the programming track and<br />
‘read’ the decoder’s information into<br />
DecoderPro. I have a dedicated test<br />
track for just this purpose, which is<br />
independent of my DCC layout (the<br />
benefit is that I cannot accidentally<br />
program any other locos at the<br />
same time), however you may not<br />
be as fortunate as me, and whatever<br />
setup works for you is fine. Put a loco<br />
on the track and we’re ready for the<br />
next step.