NMRA RH October 2018

You also want an ePaper? Increase the reach of your titles
YUMPU automatically turns print PDFs into web optimized ePapers that Google loves.
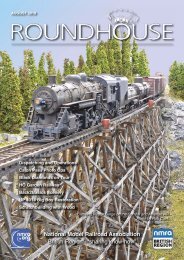
11th Avenue Station<br />
Mike Ruby<br />
Photos by Mike Ruby<br />
I<br />
have had the Walthers HO Union<br />
Station kit for many years, but<br />
had not got past opening the box,<br />
looking at the parts and making a<br />
card mockup.<br />
My 11th Avenue Freemo module was<br />
originally a double track one to the<br />
old <strong>NMRA</strong> BR standard. The station<br />
was to be mounted on a raised structure<br />
over the two mainlines and yard,<br />
there are videos on YouTube with<br />
the mockup in this position with long<br />
trains passing underneath. When our<br />
local group Western Union in Plymouth<br />
decided to change to the RS<br />
Tower single track standard, I built<br />
adaptor boards to covert the module<br />
to this standard. The station was<br />
moved to ground level on one of the<br />
adaptor boards. After a few years of<br />
use in this form I built a new module<br />
designed for single track from the<br />
start. Then 11th Avenue became my<br />
home layout.<br />
This year 11th Avenue was invited<br />
to the <strong>2018</strong> Christow, Devon Fremo<br />
event, I decided I must get around to<br />
building the station.<br />
I had always planned to fit out the<br />
interior. I’ve done this with several<br />
other buildings, but the size of this<br />
one would give a far larger space to<br />
work with. I decided the left section<br />
would be a restaurant with the centre<br />
and right still in use as the station as<br />
they open on to the platforms.<br />
8 ROUNDHOUSE - <strong>October</strong> <strong>2018</strong><br />
The first job was to do the insides<br />
of the walls, Walthers did not plan<br />
for an interior so the walls are hollow.<br />
I cut black card to fit around<br />
the window frames, the card<br />
was about the thickness that the<br />
window frames projected, black<br />
was used as I planned to light the<br />
interior and did not want it shining<br />
thought the walls. I then stuck<br />
printed texture paper to the black<br />
card but I left the paper longer than<br />
the card to allow for overlapping in<br />
the corners.<br />
Before attaching the inside<br />
walls I sprayed the outsides with<br />
Rust-oleum Limestone paint. I<br />
roughed up the inside of the walls,<br />
stuck the interiors with PVA and<br />
weighted them to keep the card<br />
flat.Next were the windows and<br />
doors, I painted the frames first<br />
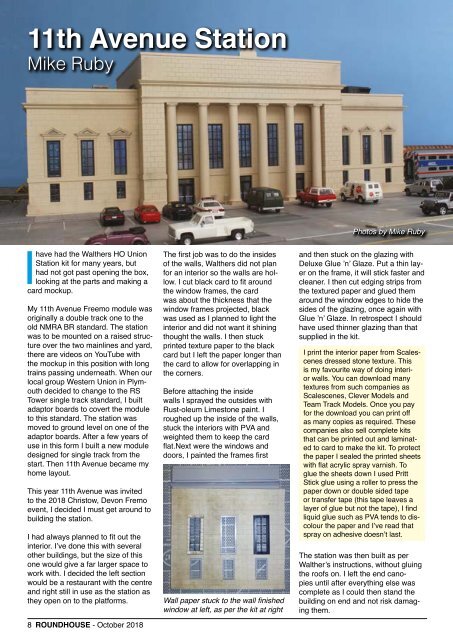
Wall paper stuck to the wall finished<br />
window at left, as per the kit at right<br />
and then stuck on the glazing with<br />
Deluxe Glue ’n’ Glaze. Put a thin layer<br />
on the frame, it will stick faster and<br />
cleaner. I then cut edging strips from<br />
the textured paper and glued them<br />
around the window edges to hide the<br />
sides of the glazing, once again with<br />
Glue ’n’ Glaze. In retrospect I should<br />
have used thinner glazing than that<br />
supplied in the kit.<br />
I print the interior paper from Scalescenes<br />
dressed stone texture. This<br />
is my favourite way of doing interior<br />
walls. You can download many<br />
textures from such companies as<br />
Scalescenes, Clever Models and<br />
Team Track Models. Once you pay<br />
for the download you can print off<br />
as many copies as required. These<br />
companies also sell complete kits<br />
that can be printed out and laminated<br />
to card to make the kit. To protect<br />
the paper I sealed the printed sheets<br />
with flat acrylic spray varnish. To<br />
glue the sheets down I used Pritt<br />
Stick glue using a roller to press the<br />
paper down or double sided tape<br />
or transfer tape (this tape leaves a<br />
layer of glue but not the tape), I find<br />
liquid glue such as PVA tends to discolour<br />
the paper and I’ve read that<br />
spray on adhesive doesn’t last.<br />
The station was then built as per<br />
Walther’s instructions, without gluing<br />
the roofs on. I left the end canopies<br />
until after everything else was<br />
complete as I could then stand the<br />
building on end and not risk damaging<br />
them.