Interlift ILK - It works! - Palfinger
Interlift ILK - It works! - Palfinger
Interlift ILK - It works! - Palfinger

Create successful ePaper yourself
Turn your PDF publications into a flip-book with our unique Google optimized e-Paper software.
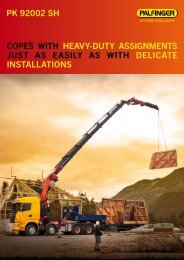
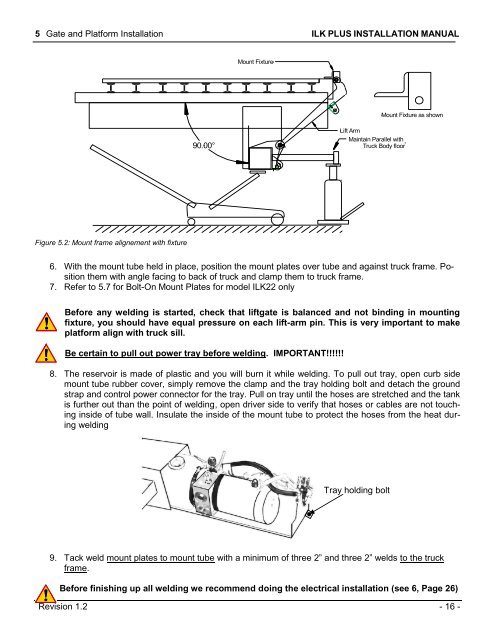
5 Gate and Platform Installation <strong>ILK</strong> PLUS INSTALLATION MANUAL<br />
Figure 5.2: Mount frame alignement with fixture<br />
90.00°<br />
Mount Fixture<br />
Lift Arm<br />
Maintain Parallel with<br />
Truck Body floor<br />
Mount Fixture as shown<br />
6. With the mount tube held in place, position the mount plates over tube and against truck frame. Position<br />
them with angle facing to back of truck and clamp them to truck frame.<br />
7. Refer to 5.7 for Bolt-On Mount Plates for model <strong>ILK</strong>22 only<br />
Before any welding is started, check that liftgate is balanced and not binding in mounting<br />
fixture, you should have equal pressure on each lift-arm pin. This is very important to make<br />
platform align with truck sill.<br />
Be certain to pull out power tray before welding. IMPORTANT!!!!!!<br />
8. The reservoir is made of plastic and you will burn it while welding. To pull out tray, open curb side<br />
mount tube rubber cover, simply remove the clamp and the tray holding bolt and detach the ground<br />
strap and control power connector for the tray. Pull on tray until the hoses are stretched and the tank<br />
is further out than the point of welding, open driver side to verify that hoses or cables are not touching<br />
inside of tube wall. Insulate the inside of the mount tube to protect the hoses from the heat during<br />
welding<br />
Tray holding bolt<br />
9. Tack weld mount plates to mount tube with a minimum of three 2” and three 2” welds to the truck<br />
frame.<br />
Before finishing up all welding we recommend doing the electrical installation (see 6, Page 26)<br />
Revision 1.2 - 16 -