Interlift ILK - It works! - Palfinger
Interlift ILK - It works! - Palfinger
Interlift ILK - It works! - Palfinger

Create successful ePaper yourself
Turn your PDF publications into a flip-book with our unique Google optimized e-Paper software.
6 Electrical Installation <strong>ILK</strong> PLUS INSTALLATION MANUAL<br />
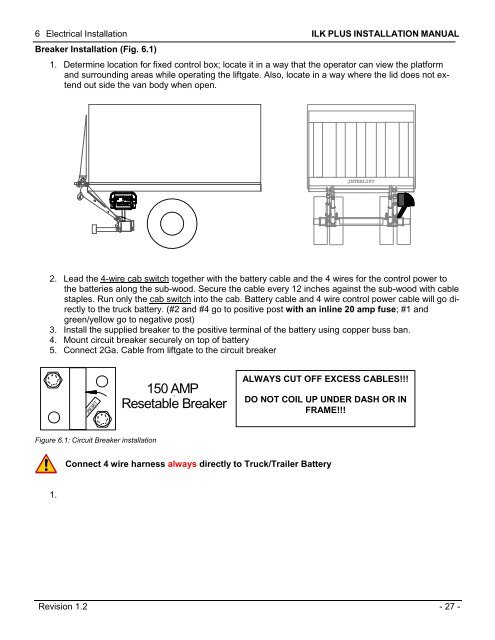
Breaker Installation (Fig. 6.1)<br />
1. Determine location for fixed control box; locate it in a way that the operator can view the platform<br />
and surrounding areas while operating the liftgate. Also, locate in a way where the lid does not extend<br />
out side the van body when open.<br />
INTERLIFT<br />
2. Lead the 4-wire cab switch together with the battery cable and the 4 wires for the control power to<br />
the batteries along the sub-wood. Secure the cable every 12 inches against the sub-wood with cable<br />
staples. Run only the cab switch into the cab. Battery cable and 4 wire control power cable will go directly<br />
to the truck battery. (#2 and #4 go to positive post with an inline 20 amp fuse; #1 and<br />
green/yellow go to negative post)<br />
3. Install the supplied breaker to the positive terminal of the battery using copper buss ban.<br />
4. Mount circuit breaker securely on top of battery<br />
5. Connect 2Ga. Cable from liftgate to the circuit breaker<br />
Figure 6.1: Circuit Breaker installation<br />
1.<br />
RESET<br />
150 AMP<br />
Resetable Breaker<br />
ALWAYS CUT OFF EXCESS CABLES!!!<br />
DO NOT COIL UP UNDER DASH OR IN<br />
FRAME!!!<br />
Connect 4 wire harness always directly to Truck/Trailer Battery<br />
Revision 1.2 - 27 -